Decreasing or increasing the demands of an exercise doesn’t always be related to subtracting or adding load, but it’s a really simple adjustment to make, and also nice for quantifying progress.
Here’s a series of single leg pistol squat variations, covering beginner, intermediate all the way to advanced.
I hope you find these instructions to be simple, yet effective. Single leg squats are an incredible exercise to practice on a regular basis. Single leg squats can be trained 2-3 days per week, leading to impressive gains over time.
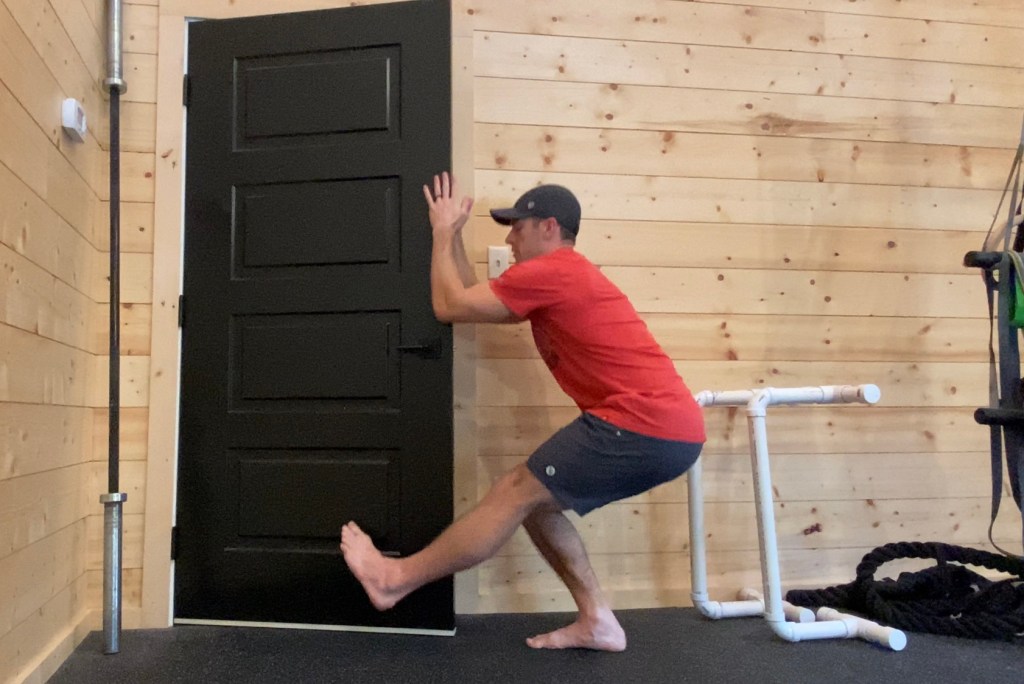
Beginner| Fully Assisted On the Way Down and Up
Grab the door itself, or ideally the door handle, using both hands. Use upper body to help guide you into the bottom of the squat and back up to the top. This beginner variation allows for decreasing weight moved, more stability and balance.
3-5 sets of 5-6 reps
Intermediate| Slow Lowering with Limited Assistance, Full Assistance on the Way Up
Use minimal upper body assistance on the eccentric (lowering phase), really slowing down the descent as much as possible. Once you’re at the bottom, the upper body can assist with standing back up.
Eccentric focused exercises can increase muscle soreness significantly in the days that follow, just a heads up.
3-5 sets of 5-6 reps
Intermediate| Lower down with NO Assistance, MINIMAL Help on the Way Up
Time to let go of the door and lower to the bottom of the squat without assistance. You feel shaky, wobbly and maybe even weak. This is normal. You’re building strength, control and coordination with this pattern!
Slow down the descent as much as you can.
3-5 sets of 5-6 reps
Once at the bottom, use minimal assistance to stand up. Challenge yourself here, you dictate the intensity of the exercise, make a choice to ramp up the intensity. Go for it.
Intermediate/Advanced| Pancake Hands on the Door for Balance Only
Slide the hands along each side of the door, stabilizing the motion. The hands are there to prevent you from falling to one side or the other, NOT to reduce the load.
If having two hands on the door feels unnatural, and it may, try using one hand, thumb on one side and the other fingers on the opposite side. Use a feather light touch on the way down and up.
3-5 sets of 5-6 reps
Advanced| Freestanding, Unsupported Single Leg Pistol Squat
Congratulations, you made it. A freestanding, unsupported, zero help single leg pistol squat.
People like to joke about pistol squats being a circus trick, but there a demonstration of single leg strength, stability, mobility and athleticism.
Once you own a single leg squat, you’d be surprised how often use it stand up from the floor. It’s quick and efficient.
Lastly, single leg training is back-friendly.
This is not a recommendation to ignore researching corrective strategies to address the back pain and train around it forever.
In a world where every other person has suffered some sort of back tweak or injury, single leg training is extremely forgiving and often a great option for people.
Some folks may need to limit the range of motion to acclimate to this freestanding single leg squat, and that is ok. Grab a chair and lower down until your butt contacts the seat. Touch and stand back up.
Increasing the load beyond bodyweight is the next logical progression.
I’ve added weight by using kettlebells, dumbbells, barbell, sandbag, weight vest, and so on.
Whatever you choose as weight really doesn’t matter. Weight is weight. Gravity doesn’t discriminate. What’s important is that it’s comfortable to hold onto.
Adding weight to exercises is trial and error at times. You want to add enough to challenge each rep in the set, but not too much that you’re unable to control the movement or find yourself compensating/cheating to complete the reps.
“Hmmm… Animal Flow looks a bit moving yoga. Then again, it also looks a bit like Capoeira. Well, maybe not. Maybe it looks like gymnastics. Yes, definitely gymnastics. Wait… there’s another yoga exercise, now it looks like yoga again.”
These are exact thoughts I had watching Mike Fitch demonstrating a movement flow several years ago.
Watching Mike flow seamlessly around the empty room captivated me. Even to the untrained eye, it’s unmistakable when you see someone who has complete dominance (aka control) over their body. When you see it, you know it.
I crashed head first into Ido Portal Method and Animal Flow at about the same time. Which makes sense now since they are both rooted deeply in bodyweight based movement.
At the time, Ido Portal was growing at breakneck speed, but he had not (and still hasn’t) packaged his movement system into a product. Animal Flow did have a product, which it has now updated into Animal Flow 2.0.
Crawling patterns and primal movement were gaining traction as validated tactics to reset one’s body, improve strength, stability, core integration, body controls, yadda yadda yadda. In reflection, it makes sense Animal Flow caught my eye because Traveling Forms (Ape, Beast, Crab) are crawling locomotion patterns. For branding purposes, Animal Flow refers to these three basic forms as “animal-like” exercises which they are, but they are also crawling patterns.
Piggybacking the opening paragraph of this blog post, the most important point I could make about integrating Animal Flow into your workouts is this: Shape, mold and make it function any way that suits you.
Animal Flow is a hybrid training system constructed from many other movement disciplines, therefore it can serve you any way you need it to.
Cardio conditioning? Move fast, aggressive, lots of transitions, soft but quick floor contacts.
Recovery? Full range of motion, move slow, controlled, breathe deep, hold positions, find the stretch.
Pre-Workout Warm Up? Move through a full range of motion, activate hard at end range looking for expanded range, build the tempo up from slow to fast.
Animal Flow as the workout? Leverage lots of different tempos, explore many positions, make shapes, breathe, bring the heart rate up, lower it back down, improvise, etc.
Ground-based movement can serve an infinite number of purposes. How do you want it to serve your needs? That’s what I’d like you to keep in mind as you read through the rest of this article.
The purpose of this article is two-fold:
1) Share Animal Flow movement tactics with people who aren’t currently familiar.
2) Expand the application of Animal Flow exercises.
In we go…
I won’t pretend like it was love at first sight.
It took me a while to jump into Animal Flow. I was already working yoga steadily on non-workout days. Days when my body needed a rest but craved a sweat, range of motion, slow tempo and breath work. You know, the calming effect yoga is famous for.
Once I finally committed to mixing in Traveling Forms more seriously, I could immediately feel the difference. I felt more connected from my top half through my core to my bottom half. Shoulders opened up and felt more stable. General body awareness in space and control improved also.
Stepping away from lifting is a major reason my body “opened up” and felt more fluid and connected. Pressing pause on lifting for several days if not several weeks (even months) is something that changed my entire perspective on daily physical activity. I recommend anyone who’s been a die-hard lifter to remove yourself from weight training for an extended period of time. Don’t stop exercising during this time, rather, seek out alternatives.
Animal Flow is a perfect place to start and explore.
Using Animal Flow exercises for Pre-Workout Warm-Up
Initially, I started by using Traveling Forms during my warm-up. Here is how I structured everything…
Pre-Workout Warm-Up (15-20 minutes) Foam Roll + Thoracic Mobility Peanut Drills Dynamic Stretching Activation (using mini bands, wall slides, etc) Animal Flow Traveling Forms (and maybe some jump rope) The Workout
After working through more traditional strength and conditioning stretches, activation and mobility, I’d start crawling for 3-8 minutes, sometimes followed by jumping rope, sometimes not.
In the beginning, 3 minutes of crawling patterns seemed daunting. After a month or so, I was crawling without rest for 8-10 minutes. Challenging? Hell yes, but the body acclimates quickly with consistent practice.
This pre-workout routine provided enough time to explore each of the three Traveling Forms in isolation. Isolating new exercises has always been my strategy. Isolating an exercise allows me to focus on the mechanics of the movement.
Favoritism and familiarity lead me to practice Beast and Crab first. Beast is a prone crawling pattern (chest to the floor) and Crab is a supine crawling pattern (chest to the ceiling). Beast and Crab are essentially opposites, and therefore complement each other very well. The difference in body position changes the stress on the core and arms, front, back, and side of the body. Each movement also challenges active mobility differently.
Currently, my home gym allows for 12 feet of crawling in any one direction. Working with my training space, I would crawl 12 feet forward, reverse it and crawl 12 feet back. The first couple of workouts I programmed low volume and a much slower tempo crawl.
Beast – Crawl down and back 5 times (120 ft of crawling) Crab – Crawl down and back 5 times (120 ft of crawling)
Start Workout.
From here, I ramped it up pretty quickly. I get antsy.
Combine Beast and Crab together, crawling down and back 6 times each without rest. This will take about 5-6 minutes to complete with a steady tempo.
Once I started to explore and understand Animal Flow Switches, I integrated them into my little Beast/Crab crawling medley…
Forward Beast + Under-Switch + Reverse Crab
Forward Crab + Under-Switch + Reverse Beast
Start Workout.
Rinse and repeat for time. This combination is simple and effective. Crawl down forward, switch, come back in reverse.
Next, I played around with longer duration for each Traveling Form, ramping it up to 1-minute per exercise before switching to the next…
I recommend working these patterns for as long as you like. Don’t overthink it. The risk of overdoing crawling is almost non-existent. Of course, if your plan is resistance training afterward, leave something in the tank for the training session.
Eventually, I introduced Lateral Traveling Ape to the pre-workout routine. Lateral Traveling Ape was my first real exposure to side-to-side locomotion. I struggled. What my mind’s eye thought I was doing was not what the playback on my iPhone camera showed. My technique was brutal. But the pattern was completely foreign.
I practiced Lateral Traveling Ape more incrementally than Beast or Crab, starting with two reps in one direction, two reps back to where I started. Rest and repeat. A smooth flowing Lateral Traveling Ape did not come easily for me.
Fast forward to current day, I’ll rip out pre-workout Traveling Forms almost in any structure I like. Lately, a medley I’ve been enjoying has been:
Cycle 8 minutes of: Lateral Traveling Ape 16 ft Switch Beast Crawl 16 ft Switch Crab Crawl 16 ft
Start Workout.
Cycle through each of the 3 Traveling Forms for 8 minutes without rest. You’ll never feel more ready for a workout as you will after this effective little medley.
The badass thing about Animal Flow exercises is that your body will learn the mechanics quickly with diligent practice. Lateral Traveling Ape went from being an exercise I avoided to one of my favorites.
Personally, I think there are a lot of people dabbling with crawling patterns, which is great, but not including enough volume to see desired results. I’m not implying you’ve got crawl for a .5 mile every workout, but if you really want to get benefit from crawling patterns, play around with increasing the volume (without bending on technique).
A Tool for Recovery…
I love many aspects of yoga and typically feel great afterward, but I don’t always enjoy how stationary yoga is. Yoga sessions can feel rather restricting. Stay on the mat, you must never part with your mat.
Animal Flow takes features of yoga and transforms it into a dynamic practice. Essentially, you can move around the room until you’re ready to hold a pose or position.
Transitioning into an animal-like crawl to relocate or continue switching body positions to find the next hold.
Combining movement with elements of yoga creates a comprehensive training session pack with benefits from each. Here is a simple recovery workout…
Lateral Traveling Ape x10 yards Beast Crawl x10 yards Downward Dog x 5 long breaths Reverse Beast x10 yards Downward Dog x 5 long breaths Crab Crawl x 10 yards Table-Top x 5 long breaths Reverse Crab Crawl x10 yards Crab with Reach x3 each side *** Repeat the cycle for time or rounds***
This simple recovery workout seamlessly fuses yoga with Animal Flow. I’ve worked sequences like this for 20-30 minutes and felt absolutely fantastic afterward.
Or, give this more comprehensive recovery session a try, which includes drills from Kinstretch and Animal Flow.
Start with some basic Kinstretch drills to nourish the joints, finishing with some dynamic Animal Flow exercises to further open up and re-educate the body to cross-crawling patterns, reaching and positional switches.
Kinstretch: Hip CAR’s x5 each leg Spinal CAR’s x3 Shoulder CAR’s x5 each arm
… Followed by…
Animal Flow: Beast Crawl x 10 yards Reverse Beast Crawl x 10 yards Crab Crawl x 10 yards Reverse Crab Crawl x 10 yards Lateral Traveling Ape x 10 yards Crab with Reach x 5 each side Slow Under-Switch x 5 each side Scorpion Switch x 3 each Slow Side Kick-Throughs x 3 each side *** Repeat for 3-4 rounds ***
*** Sidenote: If you aren’t familiar with Kinstretch, check it out. It will change your life.
This will take 30 minutes of your time (or less). Move slowly through each of these exercises in descending order (top to bottom). Breathe deep with control, owning each movement.
This workout has a boatload of natural joint mobility and muscle activation work in it. Crab with Reach alone is a million dollar movement. If you’re activating extending the hips and reaching hard in the high position of each Scorpion Switch, there is likely to be some soreness the next day.
A gentle recovery workout like this helps to open up the joints, turn on important muscles, challenge multi-planar core stability and while getting a sweat without the beaten down feeling.
It might seem off-topic to list sweating as a benefit of a recovery workout, but considering the skin is the largest organ of the human body and sweating helps eliminate toxins from the body, support proper immune function and fight out toxin-related diseases.
Animal Flow and Kettlebells for Cardio
Virtually any exercise or series of exercises can be adjusted to create a cardio training effect.
Limiting rest, increasing the tempo and exercise complexity are all fantastic ways to further tax the cardiovascular system.
The recipe is simple: global bodyweight movements recruit more muscles plus higher intensity tempo with little or no rest in between elevates heart rate and respiration. Across time and with enough intensity, the body will head straight into oxygen debt. Huffing and puffing begin.
Ground-based movements are a total body experience. Combining various Traveling Forms (ape, beast, crab, lizard crawl variations, etc) and Switches creates a potent multi-planar training effect.
Kick-Throughs… Kick-Throughs are an excellent ground-based cardio exercise. Kick-Throughs, similar to any other Animal Flow exercise, can be scaled to suit any skill or fitness level. The explosive nature of faster tempo Kick-Through’s makes them ideal for cardio.
There are two primary variations: Forward and Side Kick-Throughs.
Many people will find Side Kick-Throughs to be a great entry into higher tempo ground-based movement.
Side Kick-Throughs how-to: • Start in the quadruped position (static Beast), hands and feet on the floor, knees hovering an inch above the floor. • Lift and slide one leg underneath your body as you pivot on the supporting foot. • Reach with the sliding leg and open up the chest. • Return to the quadruped position and perform the same action on the opposite side.
Gradually increase the speed of the kick-through to the point where technique remains intact but on the verge of “out of control”. 15-20 repetitions per side of Side Kick-Throughs will get the heart rate going. Another measurement of work is time. Anywhere from 30-45 seconds of exertion is a great place to start.
Kick-Throughs pair very well with kettlebells, as you’ll see below.
Select two kettlebell exercises and one variation of kick-throughs. Here are two great examples.
Workout A Kettlebell Swings x8-10 Side Kick-Throughs x8 each side Kettlebell Overhead Press x8 each arm *Repeat for 6-8 rounds, rest for 45-70 seconds between each round.
Or…
Workout B Kettlebell Gorilla Row x8 each arm Forward Kick-Throughs x5 each side Kettlebell Deadlift x10 *Repeat for 6-8 rounds, rest for 45-70 seconds between each round.
Or…
Mix and Match: Alternate Workout A and Workout B Round 1: Workout A Rest 60 seconds Round 2: Workout B Rest 60 seconds Round 3: Workout A Rest 60 seconds Round 4: Workout B *** Repeat for 8 rounds ***
Each round you’re performing 3 completely different exercises, using the same tool (kettlebells). If you’re tight on space, limited on equipment or looking to keep training simple and effective, this is a fantastic option.
Improvised Workouts Ground Based Conditioning Plus Animal Flow…
This is my favorite part of this article.
Animal Flow is a flexible movement discipline that can serve as little or big of a role in your training as you need to. In this section, I’ll talk about using Animal Flow as the workout, not just part of the workout.
Practicing many of the Animal Flow elements in isolation leads to stringing together longer pre-planned sequences, which eventually leads to the total improvisation of a workout or freestyle. This is the “flow” part of Animal Flow.
Flowing between various exercises for several minutes changed the game for me. It’s liberating to move around an open space without having a plan, just an understanding of knowing you can move in and out of many different positions, making shapes, increasing tempo, slowing tempo, etc. You’re in control of the session, your mind-body connection is communicating the way it was designed.
Very poetic.
Improvised flow is the highest form of training. It’s essentially movement play and exploration. I touched on this in my popular Ido Portal Method post.
I have no recommendations for improvised workouts, as they are improvised. You make it up as you go. Take what you know about Animal Flow: locomotion patterns, switches, transitions, etc… and build a sequence.
There is no wrong way to flow, just start moving.
Workouts like this can last as long as you’d like. I’ve improvised for 20-30 minutes, increasing the speed of movement sporadically throughout the session but constantly moving and changing positions.
Closing Personal Commentary…
Equipment free, ground-based conditioning has expanded my conditioning in incredible ways. I am a huge advocate of rowing ergs, airbikes, skiergs and the like, but conditioning on an open floor is entirely different than machine-based conditioning.
I’m not anti-machine.
I still use my Assault Bike and Concept2 Rowing Erg 2-3 times per week. Not for extended periods, but long enough to matter.
Taking a break from machine-based cardio will make you realize how mindless it is. I’m not saying it’s easy. It’s difficult but mindless. The gears and levers of a cardio machine move through a fixed pattern/range of motion. How hard you push yourself on the machine is entirely up to you. It’s a mind game. It’s willpower.
The amount of energy required to crawl, bend, twist, lunge, reach, roll, sprawl, rotate, squat, press around an open floor intensely for an extended period of time is mind-blowing. Especially if you are new to it.
Just when you think bodyweight training is worthless, let me quickly restore your faith.
I know what you’re missing. It’s the same thing most people are missing when they are looking to leverage bodyweight exercise to boost strength, boost power or burn fat.
It’s called progression.
Progression can mean a few different things:
1) Load progression (increase in weight)
2) Skill progression (increase in motor skill demand)
I chose to limit the progressions to loading and skill. Could you say volume is a progression? Of course, but I am convinced that MORE VOLUME IS NOT WHAT MOST PEOPLE ARE LACKING WITH BODYWEIGHT TRAINING PLATEAUS.
Just the thought of marathon sets of exercises that you are already good at makes me cringe. I’m guilty of avoiding essential increases in loading or skill in favor of more volume also. It’s soothing to your ego knowing that you can dominate a bulk set of push ups or squats. I’ve been there, I know first hand. Comfort feels good.
But comfort doesn’t get your stronger, leaner or more athletic. Especially if you’ve got lofty strength or aesthetic goals and you’re attempting to leverage bodyweight training to get there.
So, progression is probably what you are lacking, but the great news is that once you have identified that proper progression is the missing link, the solution becomes rather simple.
Take the push up for example. If you can rip out 20-30 bodyweight push ups no problem, you need to take the next step to either a) rear foot elevated push ups, b) externally loaded push ups c) 1-arm push ups.
In some instances, I am going to suggest going straight to 1-arm push ups to restore that faith.
Why? Because the first time you set up and lower yourself into the bottom of a 1-arm push up, your eyeballs are going to feel like they are going to pop out of your skull, catching on your orbital bones. Seriously, you’ll feel like a weakling. The point of sending you to the 1-arm push up gallows is to expand your thought process to how effective bodyweight training can be if you’re willing explore new realms.
Generally, a lot of people who are great at strict 1-arm push ups also have incredible upper body strength and as a byproduct, a decent physique.
The junction where functional performance meets physique is an ideal point for most people. It really stinks to be all show and no go or all go and less than ideal show. But who am I to make that statement, because if you enjoy either one of those scenarios, it is your prerogative to embrace that happiness.
So as I mentioned, 1-arm push ups aren’t necessarily where I want you to start working your progressions, because the point of exercise progressions is to make one’s way from one challenging movement to the next, progressing as fast as your strength, stability and motor control can tolerate.
In school, most people don’t go straight into Calculus, right? They have to work through the progressions of basics of mathematics before they earn the right to tackle Calculus.
Bodyweight training, heck, all forms of physical effort work in the same way.
The above example involved upper body pressing, more specifically the push up.
However, progressing the lower body, particularly the squat can be just as simple.
As a beginner, you might start with improving your technique, strength and work capacity in the basic bodyweight squat. After improving the aforementioned qualities, you will need to move on to higher level variations of the squat. If you’re adamant about staying true to a minimalistic fitness approach like bodyweight exercise only, the next progression might be to elevate one leg onto a bench or other form of support, and perform what many call Bulgarian split squats, or rear foot elevated-single leg squats.
RFE split squats remove one foot from the base of support while simultaneously increasing the loading on the working leg. Instead of two legs contracting to move your body up and down, you’ve now got one leg doing the work, an obvious increase in loading.
The next progression from the RFE split squat are either assisted bodyweight pistol squats or full bodyweight pistol squats. I mentioned assisted bodyweight pistols because it might be helpful to hold on to something while you allow your body to “feel” the mechanics of an unsupported squat. There’s no shame in assisting yourself until you’re physically read to let go and go for the fully unsupported bodyweight pistol.
As it stands right now, bodyweight pistol squats are the greatest lower body strength exercise known to man. That’s a big and bold statement, but I cannot dream up another exercise that accomplishes as much as the free-standing pistol squat. A bodyweight pistol is just the beginning, because adding load and varying duration of time under tension dropping into and out of the “hole” can both work to advance your performance.
It can be quite interesting to observe the right side/left side differences in balance, strength, stability and skill acquisition.
For me personally, I have found that my right side, which is my non-dominant leg, is much stronger than my left side.
So the bottom line is this… bodyweight training is phenomenal. Just because you don’t have access to weights or you’re simply looking to switch up your training routine, doesn’t mean that you have to sacrifice results. The key is to understand your current performance, your goals and then choose the right progression to accelerate your arrival at the next level of performance and goal achievement.
Make sure that you are tracking your performance from workout to workout. It’s important for tracking progress and creating the next plan of attack.