Some of the toughest workouts I’ve ever tested are the simplest.
Fewer exercises, less complexity, just nose to the grindstone and sweat.
Yesterday’s workout involved only one exercise and a simple goal.
[If you’ve read other posts on this blog, I am rarely an advocate for extremely high volume/high intensity training. For the under-prepared person, it can increase the risk of unnecessary injury]
That being said 👆, I love to get after it and test my work capacity periodically.
Here’s the Workout
Exercise: Full Burpees
Repetitions:200
Time:20-minute time limit
What’s a Full Burpee?
Each repetition must be a FULL BURPEE.
👉 Modified Squat/Hinge
👉 Sprawl
👉 Push-Up (chest to floor)
👉 Jump Squat (aim for a consistent 8-12 inch of height per jump)
4 basic steps for a full burpee.
Like any exercise, burpees have many variations.
There are plenty of burpee variations for EVERYONE.
200 Repetitions
200 reps is A LOT of up and down.
Somewhere along the way form is going to break down.
Take breaks as needed, but watch the clock.
If you’re cranking out 10 burpees per minute, you will complete 200 burpees in 20 minutes.
But here’s the deal… 10 rep bursts in the early stages of the challenge will be doable.
10 rep burst in the later rounds will not.
Get the reps you can, managing fatigue and safety.
Time
20 minutes is the time limit.
Challenge yourself to finish as fast as possible, remaining mindfully of technique and movement quality.
Adjustments to the Workout
If 200 reps are out of the question, decrease the reps.
Here are other possible rep target options:
✅ 150 burpees in 15 minutes or less
✅ 100 burpees in 10 minutes or less
✅ 50 burpees in 5 minutes or less
Each alternative requires a 10 burpee per minute pace, just fewer reps overall.
Another way to organize a tough burpee workout is to select a pace and hold to it over a time-frame.
Here are a few options using this
👉 Perform 1 burpee every 6 seconds
👉 Perform a burst of 10 burpees inside of every minute
With these rep schemes, the question is, how long can you go?
Stay Safe
It’s important to stay engaged mentally despite the fatigue hitting you like a tidal wave.
In the moment, establish a balance between rejecting thoughts of quitting, yet remain aware of how your body is handling the stress.
If at any time you feel the fatigue overwhelming your ability to move safely, take rest. Simple as that.
High intensity/extended duration physical activity is well know to breed sloppy movement and cutting corners on technique, which increases the risk of injury.
The beginner mindset, frequently called the White Belt mindset, is extremely powerful.
So while the title of this blog post may be directed at “beginners”, the content is for everyone.
I intend to share a 20,000-foot view of movement training.
It’ll be packed with exercise and movement sequence videos, descriptions, pictures, links to valuable resources and ideas on why movement, a rarely talked about sub-category of fitness, might be exactly what you need.
And nothing expert-level here, just a few basics of movement training.
I believe in integrating many different methods.
Over the years, I’ve evolved from being a “traditional resistance training + high-intensity interval training” advocate, to:
a crawling, climbing, steady-state aerobic enduring, macebell wielding, kettlebell flow, rowing, running, skierg shredding, brachiating, flow sequence dabbling, active mobility training, gymnastics exploring movement enthusiast.
The day I stepped outside the box of traditional resistance training, a whole world of exciting physical challenges began to appear.
Locomotion and ground-based conditioning changed my entire outlook on what a workout can be.
All fitness gains accomplished from my home gym.
I started combining the better elements of yoga, gymnastics, locomotion/crawling, strongman, natural movement methods, and bodyweight strength training.
Today, my daily workouts look NOTHING like the days of old, yet I couldn’t be happier with the way I move and the transfer it’s made into my daily living. Training should enhance life in some capacity.
My body feels stronger, resilient, better conditioned, and more capable than it ever has.
Yesterday’s workout looked like this:
1a) Hybrid Turkish Get Ups
2a) Box Elevated Dragon Squats
3a) Parallette Bar L-Sits
4a) Lizard Crawl Flow
All of these “GAINZ” were earned after competitive college athletics, a time when a lot of people would say, “That was my peak athletically and physically”. Blah blah blah.
You’re done with competitive sports, not dead. Keep moving and moving often.
The human body will either adapt and allow you to expand, or it will adapt to stagnation/lack of effort and constrict.
Success leaves clues, and habits compounded are powerful.
James Clear’s book, “Atomic Habits” does an amazing job articulating the power of building good habits.
Either way, our bodies are products of what we repeatedly do, good or bad.
Weekly, I’ve experienced incremental improvements with strength, expanding movement capacity, joint range of motion control, and endurance.
And I love my workouts, they’re hybrid in how they mix a little bit of this and a little of that.
The movement rich training I’ve integrated into my workouts keeps sessions fresh without losing discipline, challenging and effective. Most of all, it’s engaging. Taxing for the body, but also for the mind. A deadly combination.
The lizard crawl (and variations) is now my favorite upper body exercise.
Interestingly, I’ve lost absolutely NOTHING when it comes to basic lifts (squats, pressing, deadlifts, pulling core strength, and stability).
Hmmmm…
Beginner Movement Patterns
The list below is not everything. But does highlight some of the more notable movement patterns a beginner should begin to familiarize with.
Crawling
Reaching
Twisting
Balancing
Rolling
Climbing
Jumping
Transitions between movement (common and uncommon)
Movement Sequences
Improvised Movement
Beginner Movement Training
This blog post is all about the beginner. The newbie to the movement training.
The rolling, crawling, transitioning, exercises, and flowing sequences rarely written about in fitness magazines.
Why don’t fitness magazines grab ahold of movement training methodology?
I have my own theories, but the infatuation with luring people in to read about the next great muscle building routine, fat loss and weight loss is addicting. Pure aesthetic trickery.
And there’s nothing wrong with using exercise for body transformation.
It’s the fact that these magazines repetitively create new angles on the same old, worn out, tired topics. Plus, judging by the exercise videos I’ve watched from some of the better known mainstream fitness magazines, the fitness editors might sport lean bodies, but they DO NOT MOVE WELL.
Standing bicep curl technique? Expert level.
Transitioning from a low crawl into a single leg squat variation back down into a 90/90 position? Nope.
Movement training encompasses a lot of the stuff that exists BEYOND lifting weights, sets/reps/rest, racing the clock, WODs, and treadmills.
Crawling. We crawl as babies, but revisiting basic crawling patterns in adulthood is packed with benefits.
Ground-based movement training is missing from the average person’s workout regimen, and it’s a key element.
Free of equipment and fancy gadgets.
Just your body moving around a space.
Squatting on uneven surfaces, with a staggered stance.
Pressing up from the floor, stepping through, dropping back down into a Cossack squat, sliding the legs across, and mirroring this combo on the other side. You could do this for 5 minutes straight.
Rotation. A lot of exercise and workouts lack rotational training. Some workouts overly stress the importance of anti-rotation exercises, paying little attention to the fact that we must be able to produce rotation also.
Injuries. People often injury themselves (to varying degrees) when the stress exceeds the body’s tolerance to handle the stress.
Progressively expanding movement by introducing manageable patterns, loading and positions can help mitigate injuries.
Pertaining to injury mitigation, active mobility training becomes essential. Increasing range of motion and CONTROLLING (building strength and stability) in these newfound ranges.
Supplementing resistance-based exercise and natural bodyweight movement with a progressive mobility-focused regimen is the gold standard in injury prevention.
With this recipe, you’re gaining strength, movement IQ, and establish a useable joint range of motion.
Movement Training For Life
On one hand, I believe in general physical conditioning versus attempting to mimic the exact movements of daily living.
On the other hand, conditioning the body for common everyday movements makes a ton of sense.
Exertion in daily life often doesn’t look like the average gym routine.
There are no symmetrically weighted barbells, chalked up kettlebells or dumbbells waiting to be lifted and move.
Real-world movement is less predictable.
We fall into and out of weird positions, often require on-the-go improvised corrections, rebalancing, and constant transitions in and out of body positions. On top of that, toss unique environments with uneven surfaces and odd-shaped objects.
This is not to say barbells, kettlebells and dumbbells are bad. There are FANTASTIC tools to leverage. But at some point, you’re no longer in the gym, you’re no longer pistoning a barbell up and down for robotic reps.
And how about that gym perfect, flat-backed, technically sound bodyweight squat?
Squatting in my life looks like something else entirely. A hybrid combination of movements and transitions.
Maybe you’ve got to navigate moving from the floor to standing without the use of your arms.
Every day, real-world movement is full of imperfections.
Interestingly, years of pounding on movement patterns didn’t make me a more efficient mover in the real world. I mean, to some extent it did, but I started to encounter a lot of different scenarios where I felt weak, uncoordinated, and immobile.
We cannot train for every quirky experience in life, but I strongly believe supplementing resistance and cardio training with movement rich tasks, challenges, and ground-based conditioning would help a lot of people increase their
I find myself squatting out of mechanical alignment, twisting, bending, reaching, rolling, lifting, and moving objects with a technique that most gym fanatics would consider unacceptable.
Picking up heavy, awkward shaped, slippery sh*t from the garage requires a creative approach, which is rarely addressed in a structured workout.
Fully flexing the lumbar spine while assuming a modified lunge stance, driving off the forefoot while my feet slide inside of my Crocs.
This is life.
Sometimes I’m moving by fusing 2-3 of those patterns at one time.
When it’s time to perform in life, it’s time to perform. Sometimes we get to step up to a heavy object, get situated and lift similar to our gym lifts. Most times, this is not the case.
Much of movement in daily life is reaction-based, rarely planned, and happens quickly. There’s no time to externally rotate the hands, pull the shoulder blades down and back, tuck the rib cage, etc.
Real-life movement is unpredictable, deviating from “flat neutral spines”, perfect posture, and ideal foot placement.
It’s life.
The human body is a movement machine.
Ground-based movement drills improve a person’s movement capacity and address a lot of these in-between life moments that a barbell squat or deadlift simply doesn’t.
Improving your ability to interact with the ground, using nothing but bodyweight will help you as a mover, and probably make your traditional lifts that much better.
And to be completely honest, engaging in movement-based training is as fun as it is challenging.
One great benefit of practicing movement based drills is how quickly a person builds confidence in unique and unfamiliar body positions.
We knowingly (and unknowingly) avoid activities we know our body isn’t suited for. After a few months of movement training, this starts to shift. You begin to look at daily tasks differently. Situations you used to avoid become worthy challenges you’ll meet head-on with a new-found confidence in your abilities.
Twisting and rotational movements are absent from most workouts.
Walk into a big box membership-based gym and you’ll witness 95% of the members slaving away on fixed range of motion cardio machines, ab machines, or and crowding the bench press area..
I’d shred my chest and core by ramping up the volume of lizard crawl versus laying lifeless on a bench while pressing the weight up and down… ANY DAY OF THE WEEK.
Rotation is a basic human movement action and training it consistently can provide some noticeable benefit with regard to performance and postural integrity. It’s quite common to have people comment on their spine feeling “locked up” or “stiff”.
Insufficient mobility at the mid-back region can cause excessive motion at the lower back, as the lower back tries to pick up the slack to make everyday movements possible.
Rotational drills are great for training mid-back mobility while opening up the hip flexors and activating the powerful glute muscles. The stretch from the hip to the shoulder is incredible.
Injecting multi-planar and multi-joint exercises into a workout regimen can (and will)_ bridge the gap that many traditional compound lifts simply do not address.
More examples…
Training movement patterns in isolation is best for learning mechanics and giving the body an opportunity to adapt.
The range of motion of each exercise can be modified to suit what you can comfortably handle at this moment and will improve with time and consistent practice.
The human body is a brilliant adaptation machine.
Most of my early ground-based movement flow practice involved spending focused time on 1 or maybe 2 movements in isolation. I like to work new exercises with a “do less but do it better” type approach.
As my movement efficiency improved, I began to string together 2, 3 even 4 exercises in a row, flowing and transitioning between each for reps or time.
Every exercise has progressions leading up to mastery. I cannot stress this enough. Movements can be progressed for YEARS.
Interested in getting a cardio conditioning effect from the workout? Great. Increase the tempo of each exercise or add time to the work set. Flowing around a room for 8-10 minutes will elevate your heart rate as much as traditional cardio. With the added benefit of training more movement patterns and improvisation to increase the brain’s processing speed.
Crawling is great for loading the upper extremities, core, and sequencing. Extremely slow tempo crawling remains one of the most eye-opening physical challenges for people.
10-15 minutes of ground-based movement training will leave you exhausted, particularly if you’re new to it and inefficient.
Are you going to be sore all over from this? Yes. Expect soreness in the days that follow.
Newbies to ground-based movement training should consider implementing such training after the warm-up, but before resistance training in the day’s workout.
Movement 20XX
Movement 20XX is a program I’ve become a huge fan of across the last year.
Eero Westerberg and I have a lot of similar ideas and approaches to building physical freedom, exploring different avenues of exercise and how to integrate those methods into a pre-existing regimen.
Movement 20XX is loaded with exercise progressions, bodyweight strength training, moving into ground-based movement, and sequences.
Sequences are a series of pre-planned movements fused together. Like a movement sentence.
Everything in Movement20XX can be adjusted for beginners/novice movers or progressed to challenge the elite mover.
Movement training will improve all other areas of fitness.
Watch for more posts sharing exercises, combinations, and flow!
Fusing body weight locomotion movements with traditional strength and conditioning exercises can create a hybrid workout experience. can breathe new life into a stale training regimen.
When training gets stale, mix it up to breathe new life into your regimen.
Basic linear lifting can get extremely monotonous. Instead of skipping the workout, toss in different exercises to give you new motivation.
What exercises are you avoiding or leaving out of your program? Everyone has some. It is impossible to do it all, all of the time. My YouTube channel has hundreds of exercise demos, only 4-10 exercises can make the cut for a workout on any given day. That leaves hundreds more sitting on the sidelines.
Many people forget about the value of carrying heavy objects. Carry those objects in as many different positions as possible (overhead, at your side, chest height, bear hug, etc). Do it all.
Locomotion drills are also a relatively new platform for building fitness most people haven’t explored. If you haven’t, you must.
This training session includes both.
Today’s workout includes the following exercises:
Lizard Crawling (“traveling forms” in Animal Flow)
Suitcase-style Kettlebell Carries
Overhead Kettlebell Carries
Kettlebell Walking Lunges
Reverse Crab Walks (“traveling forms” in Animal Flow)
*** For all of the kettlebell exercises, feel free to use dumbbells instead. Any object with a handle and some challenging weight will do.
What you’ll need:
1 heavy kettlebell
2 kettlebells of matching weight
15 yards of walking space
The Structure of the Workout
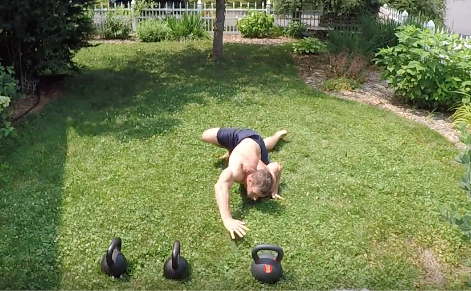
Start by lizard crawling 15 yards the location of the kettlebells.
Clean the heavy kettlebell up to chest height and position overhead. Walk down and back with the overhead carry.
Clean the same kettlebell overhead with the opposite arm. Walk down and back with the overhead carry.
Suitcase carry the same heavy kettlebell down and back with both arms.
Pick up the matching kettlebells and lunge walk the same 15-yard distance, down and back.
Reverse crab walk to the initial start position.
Repeat the process, beginning with lizard crawling once again.
Workout Video Demo
Workout Notes
This workout can be executed for rounds or time, whichever you prefer.
If you were going to work this for rounds, I suggest starting with 3-4 rounds and crushing those rounds. The idea is to work hard and work smart. Working smart is awareness of fatigue and body position. When your movement turns sloppy, you’re done.
Of course, more rounds can be added if you can handle it.
If you’re hammering this workout for 8-10 rounds, you need to increase the difficultyof all of the exercises. Lizard crawl for 20-25 yards, increase the weight of all of the kettlebell carries and the walking lunges. More is not always better.
If working for a target amount of time, I suggest capping this at 20 minutes. The video demo above shows roughly 8 minutes worth of execution.
Use the lizard crawl and overhead kettlebell carry as indicators of when you need intra-workout rest periods or when you need to pull the plug on the session altogether. Don’t be afraid to rest. There is zero shame in it. Your body can only fight fatigue for so long before the movements get sloppy. Take the rest, towel off, get back to work.
The overhead carry is an amazing shoulder stability/vertical core exercise, but it is also an exercise that deserves respect. DO NOT FORCE THE OVERHEAD CARRY FATIGUE IS EATING YOU UP AND TECHNIQUE IS DROWNING.
“Odd-object training has been practiced for centuries and the makings of the sport of Strongman can be traced back to ancient history, far before society began to experience the phenomena of physical fitness. For the general population of habitual exercisers, however, this very primal style of training has been forgotten for many years in mainstream fitness as new tools such as barbells, dumbbells and high-tech machines have dominated the common weight room. The practice of moving stones, carrying logs and lifting heavy load is about as practical and accessible as it gets and is not only excellent for training elite level athletes but for mom and pop types as well.”
I’ve been familiar with sandbag training for 15+ years and just last year I finally broke down and bought two from Brute Force, the company’s products I am going to review in this article.
I’m a skeptic with fitness equipment. The competition in the marketplace is great for consumers because it causes price wars, but it also introduces many poorly constructed low-quality products.
Sifting through what’s good and bad is time-consuming, and with companies on Amazon offering freebies in exchange for 5-star reviews, it’s getting harder to know what’s good and what’s not.
I’ll research products for months before I pull the trigger. Doesn’t matter what it is or how much it costs… the research must be done.
Why the long hold out?
I’ll admit I’m a big advocate of sandbag training now. Reflecting on my past position of the usefulness of sandbags, I’ve got that “whoops, should have jumped on that much sooner” kind of feeling.
I felt sandbag training was gimmicky after my initial introduction.
Why train with a sandbag when I could train the same exercises/movements using dumbells, a barbell or a kettlebell? Or how about just using body weight for $free.99?
Another major turn off was the obvious niche carving going on.
Were fitness professionals promoting sandbags because they added a results-oriented value to a workout session? Or because it was a novel new training tool and consumers EAT UP novel new training devices without a second thought.
Like any industry, fitness experiences periodic market-driven thrusts to create unnecessary niches and products to fit those niches. Some make it, some do not.
The marketing to use sandbags for fitness reminded me a lot of what Pavel Psatsouline did with the introduction of kettlebells to the Western World in the late 1990’s and early 2000’s. Kettlebells took off like a rocket ship. The timing was perfect and the odd-shaped kettlebell introduced a style of training previous unknown to many.
I’d watch YouTube videos and read articles from self-proclaimed sandbag experts like Josh Henkin and other guys/gals proclaiming that sandbag training was the “missing link” to building athleticism and functional fitness.
To buy a sandbag made me feel like I would be buying something that I could perform 99% of exercises with tools I already owned: kettlebells or barbells.
Of the fitness equipment I own…
I beat the hell out of all of it on a near daily basis. My wife can attest to this, since she has to cope with the clanking of iron, grunting, weight hitting the floor and shaking the house, the fans on the rower and airbike, and probably worst of all, the music pumping out of my Bose speaker.
Despite whatever vibe I project here on the blog, I don’t buy equipment just to buy equipment. I hate clutter. I don’t want my gym to look like I’m a hoarder of equipment.
The equipment I purchase must have a justified value.
I also don’t like parting ways with my money if I don’t 100% see the value in what I’m buying, no different than any of you.
Buy cheap, buy twice.It stings every single time it happens.
So, I’m sorry if I bored you to death, but that’s my personal story with sandbags. Now, I’d like to share with you the company I settled on buying from and why I did.
Brute Force Sandbags
Size Options
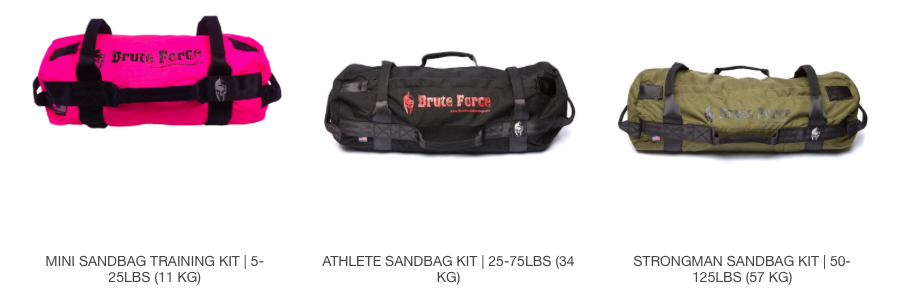
Brute Force offers 3 different size sandbags:
Mini Sandbag Training Kit – (5-25lb)
Athlete Sandbag Training Kit – (25-75lb)
Strongman Sandbag Training Kit – (50-125lb)
If you’re a beginner I suggest starting with the Mini or the Athlete option, strictly based on the weight of the bag. You can always size up as you get stronger.
For intermediate or advanced, I suggest buying both the Athlete and the Strongman in one shot.
Why? Because the Athlete won’t be heavy enough for some exercises, while the Strongman will be WAY too much weight for other exercises. They compliment each other very well.
Plus, the sandbags are interchangeable so you can transfer the filler bags from your Athlete bag to the Strongman, and vice versa.
Personally, I bought the Athlete and the Strongman, both in the color black. I would make the same purchase again without thinking twice. Both serve different purposes within my workouts.
Here are the most important features that separate Brute Force sandbags from others on the market.
Material Choice and Construction
Brute Force makes a durable sandbag using the following:
1000D Military-Spec Cordura
Military Grade Velcro
5 Panel Seatbelt Webbing
YKK Zippers
1000D Military-Spec Cordura
The outer shell and inner filler bags are constructed with the same military grade material being used by the armed forces. 1000D Military Spec Cordura. Cordura fabrics are known for their durability and resistance to abrasions, tears, and scuffs.
Cordura fabrics are known for their durability and resistance to abrasions, tears, and scuffs. They’ve been used in the military since WWII, introduced as a type of rayon at that time.
Personally, I can handle the scuffs. Scuffs are a part of the ownership of any item. But when the abrasions evolve into tears, that’s a problem.
Military Grade Velcro
Plain and simple, crappy velcro sucks.
You will need two hand technique and some serious pull-apart strength to peel back the velcro on the inner filler bags.
After my Athlete and Strongman bags arrived, this was one of the first things I noticed while filling the bags with sand. If the filler bags are crap, the entire bag is crap, even if the outer shell is durable.
Why? If the sand leaks out of the filler bags, it’s going to find a way to leach out of the outer shell at some point and you’ll slowly create a mess.
The inner filler bags of any quality sandbag SHOULD NEVER LEAK.
5 Panel Seat Belt Webbing
The seat belt wrapped around Brute Force Sandbags is the exact same that you trust your life with while driving your vehicle.
This seat belt webbing is aggressively stitched into the outer shell and leads up into the handles of the sandbag.
Much of the training you’ll do with a sandbag will utilize the handles.
The handles must be able to tolerate the weight of the bag when lifting, throwing, carrying or dragging.
Brute Force did a nice job adding a ton of reinforced stitching between the seat belt webbing and the handles. Doing so will prevent the gradual handle tear away so many other sandbag companies have struggled to fix.
YKK Zippers
I’ll be honest. I had no idea what “YKK” meant. When it came to zipper the logical feeling was that I didn’t want to deal breakage. No pulls that pop, herky-jerky sliding mechanisms, teeth that break or lockups.
But I did some research on YKK zipper anyway.
YKK zippers are produced in Japan and have been since 1934. The founder of the YKK zippers, Tadao Yoshida, built the company on the foundation of this quote: “no one prospers unless he renders benefit to others.” Boom. I’m on board with that.
Remember that awesome pair of expensive jeans you bought, but the zipper sucked? Yeah, me too. I’ve had a couple pairs of these. I didn’t think much about the quality of the zipper prior to buying my sandbag, but the reality is I was buying a $100+ dollar pair of jeans that I was going to be physically abusing.
Zippers matter. Especially if you plan on removing the filler bags frequently to change the weight for a given exercise, or traveling with the sandbag and refilling with your destination.
Handle Options
I wanted a wide variety of handle options and I got it. All of the Mini, Athlete, Strongman sandbags have 4 sets of flexible soft-grip handles, 8 handles total.
The 4 sets of handles offer the user the following grip options during exercise:
Neutral Grip (palms facing in)
Barbell Grip (overhand)
Suitcase Grip
End Cap Grip
You may think you’re only going to use 1 or 2 of these grips, but you’ll start exploring sooner than you’d think. I use them all for a variety of different exercises and various reasons.
Being able to switch grips on the same exercise can give a different training stimulus and keep training fresh.
I use the end cap handles the least, but I have used them when playing around with variations.
Filler Bags
I touched on the importance of having good quality velcro above, but what I didn’t mention is each Brute Force filler bag is designed with a double Velcro seal. The Athlete version comes equipped with two filler bags. One bag has a 50lb fill limit and the other has a 30lb fill limit, for 80lbs of total system weight.
The Athlete version comes equipped with two filler bags. One bag has a 50lb fill limit and the other has a 30lb fill limit, for 80lbs of total system weight.
80lbs in a sandbag feels like twice that weight. Don’t associate sandbag training with rigid equipment like barbells. 80lbs is going to wear you out quickly, which is the point.
I’ve not dabbled with going over the suggested weight limits for each bag, and I probably won’t. Sandbag training thrives off of the oddness of the structure, shape changing, and weight shifting as you move. Few repetitions are exactly the same.
Few (if any) repetitions are exactly the same.
Overstuffing the outer shell with filler bags will leave no room inside for the filler bags to move. We want the filler bags to move.
So, overstuffing a sandbag eliminates one of the main benefits of sandbag training, the reactiveness required to handle the sandbag during exercise.
Some things to keep in mind…
The sandbag might rip, tear and leak.
I just spent 10 minutes of your time and 1000+ words pumping up the Brute Force line and now I’m tossing this out there?
Damn right. Ripping, tearing and leaking is a reality, as it is with any fabric-based piece of gym equipment.
This is why you found this review, isn’t it? I’d bet that it is. Outside of design features and functionality of the sandbag, you’re probably curious if Brute Force Sandbag are going to hold up across a respectable amount of time.
Look, I was in your shoes asking the same questions prior to making my purchase so I get it.
The most honest answer to that question is this: it depends.
It depends on the exercises you’re doing (slams, dragging, the frequency (daily use versus just sometimes)
Friction wears things out. We change our car tires and our shoes because of friction, when we were kids we threw away pencils because the erasers wore down to the metal.
Friction is a major reason we have to replace the old with new.
If you plan on high repetition slamming or long distance dragging your sandbags across jagged gravel versus grass or a smooth wood or concrete basement floor…
… then yes, no matter what sandbag manufacturer you choose, the outer shell is going to rip and tear until the inner filler bags are exposed, then those are going to leak.
I wouldn’t quite refer to this scenario as negligence or product misuse, more a reality of using your equipment aggressively and decreasing the lifespan dramatically.
But this is common sense, isn’t it?
Here’s another fact. Just as no company should tout their sandbag products to be “indestructible”, no self-respecting company will hint their products could wear out.
I’ve owned both of my Brute Force bags for over a year, beat the hell of out them, and they still look new. I am extremely pleased.
You might not find value in every sandbag exercise.
Just because I demonstrate a sandbag exercise I found value in, doesn’t mean you will.
Personally, I find heavy hang cleans with a sandbag to be inferior to hang cleans with a barbell.
The pull is awkward, which morphs the technique into something I fear could result in injury. Probably not, but it’s a hunch I have, so I stay away from it. Plus, the exercise feels forced.
What do I do instead? I don’t use heavy sandbag cleans in my workouts. I’ll work sub-maximal hang cleans with my Athlete sandbag, mainly as a way to get the bag from a low position to chest height.
If I go heavy, I use a barbell instead. Simple as that.
Keep your mind open to all sandbag exercises. My suggestion is to start by working common linear exercises first (squats, lunges, overhead pressing) and progressing on to more involved exercises like rotational swings or combination moves.
Start with light weight, get the feel of the movements, then add weight as you progress. It’s no different than progressing with any other piece of gym equipment. Familiarize yourself, then progress to more challenging exercises.
Sandbags are EXTREMELY functional…
I’m not going to tell you sandbags will change your life, cause you to lose fat that you couldn’t with other tools or increase your conditioning more effectively.
Can’t do it.
What I will say, and I alluded to this briefly before, is training with a sandbag is a completely different training experience versus traditional weights. Sandbags lack structure, so picking them up and stabilizing them is a pure challenge.
Half of the workout is navigating the bag up to the position you’re going to use for the exercise.
Grabbing a sandbag without using the handles will be a real eye-opener to your grip strength.
Exercises like squats, lunges, carryingand dragging are ABSOLUTELY ideal for sandbag training. There are so many alternative variations, holds, grips, and movements you simply cannot do with iron gym equipment.
Bear hugging a heavy sandbag for squats, lunges or carries is brutally taxing.
Here’s a squat variation using an underarm hold, which challenges your bicep endurance while you squat…
What I’ve found is that mixing sandbag work has improved my rigid equipment performance (barbells, kettlebell, dumbells). Picking up a nicely balanced barbell seems convenient now, versus trying to figure out how to lift a 120lb structureless bag from the floor up to my shoulders.
In daily life, we are often faced with the challenge of moving odd-shaped objects. There is no way around it. Every time I load my lawn mower or our bikes into my truck bed I’m reminded of this. Where are the handles? None in sight, but the work must be done regardless.
What makes a form of exercise functional is the transfer it has to help a person become better equipped to thrive with common physical tasks, whether they are sport related or real-world task.
Few pieces of gym equipment better transfer more appropriately as sandbags.
MetCon Workouts like this are short, simple but brutally effective. I used to use barbells for combinations like this, but the sandbag has a much better feel.
I won’t be shy about my appreciation of the sandbag and the unique dynamic it’s added to my own workouts. It’s awesome additional to the home
Sandbags make a nice functional addition to the home gym set up or a personal training business for that matter.
Yesterday, I designed a tough little workout using a variety of different exercises and a sandbag.
Included was a mash-up of traditional body weight training, sandbag loaded drills (cleans, squats and lunges), dynamic core stability planks, and a modified lizard crawl.
Almost going unnoticed was a significant amount pull-ups and push-ups. Especially considering 3 pull-ups initiated the start of a new cycle and 4 push-ups were
Here is a two round demonstration of the workout structure.
Watch the video again, especially if the written description below gets a little too wordy. Make no mistake, you’ll have to pay attention to what comes next during this workout. I did this by design.
Less mindless long rep sets in favor of changing patterns quick and often.
The Details of the Workout…
From top-to-bottom, cycle the following in order for 17 Minutes:
Left) 1 Push-Up + Sandbag Crossbody Pull-Through (Left to Right)
1 Push-Up + Sandbag Crossbody Pull-Through (Right to Left)
Modified Lizard Crawl (Left arm)
Right)1 Push-Up + Sandbag Crossbody Pull-Through (Left to Right)
1 Push-Up + Sandbag Crossbody Pull-Through (Right to Left)
Modified Lizard Crawl (Right arm lead)
Back to pull-ups…
Time requirements: 17 minutes
Rest periods:None
Equipment Needed: Timer, Pull-Up bar, and a sandbag
Space: 6ft x 6ft with vertical clearance for pull-ups
This is a total body, work capacity based workout.
What makes it so?
Here’s why…
Exercise Patterns/Variations
Vertical Pulling – Pull-Ups
Ballistic – Sandbag Clean
Squat – Sandbag Squat
Lunge – Sandbag Lunge
Horizontal Pressing – Push-Up
Core Stability – Sandbag Crossbody Pull-Through
Locomotion – Modified Lizard Crawl
Total body training effect.
The modified Lizard Crawl at the end of the medley is going to feel torturous as the fatigue creeps in. Manage your efforts and execute.
If this version of the lizard crawl is too advanced for a workout like this, head to the M(EAUX)TION YouTube page to get ideas on how to scale it back. I’ve uploaded many variations to choose from.
Work Capacity-Based
Setting a 17 minute working time in combination with no rest periods makes this a work capacity developer. If you were to attempt this workout several times, the goal would be to do more work in the same amount of time as you do the previous attempt.
If you succeeded, this is an increase in work capacity.
Lately, I’ve become a HUGE fan of training sessions where the goal is to JUST KEEP MOVING. There is no pressure to chase the clock or scrutinize over accumulating the most reps. Settle into a pace that challenges you and be stubborn not to quit.
Focus on maintaining movement integrity while under fatigue and controlling your breathing.
Moving well when tired… not every physical task in life is going to present itself when you’re 100% fresh, ready to go. At some point, you’re likely going to encounter work that needs doing when you’re exhausted.
No doubt this will resonate with manual laborers and first responders whose livelihood depends on their ability to work through fatigue, yet remain injury-free in doing so.
Do not allow your breath to control you, instead, you control your breath. Become aware. Inhale and exhale deeply. Find a breathing rhythm for the entirety of the work bout.
Some thoughts about developing fatigue resistance…
Fatigue will tear apart exercise technique and perception of body position. In other words, you might perceive your plank to look badass perfect while you’re huffing and puffing, but really you’re sagging like a piece of taffy in the Summer heat.
In other words, you might think your plank looks magazine cover perfect while you’re huffing and puffing, but really you’re sagging like a piece of taffy in the Summer heat.
An exercise that looked great while fresh often changes while in a fatigued state.
Practicing one’s ability to move well while in a fatigued state is important.
Workouts like this, scaled to your tolerance and movement ability can help keep you moving safely no matter how exhausted you are.
As refreshing as the current “natural movement”, “body weight domination” and gymnastics evolution is, don’t give up on the machines.
Don’t give up on the machines!
Cardio machines are valuable tools to help build fitness.
Adding to that, some cardio machines are clearly better than others. I lump rowing machines into the “must have” category of cardio machines.
Several years ago, my increasing interest rowing drove me to purchase a Concept2 Model D Rower off of Amazon. I fell in love with it almost immediately. Living in Wisconsin, brutal Winters keep us inside for many months of the year. Going outside to exercise is the last thing a person wants to do.
Rowing was a completely foreign activity during the first few sessions.
I sucked. I was inefficient and sloppy with my technique which left me exhausted in short time. The funny part about this is I’ll never burn as many calories rowing as I did in those first few sessions.
Inefficient exercise sucks up a lot of energy.
I quickly found the rowing machine to be a perfect compliment to my airbike conditioning. I began a regular rotation between the two cardio machines, organizing row training on less grip/back/pulling intensive resistance training days to avoid overuse injuries and maximize performance.
Still today, I am a self-taught rower and proud of it. A couple of YouTube videos from elite rowers and coaches, several articles and my technique improved tremendously. If you’re a “see then do” type learner, you can easily do the same.
Accumulating longer distances (more meters)
Over the course of the last year or so, I’ve begun playing around with the training effect of increasing meters rowed per week. 2-3 days per week, my goal was to row accumulate 4000m.
2 days per week would give me 8000m and 3 days would give me 12,000 meters.
How I would go about achieving these 4000m had no rules, as long as 4000m was achieved. Longer distance rowing has always been my Achilles heel, and quite honestly, I get bored on the rower easily. Call it lack of discipline or whatever, but I lose focus quickly.
One strategy which helped improve my attitude towards longer distance rowing was descending distance workouts.
Descending distance workouts is interval based, beginning by rowing the longest distance first when you are freshest. Every distance thereafter is shorter than the previous and is separated by a rest period to catch your breath, towel off and grab some water.
Descending the distances during the training sessions allowed me to accumulate more meters while giving a guy who avoided longer distances something to look forward to as the workout progressed.
As you’ll see, the final three distances of this workout are on the shorter side: 500m, 250m, and 125m.
If you’re looking for a tough conditioning workout that will help you accumulate more meters on the rower, give this exact workout a shot.
Accumulation Rowing Workout
2000m – 1000m – 500m – 250m – 125m
Complete 1 round of the following:
Row/Rest #1: 2000m/3 min
Row/Rest #2: 1000m/2:30 min
Row/Rest #3: 500m/2 min
Row/Rest #4: 250m/1 min
Row/Rest #5: 125m/done
Total: 3875 meters
Let’s be clear… piling up 3875 meters in a single workout is fantastic!
I’ve personally experienced profound changes in my cardio conditioning by rowing roughly 4000m per workout several days per week, hitting 3875m ballparking a similar distance.
A descending workout like this is EXTREMELY FLEXIBLE.
You can shift the pieces around any way you want.
Keeping the suggested rest periods, here are a couple of variations of this workout worth trying…
Eliminate the 2000m interval if you’ve never gone for that distance, or you prefer to change the focus to shorter sprint distances. Add in a couple more 1000m intervals.
This new workout structure would be: 1000m – 1000m – 1000m – 500m – 250m – 125m
What about eliminating the 1000m but adding in a couple more 500m intervals instead?
The workout would look like this: 2000m – 500m – 500m – 500m – 250m – 125m
All of these options still add up to the same accumulated meters, 3875m.
You’ll find the rest periods necessary if you’re giving a solid effort. Don’t mis-judge how you feel after the first long interval. The fatigue is going to snowball as the workout goes on.
Settle into a challenging pace, stroke and breathing rhythm that you can maintain for the duration. To help your breathing, be mindful of unnecessary jaw clenching, tense neck and what your tongue is doing inside your mouth. A lot of times, if the tongue is at ease, so is the jaw and neck. The result is an unrestricted pathway for exhalation and inhalation.
A lot of times, if the tongue is at ease, so is the jaw and neck. The result is an unrestricted pathway for exhalation and inhalation.
Jump rope training is packed with benefits. Jumping over that tiny little rope can improve muscle strength and skeletal integrity (through medium ground impact force).
The calories burned while jumping rope are high compared to other activities and including jump rope training in a workout regimen is a great way to get a potent cardio training effect with the body in a standing position, versus seated cardio machines.
Lastly, jump ropes are inexpensive, versatile and simple to integrate with other training methods to increase the challenge and scope of your workouts.
The article came off a bit, safe and cautionary. To be honest, I was a lot younger then and my writing style wasn’t as clear and to the point as it is now. Regardless, I feel some of the points made in that article are valid.
Jumping rope can be tough on the muscles and joints early on. I don’t recommend a sedentary individual reach for a jump rope to initiate their exercise regimen. If your body hasn’t been exposed to impact in a while (maybe never), jumping rope will annihilate your lower extremity muscles in the days afterward.
But cautionary tales won’t be part of this article, so let’s get into the good stuff…
… the benefits of jump rope training.
Inexpensive
If you’re looking for an inexpensive piece of fitness equipment, jump ropes are the ticket.
The last jump rope I purchased set me back $7 on Amazon over 3 years ago.
Inflation.
The same rope is still kicking ass and serves as a valuable part of my pre-workout warm-ups, occasionally making appearances inside of metabolic conditioning workouts.
36 months of use divided by $7 cost-to-own equals roughly $.19/month.
Previous to my $7 jump rope, I purchased a $30+ jump rope from LifeLine Fitness which turned out to be a piece of shit for the cost.
In the early 2000’s, LifeLine was considered to be the “functional fitness” company, so I was surprised at the quality and design of their jump ropes. Durability was terrible and there was no way to adjust the length of the rope.
So, when it was time to find another rope, I went with the thinnest cable based rope I could find and I have had no issues yet.
Side-thought: One downside to jump ropes is they are a one-trick pony. In other words, you can only really jump rope with a jump rope. But hey, for $7-$15, who cares, it serves it’s purpose without breaking the bank.
Cost comparison to other popular forms of equipment-based cardio:
Jump Rope: $7-$40
Concept2 Rower: $950
Assault Airbike: $799+
Versaclimber: $2000+
Treadmill: $900+
Jacobs Ladder: $2500+
Non-Treadmill Running: $50+ for shoes (dependent on weather)
* To be clear, I’m not advising you to stay away from any of these machines. For machine-based cardio, each ranks high on the effectiveness list. I personally own both a Concept2 rower and the Assault Airbike and wouldn’t have it any other way.
Environment/location/equipment friendly
I’m going to tackle this benefit in bullet point fashion.
Jump training doesn’t require a lot of room to train.
You can do it on the spot.
You can pack it up and travel with it, taking it anywhere.
You can train inside (not weather dependent)
If you’ve got a 6×6 space with a 7ft2inch high ceiling, you’re clear for jumping rope. I know this because 70% of my workouts take place in my home basement, where space is limited but adequate for twirling a rope.
Scalable for everyone
Any great piece of cardio training equipment is scalable to a wide range of skill and fitness levels. Most are, but some are not.
Beginners who are new to jump rope training can start with the basics: two-foot jumps, alternating jumps etc.
Turning up the intensity is simple: turn the rope over faster.
Don’t confuse “basics” with ineffective. Exercises are best scaled to match fitness level, the challenge is therefore proportionate no matter how fit you are.
Advanced jump rope training can include various single leg jumps, mixed medley jumping and double-unders (turning the rope under the feet twice per jump).
High knees (running in place) while jumping rope is extremely taxing when performed for intervals of 30-60 seconds per work set. A workout designed with 10-15 intervals will make you a believer in the cardio training effect of jumping rope.
Just like a beginner, if an advanced trainee wants to increase the difficulty of their training sessions all you need to do is
Duration of jumping rope can be adjusted for both beginners and advanced alike. Adding a minute to a jump rope workout every week or two can have you jumping for 15-20 minutes in no time.
However, once you hit 20 minutes of continuous jumping, I suggest adjusting the movement complexity of the jump or cranking up the tempo of the rope versus adding more time.
Jump Rope Posture
As stated earlier, I love cardio equipment like rowers and airbikes, but these machines put people in a seated position to operate.
If sitting is the new smoking, and a lot of people are sitting too much throughout most days as it is, I don’t want you to come home and sit down to exercise. This would be contributing to the epidemic.
Jumping rope puts a person in a standing position with shoulders pulled back and hips forward.
It is difficult to jump rope with poor posture. Doing so will likely limit the speed you’re able to turn the rope and also the jump technique. Plus, it will be uncomfortable to hunch over and jump.
Any physical activity getting a person uncoiled from the seated posture is a great option.
Great for Pre-Workout Warm-Ups
After some basic stretching and mobility work, grab a jump rope and work through roughly 5-10 minutes of medium-intensity rhythmic jumping. Work a medley of jumps: two-foot jumps, high knees, single leg, back and forth, side to side and lower body boxer twists.
I promise you will find little else as simple and effective to get your body and mind prepared for a workout.
Again, getting the blood flowing pre-workout in a standing position is ideal.
Impressive calorie burn
Jumping rope can burn up to 700 calories per hour.
But here’s the deal, I don’t think anyone should be jumping rope for 60 minutes, it’s too much volume. If you have the attention span and endurance to turn a rope for 60 unbroken minutes, you’re a badass.
In terms of training volume and ground contacts, 60 minutes of jump rope training is sort of like running a marathon every week. There are obvious dangers associated with both (overuse, overtraining, lack of variety, etc).
I don’t recommend choosing exercises based on calorie burn, it can develop favoritism toward certain activities while and excluding others. Balance is the key.
However, jump rope training does use up an impressive amount of energy which means a larger amount of calories being burned in the same amount of time when compared to other popular activities like running, cycling and swimming.
Weight Loss/Fat Loss
Jumping rope consistently can help you look better naked. See reasons above for why.
Jumping rope burns calories. Increasing calories out compared to calories taken in is a scientifically backed strategy for both weight loss and fat loss. Calories in versus calories out. Of course, the quality of calories taken in will influence the rate of weight loss and fat burning a great deal also.
Combine a decent nutritional regimen with some quality jump rope training and you’ll see a major shift in body composition. Intermittent Fasting is hot diet pattern right now.
Cardio Integration
This is the real reason why I love jumping rope. Supplementing jump rope training in with rowing, biking, running and bodyweight metabolic conditioning workouts keeps workouts challenging and fresh.
Fact #1: If you look forward to your workouts, you’ll keep training.
Fact #2: If you despise your workouts, you’ll fade to doing nothing quickly.
Jumping rope after pre-fatiguing your body with other exercises provides a great challenge. When muscles are tired, posture degrades, so turning the rope while huffing and puffing demands an increased level of focus.
Here’s quick and dirty bodyweight and jump rope workout for you to try:
10 Squats
10 Push Ups
1 Minute Jump Rope
10 Lunges
10 Body Rows or Pull Ups
1 Minute jump rope
8 Hollow Body Rocks
Complete 5 rounds as fast as possible. Record your time and re-test in a month or so.
If you completed 5 rounds, the numbers break down like this:
10 minutes of jumping rope
50 squats
50 push ups
50 lunges (per leg)
50 body rows/pull ups
40 hollow body rocks
If you’re in the market for developing work capacity and burning fat in the process, simple and effective workouts like this are essential.
Splitting up the jump rope into 1-minute bursts will make you feel like you’re hardly jumping. But as the numbers show, you actually accumulated 10 minutes worth. Not bad.
Over the course of the next few months, you’ll see an increased number of full workouts posted to this blog, and my YouTube page. If you’re interested in following along, I suggest you subscribe for updates.
I’ll be keeping things fresh for a long, long time.
If you got some value from this post, I’d like to expose you to several other popular posts my readers have enjoyed:
Movement 20XX is a brilliant bodyweight fitness program designed to build a body using ground-based movement and smart exercise progressions
Beginner, novice or elite… it doesn’t matter.
Eero Westerberg created exercise progressions for any level of fitness, from a beginner all the way up to an elite mover looking to develop movement mastery.
Movement 20XX is a bodyweight ground-based movement training system that integrates different training methodologies into one unique workout experience.
Looking closer, you’ll notice elements of yoga, ground-based locomotion, and various gymnastics drills fused into one flexible training system.
The most effective online fitness programs coach clients using clearly communicated coaching cues. Clear and concise communication is an art form.
Eero’s communication is what makes Movement20XX great, combined with regressions and progressions to those exercises.
Movement20XX introduces beginner movers to the fundamentals of movement training while providing exercise progressions to challenge people who are higher up on the ladder.
Natural (bodyweight-based) movement training is MISSING from most workout programs.
Improving your ability to control your body in any environment, with or without external load moving through space.
Climbing, crawling, balancing, jumping, rolling, reaching, twisting, lifting, etc.
… keeps people young.
Lifting weights is great. Mobility training is great. But at some point, MOVE.
Ground-based exercises like crawling are rarely included in traditional fitness programs.
Shame. It should be.
Ground-Based Crawling
3 basic locomotion patterns I’d like to share today: ape, forward/backward crawl and the crab walk.
Each pattern is bodyweight-based, requiring no equipment, just a small about of space either indoors or outdoors
Crawling Patterns:
Ape is likely going to be the most challenging pattern shared today. Ape requires the most upper body strength and coordination.
Forward/backward crawling is a basic crawling pattern, and probably the most recognizable.
Crab Walk is a supine (chest up) pattern that’ll challenge shoulder and hip mobility in a unique way.
Ape
Forward/Backward Crawl
Crab Walk
Adding Crawling and Locomotion to Workouts
I started slow with crawling. Not because I wanted to, because I had to.
Even the basic patterns crushed me for short distances.
#humblepie
Over the course of a few months, I increased the crawling frequency from 1-2 times per week (mainly during warm-ups) to daily practice for longer distances and durations.
I’ve posted several videos on the Meauxtion YouTube pagedemonstrating 5+minutes of traveling forms/crawling.
5+ minutes may seem like a long time to be crawling without rest… and you’re right… it is.
Ideas For Workouts…
I train in the morning 99% of the time.
If I wake up and feel residual fatigue or muscle soreness from the previous day’s resistance training or metabolic conditioning workouts, I reach for ground-based only sessions.
Isolating a workout to only ground-based movements like crawling (and other locomotion patterns) is great for the joints yet doesn’t involve huge muscle contractions, challenging, FUN… while delivering a significant training effect.
The tempo (speed… fast or slow) of the movements can easily be adjusted to change the stimulus.
Crawling can be formatted for cardio training. Increasing the speed of a basic crawl pattern (while reducing rest periods) challenges mind-body processing speed and coordination.
Or, add a weight vest to increase the loading. Progressive loading is essential to make gains while lifting weights, and crawling is no different.
Here I am wearing 80lbs of extra weight while practicing an advanced crawl variation, the lizard crawl:
In time, simple movement patterns like Ape, Forward/Backward Crawl and Crab Walk can be integrated into flow-like sequences.
See below:
Video
For beginners, crawling is learned best using a slow and controlled tempo.
Slow and controlled practice allows for a better motor pattern education. You’ll develop a better understanding of the mechanics and physical demands of each movement.
Why Crawl?
Ground-based crawling and other locomotion patterns are both fun and challenging.
You may find (as I did) that these patterns bring restore life into your workout regimen.
Isolated resistance training day in and day out can get extremely monotonous.
One secret to maintaining a healthy long-term relationship with your fitness is to keep training fresh.
Choose activities that require increased physical AND mental engagement.
Most of us don’t have the will power or capacity to sustain a workout regimen it despises. You’ll fizzle out over time.
Make sure to find a workout structure that’s results-oriented, challenging, yet ENJOYABLE.
I love a good physical challenge, and these bodyweight ground-based movement patterns provide it every single time.
Engaging in more locomotion-based exercises reminded me it’s possible to finish a workout exhausted but REFRESHED, not beaten into a pulp.
A 20-25 yard lizard crawl is both exhausting and humbling. For me personally, diving deeper into crawl work was a splash of cold water to the face.
Bodyweight training is an anytime, anywhere with zero equipment and limited space method of building fitness.
Small, odd shaped, cluttered spaces become ideal areas to workout when bodyweight training is the focus.
The purpose of this post is to expose my readers to Intermittent Fasting (IF), sharing it’s effectiveness for improving general health biomarkers along with IF’s effectiveness for burning fa you to start Most diets work very well, this is hard to argue. It’s commonly a matter of how the diet fits with a person’s lifestyle, which can impact how well they are able to stay on track.
Not every diet is for every person. What works for you, might not be great for me, which might be so so for the next person. We are all unique in what our body responds best to, and how well we are able to manage our approach to eating across the long-term.
“Long-term” is the key part to remember. Choose a diet, or in the case of intermittent fasting, a “pattern” of eating that is a long-term solution. Sustainable to your wants and needs.
I encourage you to shop around and collect enough information to help you make a decision on what’s best for you.
This article hopes to shed some light on Intermittent Fasting, what I.F. is, the benefits and various approaches, etc.
The big question…
Does intermittent fasting work?
Hell Yes. Intermittent fasting works.
Intermittent Fasting works to the degree a person is able to execute the principles of this pattern of dieting.
Some people may find intermittent fasting to be a godsend, effective and simple. Others, conditioned to eating frequently, may find refraining from eating food for longer periods to be torturous.
Take a break and test the waters…
Regardless of the category you may fall into, I recommend everyone purposely go without eating food for extended periods (16-24hrs) for one big reason…
… to find out if you have the discipline to handle it. We live in an age where food is literally everywhere. We eat without purpose, even when we are not hungry we eat.
Eating too much, just like taking a break from eating, is a habit. And despite all of the data showing how long it takes to break an old habit or make a new one, habits require conditioning. No different than physical conditioning.
So, the question is… Can you take a break from eating for a little while?
Depending on the pattern of intermittent fasting chosen, a “little while” can mean 16 hours (8 sleeping hours, 8 hours awake). 16 hours without eating. It might sound like a lot, but it’s not.
Again, it’s all conditioning, shifting of habits.
Rather than sulk about how hungry you feel during the fasting window, take advantage of not being tethered to finding your next meal. You’re unchained, free to be productive and get things done! Build up your career, start that business, connect with old friends, spend time with family, workout, get chores and errands done.
When it comes time to eat, you’ll eat. Plain and simple.
Let’s hammer out the basics of intermittent fasting and see if the data satisfies your research side and structure fits your lifestyle…
What is Intermittent Fasting?
Intermittent fasting is a pattern of diet where a person takes a scheduled break from eating food and opts to not eat food (fast).
Depending on which intermittent fasting method is chosen, the timeframe of eating/fasting pattern or “cycle” can be split into a day (24 hours) or an entire week.
Brad Pilon, author of the “Eat Stop Eat” method of Intermittent Fasting says:
“If you consider Intermittent Fasting to be the ability to practice patience when it comes to the act of eating – a conscious polite restraint when it comes to food intake, then the philosophy is simply – we do not have to eat all the time, therefore we are free to choose when we eat.”
The focus with nutrition has long been how many calories and what kind of calories. These things are still important, but now add in the influence of time.
Time, changes the game.
Eat, then stop, then start eating again. Time is proving to be an important variable to improve the triad of nutrition:
Aesthetics (fat loss, lean muscle, etc)
Peformance
General Health and Longevity
Here’s an intermittent fasting infographic provided from Dr. Mercola (Mercola Nutrition):
How did I find Intermittent Fasting?
Several years ago, I stumbled onto intermittent fasting by accident. I was researching another topic. I was curious after reading Martin Berkan’s Lean Gains. 5-6 articles later, I was sucked in but still not a believer.
Martin’s fasting approach was a hybrid, like nothing I’d seen before. His own physique speaks to the potency of intermittent fasting, especially when paired with resistance training. And to be honest, I trusted the guy from the get-go because it was obviously he’s practicing what he preaches. Very noble in this day in age.
Here are some broad takeaways from LeanGains:
In a 24-hour day: 8-hours of eating, 16-hour of no eating.
Physical exertion encouraged (mostly heavy multi-joint resistance training)
Supplementation was recommended to help break the fast (BCAA’s, etc)
As great as LeanGains information was, it lacked direction, was heavy with science and lacked “the plan” so to speak. No offense to Martin, but his blog is essentially a collection of years of his own trial-and-error with intermittent fasting on himself, some of his clients and translations of research on the topic.
LeanGains provides great info, just lacks a clean action plan.
Investigating further, I read “Eat Stop Eat” by Brad Pilon. Brad is a former big food industry researcher. His background in the food industry was a little hard to believe, considering his book was advocating people to step away from food. Ha.
“Eat Stop Eat” turned out to be the book that made me cave.
Why did I resist Intermittent Fasting for several months?
If you thought this was going to turn into the feel-good success story, nope. I’m stubborn as hell when it comes to change, especially with things I feel like I’ve invested time into getting right. My previous personal nutritional habits was one thing I felt I was doing right.
You have to remember, for the previous 5-8 years, I had subscribed to the “eat 2-3 meals per day with snacks in between each meal”.
“Keep the metabolism firing”. Right?
I was hardcore into this approach, unwavering.
Reflecting back, this pattern of eating had many flaws:
I needed a luggage bag for all of my on-the-go meals and snacks (inconvenient).
Post-meal mental fogginess.
Overwhelming meal planning (eating six times per day requires a lot of planning).
I never minded bringing extra Tupperware containers work. The problem was the AMOUNT of Tupperware, and the food inside of the Tupperware occasionally needed cold storage to avoid spoiling, which wasn’t always available.
Regarding mental fogginess. I’d satisfy my hunger by eating followed by very predictable mental crash 15-20 minutes later. The most frustrating thing was the crash. I wanted… no, needed, clear mental performance.
Meal planning what you’re going to eat six times per day sucks. I became very efficient at the planning, but it didn’t ever not suck while I was doing it… know what I mean? I pushed through because I was committed to staying disciplined.
On top of that was the macronutrient mathematics. Subscribing to 1.5-2.0 grams of protein per pound of bodyweight, I was constantly stressing about getting enough protein at each sitting.
Regardless of approach, here are some frequently asked questions about Intermittent Fasting…
What food/drink is allowed during the fasting period?
Coffee, tea, water and other non-caloric beverages are generally approved to be consumed during the fasting period.
In most cases, I think sticking to just coffee, tea and water is best.
The minute a person sneaks a calorie in here and there, the floodgates can open. Just avoid calories during the fast altogether, it will help you stay focused.
How to make periods of fasting easier?
Discipline.
Seriously. Go deeper within yourself ask the simple question of, “How bad is it really?”
Another helpful tip when trying something new is having some anticipation on what to expect. If you’ve rarely fasted beyond hours spent sleeping, be prepared for hunger pains.
Again, expect to be hungry.
To sugar coat it less, Intermittent Fasting is a choice. If you can’t handle what comes with it, move on to something else. If it was easy, everyone would do it.
I can tell you this from experience: If you can grind your way through the first 10-14 days of trying intermittent fasting, you’ll be just fine.
For many people, coffee and water can help to supress appetite and keep hunger pains at bay.
Look past the superficial hunger pains, don’t let them control your mind. Instead, look forward to the increase in mental clarity many people find during periods of fasting. I sure did.
Since there are many different methods of intermittent fasting, consider less aggressive methods where the fast is not so long. Work up to it.
Nutrition can, and often does, drive a person insane. Way more than exercise in my opinion.
There are great winds of changes with regard to nutrition. The research is pumped out at an extremely high frequency, the prescription about what is “best” is conflicting and confusing.
Personally, I think the promotion of not eating (aka: fasting) has been slow to gain popularity because the food industry doesn’t want people to reduce eating. A reduction in eating means a reduction in revenue, plain and simple.
What business is ok taking a massive hit to their revenue? None I’m aware of.
So recommending people to eat less is not something big food business wants on billboards, TV commercials or internet advertisements.
Exercise, from my vantage point, is pretty clear cut. Incorporate resistance training, cardio, stretching and mobility, rest when needed and aim to use daily workouts to make progress over the long-term.
Want to get stronger? Lift weights (mostly free weights or progressive body weight) and try to increase the amount of weight lifted over time.
Want to improve cardio endurance? Do cardio. Include short burst high-intensity intervals (10sec-3min), mid-range intervals (5-15 minutes) and long slow aerobic cardio here and there.
Ok, off the topic of exercise, back to intermittent fasting.
The airbike is a near total-body, beast of a conditioning tool.
I’ve been an avid user and advocate of airbikes for over 10 years so for what’s it worth, I will speak on their effectiveness as a conditioning tool.
I love to hate on my Assault Bike, always have.
But don’t let the rumors about airbikes scare you off. Any workout on an airbike can be scaled to suit your current fitness level or goals for the workout. Not every training session needs to be “torturous” or end of days.
My experience with airbikes…
During the first 8 years, I owned the only airbike on the market, a large fan Schwinn Airdyne. It was a vintage model: gold metal frame, plenty loud and weighed as much as a refrigerator. For $150 on Craigslist, I couldn’t pass it up.
The problem with the Airdyne bike is they break down. Mine blew apart on me, literally. Others who have owned these older model Airdyne bikes have probably had similar experiences. The Airdyne was a great piece of equipment but had poor durability when used consistently with higher intensity workouts.
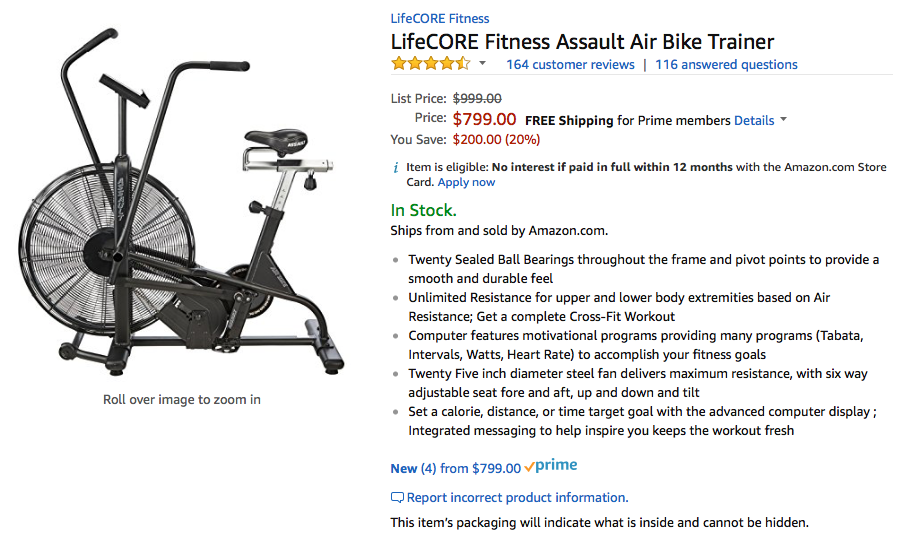
The damage proved too much to repair (finding replacement parts is a nightmare), so I chose to invest in the next generation airbike, the LifeCore Assault Airbike.
The main reason for the purchase was my belief in the versatility and overall training effect an airbike can inject into a workout program. Plus, once I purchased my Concept2 rower, the mechanics of each offset each other quite well.
For the past 2 years, 33% of my machine-based cardio workouts have been satisfied using the Assault bike (33% on the rower, 33% running).
I purchased my Assault Bike from Amazon.com with Free Prime Shipping, trust in Amazon as an online retailer and a killer price of $799 (usually $999). The same deal is still live on the site to this day.
Though I felt it was important to share how I came into ownership of my current Assault bike, it’s not the point of this article.
Enough with the back story, let’s talk about how you can bring airbikes into your training sessions using several different methods…
Hybrid Work-Capacity Training
As mentioned earlier, airbikes are more versatile than most people know. Sure, they provide a tremendous training effect on their own, but the challenge gets cranked up a notch when positioned inside of a bigger workout.
Here’s an example of a hybrid workout (airbike mixed with other exercises):
Complete 5 Rounds (as fast as possible)
20 Squats
10 Pull-Ups
20 Push-Ups
15 Lunges
15 Hollow Body Rocks
20 calorie Airbike
*** Caution: Your soul (and your oxygen) will be consumed by round 3 and fully digested by round 4 or 5.
Workouts like this a built on simplicity. No fancy exercises needed . The focus of this workout is to perform as much work in as little time as possible.
A 20 calorie ride may take roughly 25-40 seconds depending on how hard you’re pushing. Choosing calories as the target can provide increased motivation to pedal harder since the calories will accumulate quicker with higher output, or slower with lower output.
Adding an airbike sprint to the end of each round adds an injury-free exertional challenge.
Expect major fatigue here.
Airbikes kick ass alone…
Let’s not forget how great of a training stimulus airbikes provide by themselves.
I’m talking about doing nothing else along with it, just hopping on the bike and working hard for a set period of time, distance or calories.
Keeping a workout simple can mean keeping your objectives simple, and is often the best choice for the day.
Sore or lacking time?…
For the individual who finds themselves frequently pressed for time but wants to workout, airbikes can provide a potent workout solutions in less than 20 minutes, including a warm-up.
That’s hard to beat.
Here’s a classic distance based interval training workout…
.3 Mile Sprints
Complete 6-12 rounds of a target distance of .3 mile
Each sprint is 100% effort for best time.
Work:Rest Ratios (Example: 1:3 = 30 second sprint, 90 second rest)
Beginner – 1:4
Intermediate – 1:2 or 1:3
Advanced – 1:1 or 1:2
An distance-based workout like this will take anywhere from 15-30 minutes, depending on how many rounds
If you’re capable of a 1:1 work-to-rest ratio without any significant drop-off in watt output in the later rounds, you’re an animal and probably need to increase the distance per work bout.
Most people won’t touch a 1:1 work-to-rest scenario, and that’s perfectly ok.
Progressive fitness is smart fitness, right?
A Recovery Option…
For the person who’s suffering from delayed onset muscle soreness or simply looking for a low-impact workout, a long and slow ride on the airbike can serve as a great total body recovery tool.
To measure effort best, I suggest using a heart rate monitor with chest strap to track beats per minute. Try to keep heart rate below a target beats per minutes, say 130-150bpm. Typically I aim for 150bpm with my recovery rides.
If you don’t have a heart rate monitor, you can keep your RPM’s below a certain pace, anywhere from 55-70 RPM. This pace translates well with the 130-150bpm suggestion.
Both beats per minute and RPM’s will depend on your current fitness level of course. Some folks with ride at 60RPM and see a heart rate of 150bpm. Others could ride at the same pace and see a heart rate of 130bpm or less.
This is fitness, unique to each person.
Once you identify a manageable pace, aim to ride for an extended distance or time.
Personally, I prefer riding a distance of 10-15 miles or 30-40 minutes for recovery. Grab some water and a towel, set the bike up in front of the TV, put the headphones in and start riding.
Post-recovery ride, you should feel good, not drained, just good.
During interval training, pay attention to recovery…
My goals during an interval training workout are not solely centered around my output.
Ability to recover quickly, fully and repeatedly is an important adaptation of training.
It’s worth measuring from workout to workout, month to month. Recovery tells a story. For some it can indicate over-training. For others, it can indicate improvements in cardiovascular conditioning.
Example: If youroutput is 1000 watts during interval #1 but drops off to 800 watts during interval #2, this is an indication you were not recovered enough between work bouts to maintain initial intensity. You could expect interval #3 to be even worse.
This is an example of a mis-managed workout. The workout looked great on paper but didn’t translate well when it came time for application.
Interval training, much like resistance training, should be programmed progressively. If you’re a beginner, you’ll need more rest between work bouts. If you’re well conditioned, you may need to decrease your rest periods or increase the work interval while maintaining a steady watt output.
One major benefit of interval training with an airbike is the ability to start and stop quickly. When the interval begins, it’s easy to get the bike up to speed. The interval ends and it’s easy to back off and recover in a comfortable position and pace.
Part of the art of interval training is managing the work bouts and the rest periods according to your fitness level and goals for the workout.
We want to develop our ability to exert at higher and higher intensities (adding duration) during the interval, yet we also want to train our body to recover faster between efforts.
If you’re tanking from fatigue on the first couple of intervals, it’s defeating the purpose altogether.
Monitoring improvements in recovery time can provide valuable insight on the body’s adaptation to physical exertion.
With discipline, consistency and appropriate progression in interval length and rest periods, your body will improve its ability to exert but also recover from that exertion.
*** Beginners will take longer to recover after performing work than a more conditioned individual.
Connect your mind to your body for recovery…
One important, yet overlooked strategy to recovery is to become AWARE.
Get in touch with how your body is feeling during the workout. Check your breath. Are you breathing deep, with control and purpose?
Or are you neck breathing in full panic mode?
Control your breathing, calm your thoughts, do your best to relax during the rest periods.
Allowing your thoughts run wild is the wrong way to recover, but it’s what we often default to when physical stress becomes overwhelming. Developing capacity to control your mental self-talk in times of physical stress is a character builder.
The mental-self frequently acts as a governor to the physical-self. In other words, your mental will give out before your physical will.
Physical stress alters our state, perceptions and rational thinking.
Learning to anticipate, manage and expand our ability to handle physical stress is important.
It’s worth asking the question: “Is this really that bad?”
Time-based Interval Training
Time-based interval training is a classic strategy to training on any piece of cardio equipment. Comparing effort with time is highly applicable to sport, and provides great benefits to general population looking for tough workouts.
Here are several of my favorites, varying in length:
Short: 20 seconds work/ 40 seconds rest
1:2 Work-to-Rest Ratio
5 to 10 rounds
All out sprint for 20 sec work interval.
Don’t hold back on this sprint. 20 seconds is short enough to max out your watts.
Intermediate: 30 seconds work/60 seconds rest
1:2 Work-to-Rest Ratio
6-8 rounds.
All out sprint for the 30 sec work interval.
Long: 60 Second work/120 second rest
1:2 Work-to-Rest Ratio
5-8 Rounds
Find pace for the 60 seconds.
Any working interval extending beyond 30-40 seconds will have to be paced.
Maximum effort cannot be sustained across the timeframe. With newer generation airbikes, managing effort can be gauged several ways: watts and RPM’s. Use both to monitor output during the work interval.
It will take some painful trial and error (and honesty) to pinpoint the highest output you’re capable of sustaining across during of 60 seconds.
Choose an output based on the last 10-15 seconds of the work interval when fatigue is highest, not the first 30 seconds of the work interval.
It’s easy to come out of the gates hard during interval training, only to see output drop off drastically.
The goal of this workout is to sustain end range output across the entire 60 seconds. It’s important to note that end rage output for 60 seconds will not be the same as it is for 20-30 seconds.
Closing it out…
If you’ve read other posts on Meauxtion, my promotion of airbike training might seem to conflict with the current “movement culture” approach. Maybe it does, maybe it doesn’t.
The cool part about fitness is there are MANY ways to “do” fitness, and I see value in participating in ALL of them.
Too much of any one “thing” can end up being a bad thing because you’re excluding other “things” that can provide valueand balance.
Make sense?
Cardio machines such as airbikes, rowers, SkiErgs, and Versaclimbers serve a valuable purpose inside of a long-term term training regimen.
Keep your mind open, train hard, and let me know how you did with these workouts.