Pistol Squat Progressions For Beginners

Motion

Screen Shot 2017-06-14 at 6.14.58 AM

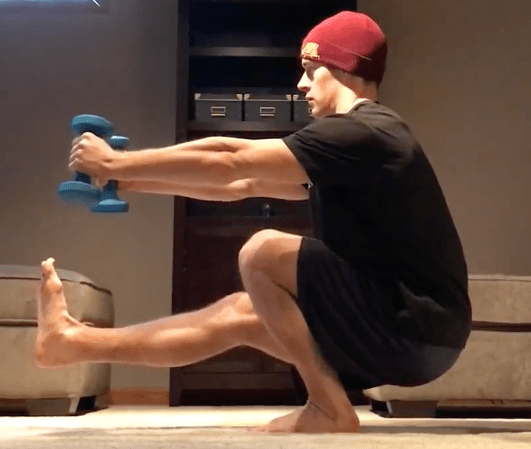
Pew, pew, pew… pistol squats.

There are few exercises that accomplish more for functional lower body performance than single leg squats, aka “pistol squats’.  They’ve been referred to as the “king of lower body strength training”, and I cannot disagree.  

Here are some key benefits of pistol squat training:

  • Improve single leg performance (strength, balance, stability, etc)
  • Challenge movement complexity beyond regular squats
  • Training body control and coordination
  • Low reps, high reward
  • Mind/body focus
  • Assessment for movement deficits (strength, balance, flexibility, etc)
  • Portable strength (you can do them anywhere)

I’ll expand on each of these benefits in a separate article.  For now, the takeaway is pistol squats are a potent lower body performance enhancer, connect the mind and body to a greater degree, progress body control and coordination, and you can practice them anywhere.  

Symmetry

Building symmetrical strength, balance, and coordination between the right and left sides of the body provides immediate and noticeable benefits to performance in daily life and sport.  Bilateral squats are not bad, but they can mask deficits and encourage compensations.  Your body is extremely good at finding a way to complete exercises by any means necessary, even if the movement is full of compensations. 

For a lot of people, one of the great payoffs in practicing physical fitness is that one moment when you realize a physical task was executed that wasn’t previously possible.  Surprisingly yourself physically is rewarding.

“Oh, I can do that now”.

Unknowingly, many daily tasks are performed on one leg.  Improving one’s ability to perform on one leg makes doing anything on two legs that much more efficient.

Personally, increasing my focus on improving pistol squat performance has saved my lower-back, and served as a door opener to more advanced movement flows.  

More so, single leg training brought to light my own right/left performance deficits.  I won’t say I became a better person once I cleaned up my asymmetries, but my performance saw improvement and nagging irritations went away.  

If you find yourself unable to mirror a range of motion, or lift a similar amount of weight on one side of the body but not the other, it’s worth investigating why these differences exist.  

It could be because of favoritism.  Right/left side favoritism is common.  I have it, you have it, we all have it. Repetitively completing tasks using the same arm or leg can slowly create imbalances, which may or may not manifest into acute or chronic issues down the road.

Examples:  Stepping up or down a ladder with the same leg, using the same arm for heavy lifting or carrying, slinging the work bag over the same shoulder, driving with the same hand on the steering wheel tilted to the same side.

I’m not saying audit your entire life and become a hypochondriac with these things, just be aware favoritism exists.

Though it is important to practice traditional bilateral squats (2-legs), single leg training, even if only using one’s body weight, addresses gaps left unfilled by regular squats.  

Balancing on one leg requires hip stabilizers to wake up and participate.  This is a positive for those who sit for long periods throughout the day. 

Leverage Exercise Progression

For a beginner, a full round of pistol squats may seem unachievable, and only for the “fit”.  This is bullshit.  

The “fit” didn’t enter this world sporting six-packs while ripping out pistol squats, just as the wealthy (typically) haven’t always been wealthy.  The simple truth is your body isn’t acclimated to the mechanics of the pistol squats yet.  Leveraging proper exercise progression and dedicated practice, a full pistol squat is a lot closer than you’d think.

If you’re unable to execute a pistol squat, the simple truth is that your body isn’t acclimated to do so.  It’s a sign you may be lacking strength, flexibility or coordination, all of which can be improved quickly through proper exercise progression and practice.

You’re a lot closer to doing pistol squats than you think.

With proper progression and some tenacity for achievement, the human body adapts to be strength and new patterns quickly.  

The power of progression is why I continue to demonstrate progression roadmaps leading to these “big bang for your buck” exercises.

All 3 of the following exercise progressions can be used regardless if you’ve been squatting with two-legs or using supported single leg squat variations.  Though these exercises are a nice stepping stone, they are not necessary if the exercise is regressed back far enough to be manageable.

Variation #1:  Suspension Trainer Assisted Pistol Squats

Use the suspension trainer to guide your body into and out of the squat.  Grip the handles with intent and use the arms to lessen the intensity as needed.  Slowly ask your legs to do more work as you gain strength.  

3-5 sets of 5-8 reps per leg

Variation #2:  Pinch Grip Assisted Pistol Squats

This pistol squat progression is demonstrated using a squat rack, but a door frame will work just as well.  Grip the rack or doorframe with your fingertips, lower into the squat and back up, assisting as needed.  Slowly soften the grip as you become more efficient.  Move to a 2 or 3 finger pinch grip to increase the challenge.  

3-5 sets of 5-8 reps per leg

Variation #3: Dowel Assisted Pistol Squats

The dowel acts as unstable assistance in this progression.  This unstable assistance provides an introduction to a training effect similar to an unassisted pistol squat.  Maintaining balance throughout the range of motion will have the hip, knee, and core stabilizers working overtime.  

Expect to feel soreness in the days from maintaining balance throughout the work set. 

3 sets of 4-6 reps per leg

All three of these exercises should be used as progressions to a fully unsupported single leg pistol squat.   Keep in mind that each exercise demonstrates a full range of motion.  

Select a progression according to your current fitness level.  Aim to graduate to the next most difficult progression as you gain strength and efficiency. 

If this article was helpful, leave me a comment, or check out others like it.

Next steps?  Get after it.  

Cheers, 

Kyle 

SaveSave

Carpet Slide Push-Ups (with reach)

How-To, Motion

A pair of carpet slides is an essential tool for every home gym.

Carpet slides add a new training dimension to a boat load of exercises. Slides can be used with exercises like reverse lunges, lateral lunges, crawling drills, hamstring curls, core work, and in this particular case, push-ups.

Probably best of all, they’re incredibly economical at $2-$7 for a pack of 3-4 sliders.  How?  The carpet slides marketed for fitness purposes are dangerously close in design and functionality to the furniture sliders available at your local home improvement store.

In the past, carpet slides have received the most attention when incorporated with lower body training.  Think hamstring curls and reverse lunges.

But carpet slides are extremely useful for upper body training also.  Using slides to introduce new variations of push-ups can be refreshing, and brutally challenging.

Carpet slide push-up variations are amazingly challenging.  Not everyone is ready for the coveted single arm push-up, and for those of you that are, maybe you’re looking for a new variation.  Something you can integrate into a work capacity circuit or load up with a weight vest and grind it out.

This is it.

Progression-wise, the carpet slide push-up w/ reach exists somewhere between a traditional two-arm push-up and full-blown single arm push-ups.

Some (not all) of the load is from the moving hand does take on some loading during the exercise, although this can be limited by the exercisee.

Exercise Technique…


screen-shot-2017-01-21-at-8-17-59-am

  •  Begin in the top position of a push-up, hands centered on top of the sliders.
  •  Slowly lower yourself to the floor, hugging sliding the non-working arm out in front of your body.
  •  Keep the elbow of the working arm pulled into side body
  •  Pause briefly at the bottom, working elbow at 90 degrees.
  •  Press up and repeat on the other side, alternate for scheduled reps.

Workout Integration…

  •  Rep range:  6-12 reps per side with bodyweight, beyond than add more weight.
  •  Load:  Bodyweight until 12 reps are achieved, then add weight.
  •  Sets:  This depends on goals, 3-5 sets is plenty.
  •  Tempo:  Slow it down on the descent to the bottom, 3-5 seconds on the way down.
  •  Technique break down = rest

Where does this exercise belong?

The strategy of building fitness progressively from the ground up is awesome.  Your current fitness level and past training experience will determine how and where you place this exercise into a workout.

For some, this will be a strength training drill, you’ll need adequate rest after the set.  3 simple sets of 6-8 reps will leave you drained.  That is fine.  Beat on it for a few weeks, aim for improvement.  Expect to be sore through the chest and tender around the obliques in the coming days.

For others, the carpet slide push-up will provide a delightfully saucy challenge in a short burst metabolic training session.  I’ve worked it into a long circuit or kept it simple as part of a 3-exercise burner.

Here’s an example of where this exercise could live within a total body workout:

Alternating Split Squat Jumps x 8 each side

***Carpet Slide Push-Up (with forward reach) x 8 each side***

Airsquats x20 or Goblet Squats x8 (load up here)

Suspension Trainer Inverted Row x10 or 1-Arm Bent Rows x 8 each side

Own the exercise from top to bottom to top…

I have to admit I’ve seen several YouTube videos of carpet slide push-ups.  85-90% of the people in the videos are dropping into the bottom of the push-up too quickly.  More like falling into it.

Address the concept of OWNING the eccentric descent in this exercise.  Pause at the bottom, stay tighter than a pair of skinny jeans, contract and push up and out of it.

Again, slooooooowwww down, spend more time under tension and focus on remaining as rigid as possible.

At most, the descent into the bottom of the push-up should take 1-2 seconds, with NO bounce out of the bottom.  Pause at the bottom, hang out there.  Press out.  Strict.

Core training?  This is core training…

Without sounding like a physique zealot, because I’m not, this exercise provides an unbelievable stimulus to the core.  All without any bells and whistles, just basic rigid body position, technique, and gravity.

You won’t be able to execute as full extension carpet slide push-up without activating the torso aggressively.  It’s self-limiting.

To help make my point on how much core is involved with an exercise like this, drop down into a push-up position, raise one arm forward in full extension, while the other supports the body.

Stay in this position for time.  Just remain in that position without changing posture.

Too easy?  Inch the feet closer to together, narrow the base of support.  Any exercise can be made harder.

The challenge to the core during the carpet slide push-up with reach will be intense, felt from the hip flexors, through the torso, up to the collar-bone.

There will be a tremendous anti-rotation stimulus while supporting the body with one arm. Think about it for a second… the other half of the body wants to sag toward the floor (damn you gravity). Even with the sliding arm providing some assistance, your core will be lit up.

Maintaining a rigid body from head-to-heel is a must. Stay straight. Creating rigidity will require adequate tension through the mid-section.

Progression: Make it harder…

To increase the challenge, gradually lighten the hand contact of the sliding arm, which will lessen the amount of assistance from the sliding arm while increasing the load of the working arm.  Removing assistance from the sliding arm also drastically increases the amount anti-rotation stress as the exercise inches closer to a true single arm push-up.

Increasing the difficulty can be accomplished several ways, but the most honest approach would be to lessen the contact to just the fingertips.  Start with all five fingertips, progress to three fingers, two-fingers (thumb and pointer)… etc.

Before you know it, you’ll need a weight vest, at which point you’ll begin from the bottom rung of the progression once again, with palm firmly on the carpet slide.

Regression:  Make it easier…

To decrease the challenge, wrap a band around your torso and anchor the band to a point directly overhead.  The band will assist you during the hardest point of the exercise when you’ll need help the most.  For most, the hardest point will be the bottom of the push-up.

No carpet?  

Carpet slides work on hard surfaces also.  I’ve used them on hardwood and cement floors with great success.  Of course, this will limit the lifespan of the carpet slides, so if you’re going this route, purchase cheap slides at your local home improvement store.  A pack of carpet slides at Menard’s near me costs $2.99.  Cheap.

A suspension training set to the lowest possible height (without making contact with the floor) will also work.

The other option tools like the Ab DollyHAVYK Sliders, or a more budget friendly option like Core Coasters.  All have wheels which make them ideal tools for hard surfaces.  These options cost significantly more than the carpet slides, but you’ll find a plethora of uses for each, making them a worthy investment.

Early in the article, I suggestioned using furniture slides as a viable alternative to carpet slides designed for fitness.  There is a slight difference in my experience, being that fitness specific carpet slides typically have a much better integrity.  The manufacturers know that these are going to be used frequently, the design is more durable.

Here are some fitness carpet slides on Amazon.

No equipment at all?

Worst case scenario, I’ve done these push-ups without any tools period.  Doing so requires minimal weight on the sliding hand, but it works just the same.

User beware, going this route is intense.  There’s going to be way more friction on the floor  without a slide.  This is ok, just be aware that it might be too aggressive.

The end…

That’s all folks.  I’ve written too much already, way too much.

Give this baby a try.  Mix it in wherever you see fit.  Ask questions as you have them.


Kyle


Bodyweight Training Programs

Motion

Intelligently designed bodyweight strength and conditioning programs can turn a beginner into an absolute machine with little to no previous workout experience.  The same programs can humble the elite who have a perception that bodyweight exercise has relevance to their situation.

I’ll come clean.  It wasn’t that long ago that I believed bodyweight exercise could have zero impact to my own training.  I’ve been designing my workouts for the last 10+ years or so, and I was completely wrong.  It’s easy to evolve to have tunnel vision with fitness.  You get used to doing things a certain way, and you discard anything that doesn’t parallel “that way”.

It’s why I support all forms of fitness and do my best to avoid being a zealot.

Bodyweight training, similar to more traditional externally loaded resistance training (barbells, dumbbells, kettlebells, etc) is all about leveraging the principles of progression.

If you stay disciplined to practicing the progressions, you’ll make incredible gains in a short amount of time.

From my experience, the most profound improvements can be made by adjusting any one (or several at once) of the following training variables:

  • Time under tension
  • Movement complexity
  • Stable transition to unstable (example: using 1 arm or 1 leg instead of 2 arms or 2 legs)
  • Increase reps, sets, rounds
  • Decrease rest periods
  • Single plane exercises into multi-plane exercises
  • Rotation

Coaches who are designing the best programs know that leveraging continuous exercise progression is the key to getting client’s the results they want.

I say again:  smart progression and the willingness to continue to go outside of your comfort zone is what gets results.

While I feel that my own program design is solid, I do borrow ideas from programs and other coaches.  Borrow and tweak, but always give credit where credit it due.  That’s my philosophy.

So here we go.  Below are some timeless programs, and also some of the hottest bodyweight-only training programs on the market today.

The best part?  Once you have the program you’re good to go… no equipment necessary.

The Naked Warrior (Pavel Psatsouline/DragonDoor paperback)

screen-shot-2016-10-15-at-9-50-17-am

The Naked Warrior was my first exposure to next level bodyweight strength training.  It changed the way I viewed strength forever.  After adding a healthy dose of pistols, dive-bombers and 1-arm push-up progressions to my training regimen, I had never been stronger.

Pavel Psatsouline is the godfather of modern-day kettlebell training, but he is also an accomplished military and sport performance instructor.  He can be credited for making advanced bodyweight training mainstream and also for sparking the kettlebell revolution in the Western Hemisphere.


TacFit Commando (Scott Sonnon/RMAX)

screen-shot-2016-10-15-at-10-32-41-am

The design of my personal bodyweight workouts involve a ton of exercise variations cherry-picked from Scott Sonnon’s TacFit Commando training system.

TacFit acknowledges the need for improving ROTATIONAL performance and addresses it with a lot of really unique drills.  Rotation is rarely addressed by the fitness industry and often under-developed in a lot of people.  Building rotational power and the ability to resist rotational forces is important for athletic endeavors and the demands of everyday life.

Improving rotational power can be a game-changer for weekend warriors, particularly those who enjoy playing golf, tennis, hockey or softball.

TacFit training systems are a melting pot of many training methods, which Scott collected and organized into a comprehensive program.

The attention to detail extends beyond smart exercise progression and into tactics for recovering from exertion and joint mobility, which again, is rarely discussed in most training programs.  Doing the work at a high level is one thing, but more important is the ability to recover as quickly as possible from work bout to work bout.

TacFit addresses these lesser known concepts brilliantly.

Scott Sonnon is an accomplished martial arts athlete turned military and sports performance coach.  He specializes in training the tactical sector (firefighters, law enforcement, military special forces, etc).


C-Mass (Paul Wade/DragonDoor e-book)

screen-shot-2016-10-15-at-9-53-59-am

C-Mass is a bodyweight program for those who are interested in building a physique using nothing but the weight of their body.  The exercise progressions in C-Mass are not for the faint of heart, but anyone who’s pursued building muscle aggressively knows that uncommon result require uncommon efforts.

I highly recommend this book for those interested in taking their training to the next level, all without touching a weight.


Pushing the Limits! (Al Kavadlo/DragonDoor e-book)

screen-shot-2016-10-15-at-9-56-16-am

Just like Pavel Psatsouline is the godfather of kettelbells, Al Kavadlo can be pegged as the modern-day guru of bodyweight training.

Where Paul Wade’s C-Mass may be more appropriate for the advanced trainee, “Pushing the Limits” is packed full of exercise progressions to serve anyone.  Personally, I’ve beat on Al’s 1-arm push up progressions to improve my pressing strength (and as a byproduct my core stability) well beyond what I thought was possible.

Whether you’re looking for clever bodyweight exercises to add to your current iron regimen or a guide to move you passed road that “The Naked Warrior” paved, this book is for you.


Street Workout (Al Kavadlo and Danny Kavadlo/DragonDoor e-book)

screen-shot-2016-10-15-at-9-57-43-am

“Street Workout is an incredibly comprehensive collection of calisthenics concepts, exercises and programs.”

I’d consider this an equally comprehensive resource as TacFit, with unique bodyweight variations, tips and pearls for building to the next level.

Al and Danny are world-class calisthenic coaches that share a ton of tips and techniques in this book. You’ll be busy for some time with this one.

No matter…

…what methods you’re currently leveraging for workouts, it is important to know that you always have options.

Bodyweight strength and conditioning is a tool in your training tool bag.  Use it when needed, inject some difficult bodyweight exercises into your workouts, use them as a baseline for improvement.

Where can you progress?  What should you regress and tweak to make the next jump?

Establishing an awareness of training options will keep your workouts fresh while avoiding that common cluelessness that many people have when the training space isn’t big enough, time is limited or equipment isn’t what they are accustomed to.

Bodyweight training is adaptive training, but it is also human performance enhancement training in its rawest form.

Bodyweight training strategies are an ace up your sleeve, always.  Play it whenever you need to, and be confident that the workout is going to be HIGHLY EFFECTIVE.


Kyle


Ass Kicking 250-Meter Rowing Workouts

Motion
screen-shot-2016-10-09-at-3-46-46-pm

Photo Credit:  Amazon.com

The rowing machine (aka rowing ergometer or “erg”) is an awesome piece of cardio equipment, and the 250-meter interval is a perfect distance for high-intensity interval training.

Why 250-meters?

Isn’t it too short?  Absolutely… not.  Performed for one rep, yes, it’s too short to get any significant benefit. Spread across 8+ rounds, the training effect is just right.

Repeated effort interval training works extremely well when rowing distances shorter than 500-meters.

It will take most people 40-50 seconds to row 250 meters.  45-50 seconds of high-intensity effort is a long time to be working at end range intensity. 

Smart interval training workouts can and should make you tired, but progressively.   

Interval based training is a great method to reinforce active rest period management.  You exert, then you calm yourself down as quickly as possible before the next round of exertion.  This method has great carryover to real world activities.

The 250-meter distance is overshadowed by other benchmark distances, notably the 500m, 1000m and the distance all nightmares of made of, 2000m.

The 250-meter is a perfect distance to row on its own, or as part of a circuit.  Adding exercises to the row increases the amount of work performed, which increases the training effect.

If you choose to row 250 meters without adding on other exercises (which is perfectly fine),  I recommend pulling at your maximum watt and stroke rate threshold.  I don’t see a reason not too, as the distance is short enough to sprint.  

Especially if you’re resting in between each effort, might as well leave it all on the rower.

Rowing is another zero-impact activity with high reward. Very similar to the airbike.  An excessive amount of impact can wreak havoc on a person’s joints over time.  Being able to induce such a potent training effect while sparing the joints is a major benefit of rowing.

Blazing the meters demands a total body effort, making rowing an ideal piece of cardio equipment for fat loss.  

The ideal situation for fat loss: a lot of muscles exerting together with limited rest and oxygen debt.  

Discipline with diet is the best method.

For those with internally rotated shoulders and an overworked chest excessive pressing, rowing can serve as a counter-balance since each stroke has an emphasis on upper body pulling.

Enough chit-chat.  The purpose of this article is to share three different 250m row workouts, traditional and non-traditional.  

Here they are… 

Row Workout #1: 250-meter interval

250-meter repeats 

  • Complete 8-12 rounds
  • Rest for 1:1 (work to rest) or a flat 60 seconds before starting the next interval

Using the 1:1 work to rest ratio, a 45-second effort gets you 45 seconds of rest.  Adjust the rest periods as needed.  Fatigue will creep up quickly as you progress through the rounds.

This workout can be a brilliant cardio finisher to a resistance training workout.

It may be best to row on days where pulling or grip heavy exercises are NOT part of the program to allow the hands and back a chance to rest.  

A 10 round workout will take about 15 minutes.

Workout #2:  Bodyweight Exercise + 250-meter Row 

15 Push Ups

15 Bodyweight Squats or 6 R/L Alternating Assisted Pistol Squats

250-meter row

  • Repeat for 8-10 rounds
  • Rest 60 seconds (advanced) or 75 seconds 

Here I am working this circuit… 

Integrating bodyweight exercises with rowing is a great way to mix up the session.  Remember, more muscles stimulated and more work being done equates to a higher training effect.  Remember, more muscles working equals a larger training effect. 

Depending on fitness level, the reps for push-ups and squats can be down.

If 15 push-ups are too easy, add weight in the form of a weight vest, sandbag or weight plate.  If you don’t have access to equipment, use single arm push-ups.  Switch bodyweight squats in favor of weighted

If 15 squats is a piece of cake, load up the squats with weight (sandbag, barbell, kettlebell or dumbells) or use a more advanced bodyweight progression like pistol squats.

Workout #3:  250-meters + diminishing rest periods

Interval #1:  Row 250-meters, rest 60 seconds

Interval #2:  Row 250-meters, rest 55 seconds

Interval #3:  Row 250-meters, rest 50 seconds

Interval #4:  Row 250-meters, rest 45 seconds

Interval #5:  Row 250-meters, rest 40 seconds

  • Repeat workout for 2 full rounds (10 total intervals)

A rower is a great investment.  Basic upkeep could make a rowing machine last a lifetime, no different than a car really.  There are many 15-20-year-old rowers still getting frequent use. you’ve been on the fence about the purchase due to cost, I encourage you to take the plunge.  They are worth every penny.

Amazon Prime members, the Concept2 Model D with PM5 (performance monitor 5) is $945 with free 2-day shipping.  

screen-shot-2016-10-09-at-3-51-47-pm

If you have any questions about the Concept2 Model D w/ PM5, message me privately and I can share my experience as a rowing machine owner.

Most importantly, give these workouts a shot and let me know what you think…

Cheers, 

Kyle