Metabolic conditioning is often shortened to “metcon.” It is a type of fitness training designed to supercharge your metabolism. This acts as the engine that burns calories in your body.
Think of your metabolism like a car engine. Like how some engines burn fuel more efficiently, metabolic conditioning helps your body become better at using energy. This means you can get stronger, faster, and leaner, all while improving how your heart and lungs work.
Let’s dive into what metabolic conditioning is. We will explore why it’s important. You’ll learn how you can do it and when it’s best to include it in your fitness routine.
What is Metabolic Conditioning?
Metabolic conditioning is a mix of high-intensity exercises. These workouts raise your heart rate using primarily resistance-based moves with little rest between exercises.
Why Do Metabolic Conditioning?
1. Burns more calories. Even after you stop, your body keeps burning calories at a higher rate. This is great for losing weight or staying lean.
2. Improves endurance. Regular metcon training makes your heart and lungs work better together. So, you can do activities like running, swimming, or biking longer without getting as tired.
3. Builds strength and muscle. Lifting weights or doing bodyweight exercises makes you stronger. It also builds muscle. This helps your body burn more calories even when you’re not working out.
4. Time-efficient. This is because they’re so intense. This means you can get a great workout in a shorter amount of time.
How to Do Metabolic Conditioning
Metabolic conditioning workouts usually combine strength training exercises with cardio exercises. For example, a circuit. It includes push-ups, squats, jumping jacks, and mountain climbers. You move from one exercise to the next with little rest. The key is to pick exercises that target different parts of your body. You should do them at a high intensity.
Here are some tips:
Start Slow. If you’re new to metcon, start with simpler exercises and shorter workouts. You can add more challenging exercises and longer circuits as you get stronger.
Keep it varied. Mix up your exercises to stay interested and to work different muscles.
Listen to Your Body. Metcon is intense, so it’s important to rest when necessary and not push yourself too fast.
When to Do Metabolic Conditioning
How often you include metcon workouts in your week depends on your goals and fitness level, but 2-3 times a week is a good starting point for most people. Make sure to have rest days between to let your body recover.
A sample training week could look like this:
Monday: MetCon
Tuesday: Mobility + Zone 2 Cardio
Wednesday: MetCon
Thursday: Rest Day
Friday: MetCon
Saturday: Mobility + Zone 2 Cardio
Sunday: Rest Day
Metabolic conditioning workouts are great for people with busy schedules. They can be performed in 20-30 minutes from start to finish. The higher intensity part of the workout lasts 10-15 minutes.
Final Thoughts
Metabolic conditioning is a powerful way to boost your fitness by improving how your body uses energy. It helps you burn more calories, build muscle, and increase your endurance, all in a time-efficient way.
Adding metcon workouts to your routine can help you achieve many fitness goals. They also keep your workouts fun and hard. Remember to start slow, keep it varied, and listen to your body to get the most out of your metabolic conditioning sessions.
If you’re looking for an exercise that can help you build core strength, improve your balance, and enhance your overall athletic performance, then standing diagonal cable chops might be just what you need.
In this article, we’ll take a closer look at the benefits of this exercise and provide you with a step-by-step guide on how to perform it properly.
How to Perform Standing Diagonal Cable Chops
You’ll need a cable machine with a handle attachment to perform standing diagonal cable chops. A tricep rope is the ideal attachment for diagonal chops and lift exercises. If you’re training at home and space is restricted, take a look at the ANCORE functional cable machine.
Here’s how to do it:
Stand perpendicular to the cable machine with your feet shoulder-width apart, and knees slightly bent.
Grab the cable handle with both hands and hold it at shoulder height (or just above) with extended arms.
Keeping your arms straight (at the beginning), flexed through the middle and extended at the end of the exercise, rotate your torso and pull the cable handle diagonally across your body until it reaches the opposite hip.
Return the cable handle to the starting position and repeat the movement on the opposite side.
Perform 10-12 reps on each side for 3-4 sets.
Benefits of Diagonal Cable Chops
Standing diagonal cable chops are a great exercise for improving core stability and balance.
Diagonal chops are a frontal plane exericse that cross the midline of the body. Many sports and activities involve crossing the body’s midline, such as: throwing a ball, hitting a tennis ball and swinging a golf club.
Midline crossing exercises have the following benefits:
Improved coordination: When you perform exercises that cross the body’s midline, you engage both sides of the brain, improving coordination between the left and right sides of the body.
Increased cognitive function: Cross-lateral exercises require the brain to work harder, which can improve cognitive function and overall brain health. This can translate to improved memory, focus, and attention span.
Better balance and stability: Cross-lateral exercises can also improve balance and stability by strengthening the core and improving proprioception (awareness of body position in space). This can particularly benefit older adults at risk of falls and balance issues.
Improved athletic performance: Cross-lateral exercises can also improve athletic performance by increasing power and explosiveness in rotational movements.
Rehabilitation and injury prevention: Cross-lateral exercises can be used for rehabilitation and injury prevention by improving range of motion and joint stability. This can be especially beneficial for individuals with lower back, hip, and knee pain.
Explosive Diagonal Chops for Power
When performed explosively, diagonal cable chops can help improve power and speed in rotational movements. In order to move fast, you have to train fast. Explosive chops can train your body to generate force quickly and efficiently, translating to better performance on the field or court.
Training diagonal chops with speed can enhance your overall coordination and agility. As you perform the movement explosively, your body is forced to coordinate different muscle groups and movements simultaneously, which can improve your overall body awareness and agility.
Tip for Newbies Looking to Add Chops to Workouts
Explosive chops should only be implemented after you have mastered the form and technique of the exercise. Starting with slow and controlled movements is essential to ensure that you engage the correct muscles and maintain proper form throughout the movement.
Here’s the rep scheme I went with for the Macebell exercises:
360 Swings x 10 per side
Gravediggers x 5 per side
I didn’t want to have type out the reps for each round, it’d be redundant.
Reps can and probably should vary from person to person. This will depend on your familiarity with the exercise, macebells and current fitness level.
Also, I do use specific equipment in this workout. Suspension trainer, barbell and landmine trainer. You don’t need this exact equipmetn to participate. Leave a comment below and I can help with substitutions.
Round 1 – Macebell 360 Swings + Push Ups
Round 1 of this workout kicks things off with a bang: 360 swings and push-ups.
10 reps of push-ups.
Keep each burst of exercise brief, constantly alternating between exercises.
Push-ups, are undefeated for building upper body pushing strength and muscle mass.
Many people stop exploring push-ups at the basic 2-arm variations. Progressing into single arm push-ups builds pushing strength, core stability and total body tension.
Gravediggers are the gym version of exaggerated shoveling. You’re “scooping” the macebell from low to high, up and overhead. While shoveling dirt, you’d never do this, but the gym isn’t the back yard.
Inverted rows are one of my favorite horizontal upper body pulling exercises. They’re resourceful, demand total body tension and can effectively balance out the pushing in one’s workouts.
Gravity creates the resistance. I stuck with bodyweight loading for this workout, but feel free to add or decrease weight to tailor the difficulty to you.
Round 4 – Gravedigger + Landmine Grapplers
Round 4… time to toss the barbell.
8 reps of landmine grapplers per side.
Landmine grapplers are a side to side, midline crossing exercise, and one of my favorite landmine exercises ever.
The landmine apparatus creates a whole new dimension of exercises and training options. I highly recommend looking into getting one if you’re curious. Great piece of equipment.
Round 5 – Macebell Swings + Deadlift
Round 5… deadlifts?
6 reps of traditional barbell deadlifts.
Yes, pre-fatigued, sub-maximal barbell deadlifts in round 5.
I’ll take the walk of shame. Shame…. shame… shame…
Know thyself, worry about thyself, not your neighbor. I know that I can handle 225lb barbell deadlifts x 6 reps handedly while under fatigue. Can you? If the answer is no, dial it back, use a kettlebell or consider an exercise like hip thrusts for this round.
8 reps of modified dragon flags and 6 reps of Pallof Press.
Modified dragon flag:
I used my sexy new Ancore Trainer to add resistance to the Pallof Press. The Ancore Trainer is an amazingly versatile and genius piece of home gym equipment. It’s a functional trainer shrunk down into a portable unit weighing about 5lbs. Attach it to almost anything and start training. Game-changer.
Assuming you don’t have an Ancore Trainer, use resistance bands or a cable machine.
Pallof Press is an anti-rotation core exercise, and a good one. Press the hands out, avoid any rotational deviation. Bring the hands back in.
You thought I was going to skip core exercises? Not a chance.
Summary
30 minutes of movement using the macebell and a variety of other exercises.
Very little rest and lots of work being performed in a relatively short amount of time.
I did this workout on a Saturday, where I knew Sunday was a non-exercise rest day. The volume of macebell 360 swings and gravediggers fried my grip and arms. I actually felt this workout for a few days after.
Any of the exercises can be adjust/modified to suit your space, equipment and know-how.
Leave a question in the comments section and I’ll help you with ANY questions.
20 minutes is all you need to get a hell of a workout.
This 20 minute workout combines the SkiErg, kettlebell swings and landmine grapplers to create one hell of a training stimulus using just 3 exercises.
The SkiErg and kettlebell swing combination is one of my favorite gym combinations of all time.
Yes, they are both somewhat linear, but the opposite actions is what I love.
Kettlebell swings are mostly hip extension focused. (Yes, I know the eccentric loading is great with kettlebell swings).
SkiErg is a flexion heavy exercise. The pull downward requires a lot of lat and core contribution. The hips hinge as you finish the stroke, followed by moving back up into extension to reload for the next pull. One of the great features of the SkiErg machine is being able to walk up to it and walk away from it quickly. It’s awesome.
Landmine grapplers, well, read below about why I think landmine grapplers are badass.
Both are completed in the standing position, feet firmly fixed to the floor. In a world where machines are taking over, standing up like human during a beat down is refreshing.
Complete the following exercises in cyclical fashion:
Kettlebell Swings x8
Landmine Grapplers x8
SkiErg x150meters
Choose your kettlebell weight and throw a plate on the barbell for the landmine grapplers, and you’re ready to move.
I used a 32kg kettlebell and a 25lb plate on the landmine apparatus.
The beauty of this circuit is how little space you need. I’m clearly training in a larger home gym space, but I could be getting after it inside a bedroom closet and still get the same training effect.
Maybe I’ll shoot another video doing the same workout inside of super tight space to make my point.
The rest periods are designed to be INCOMPLETE. You won’t want to start into the next exercise, but do it anyways.
The idea is to start the next exercise BEFORE you’re completely ready to do so, yet be mindful of when it’s inappropriate to start the next bout of work to avoid injury (technical failure, etc).
You have to be an adult in the gym, make adult decisions, and know thyself.
If the next round is going to involve crappy reps, stop. Rest. When you’re ready, get back to it.
It’s a fine line… and only you know when you’re toeing that line.
Landmine Training is Sexy
There’s no other way to say it.
Landmine training is sexy and I love my landmine set up. It was a small investment for the vast amount of training options I gained.
For anyone who owns a barbell and plates, but doesn’t own a landmine, SHAME ON YOU.
Kidding.
Adding landmine trainer to your home gym can change a lot about how you workout, including more pressing, pulling, squatting options. As it relates to this workout, more rotational training.
My favorite landmine exercises involve rotation.
Grapplers are a classic rotational exercise that can be tweaked for rotational power work, grinding strength or cardio conditioning.
Every swipe through the middle feels like this movement has application beyond the gym setting. And no, not all exercises give me that same warm and fuzzy feeling.
Landmine Grapplers bring joy to my soul.
They aren’t a cheesy isolated core twist. Grapplers are full body exercise that begin on the floor, traveling up the body, through the hips/torso and out the hands.
Biggest Problem with this Workout
Access to the SkiErg will be the biggest issue for people to give this exact workout a go.
If you have a few dollar laying around, theSkiErgis an incredible piece of equipment to own.
I have to admit I purchased my rowing machine first, but the SkiErg was a much more anticipated addition. It hasn’t disappointed one bit. Mine is well fixed to a wall.
Decreasing or increasing the demands of an exercise doesn’t always be related to subtracting or adding load, but it’s a really simple adjustment to make, and also nice for quantifying progress.
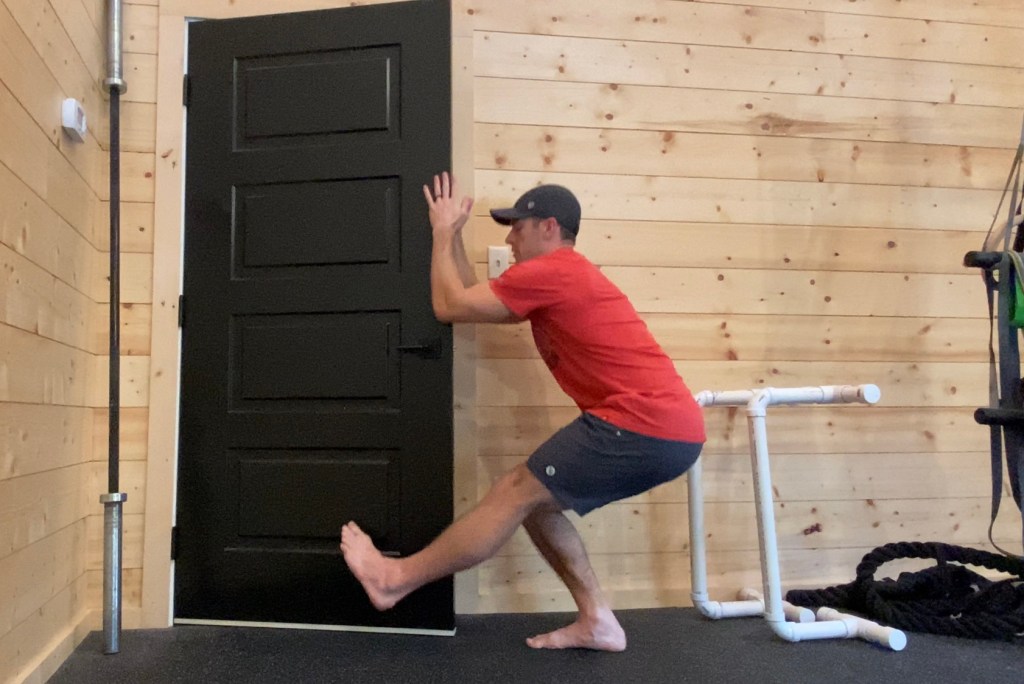
Here’s a series of single leg pistol squat variations, covering beginner, intermediate all the way to advanced.
I hope you find these instructions to be simple, yet effective. Single leg squats are an incredible exercise to practice on a regular basis. Single leg squats can be trained 2-3 days per week, leading to impressive gains over time.
Beginner| Fully Assisted On the Way Down and Up
Grab the door itself, or ideally the door handle, using both hands. Use upper body to help guide you into the bottom of the squat and back up to the top. This beginner variation allows for decreasing weight moved, more stability and balance.
3-5 sets of 5-6 reps
Intermediate| Slow Lowering with Limited Assistance, Full Assistance on the Way Up
Use minimal upper body assistance on the eccentric (lowering phase), really slowing down the descent as much as possible. Once you’re at the bottom, the upper body can assist with standing back up.
Eccentric focused exercises can increase muscle soreness significantly in the days that follow, just a heads up.
3-5 sets of 5-6 reps
Intermediate| Lower down with NO Assistance, MINIMAL Help on the Way Up
Time to let go of the door and lower to the bottom of the squat without assistance. You feel shaky, wobbly and maybe even weak. This is normal. You’re building strength, control and coordination with this pattern!
Slow down the descent as much as you can.
3-5 sets of 5-6 reps
Once at the bottom, use minimal assistance to stand up. Challenge yourself here, you dictate the intensity of the exercise, make a choice to ramp up the intensity. Go for it.
Intermediate/Advanced| Pancake Hands on the Door for Balance Only
Slide the hands along each side of the door, stabilizing the motion. The hands are there to prevent you from falling to one side or the other, NOT to reduce the load.
If having two hands on the door feels unnatural, and it may, try using one hand, thumb on one side and the other fingers on the opposite side. Use a feather light touch on the way down and up.
3-5 sets of 5-6 reps
Advanced| Freestanding, Unsupported Single Leg Pistol Squat
Congratulations, you made it. A freestanding, unsupported, zero help single leg pistol squat.
People like to joke about pistol squats being a circus trick, but there a demonstration of single leg strength, stability, mobility and athleticism.
Once you own a single leg squat, you’d be surprised how often use it stand up from the floor. It’s quick and efficient.
Lastly, single leg training is back-friendly.
This is not a recommendation to ignore researching corrective strategies to address the back pain and train around it forever.
In a world where every other person has suffered some sort of back tweak or injury, single leg training is extremely forgiving and often a great option for people.
Some folks may need to limit the range of motion to acclimate to this freestanding single leg squat, and that is ok. Grab a chair and lower down until your butt contacts the seat. Touch and stand back up.
Increasing the load beyond bodyweight is the next logical progression.
I’ve added weight by using kettlebells, dumbbells, barbell, sandbag, weight vest, and so on.
Whatever you choose as weight really doesn’t matter. Weight is weight. Gravity doesn’t discriminate. What’s important is that it’s comfortable to hold onto.
Adding weight to exercises is trial and error at times. You want to add enough to challenge each rep in the set, but not too much that you’re unable to control the movement or find yourself compensating/cheating to complete the reps.
In my experience, most people are going to notice the most significant improvements from dedicated mobility training in the hip and shoulder region.
Getting the shoulders and hips working nice, pain-free, strong, and supple is a good goal for ANYONE.
And I know saying that sounds really broad, but a body that works nicely without pain during movement is ideal.
Today’s post shares 3 hip mobility exercises that can wake up your hips and make them feel great.
I preach to play the long game with fitness. Whether you’re pursuing a body transformation, performance gains, or general health improvement, it’s going to take time.
Nothing long-lasting happens overnight with fitness and movement.
It’s a process.
But after “blowing the dust” off of your hip musculature with a few good work sets of active mobility work, your hips will likely feel amazing.
“Amazing” = buttery, mobile, alive, awake, workable, etc.
The basic premise of active mobility training is to increase range of motion (progressively) and establish full CONTROL over that range of motion.
We accomplish this using a variety of isometric holds and dynamic movements.
Conditioning the hips, a ball-and-socket joint with a really robust potential for movement in many directions, to perform tasks beyond lifts like deadlifts, squats, and lunges is ESSENTIAL.
Deadlifts, squats, and lunges are all great exercises to include in a workout regimen.
No question.
My YouTube channel is loaded with variations of each of those movement patterns.
But, from a joint articulation perspective, these exercises only scratch the surface.
Your hips can do more. Way more. Mobility training can help retrain your body to access this movement.
Don’t interpret my message as a call to stop lifting weights. but rather an encouragement to deliver nourishment to your joints in the form of active mobility training.
Dedicated mobility training can help mitigate injury while boosting movement performance.
Building strong hips is can be made simple, and these 3 hip strengthening exercises will help to improve your hip control and strength.
90/90 Knee to Heel
Touch the knee to the heel.
Position the hands in front and outside the lead leg, using your arms to prevent any contorting of the body.
While moving the leg, hover the knee an inch or two above the floor while the foot lightly glides. Keep the floor pressure as soft as possible.
After touching the knee to the heel, drive the leg away from the heel as far back as possible.
Squeeze the glute hard and PUSH!
Keep the torso calm throughout the drill.
Aim for 3-5 sets of 10-15 reps per side.
90/90 Heel to Heel
Same idea here, except right before the knee touches the heel, articulate the hip and lift the knee upward.
Guide the trailing foot heel to contact the down leg heel.
Some people might refer to this as a “heel click”.
Call it whatever pleases you, just make sure you try it.
Lightly touch heels without losing body position before reversing the range of motion and reaching back.
On the reach back, SQUEEZE your ass cheek HARD. REACH!!!
Aim for 3-5 sets of 10-15 reps per side.
90/90 Around the World
I wasn’t sure how to name this movement, “around the world” seemed fitting.
Perform the same knee to the heel, upward lift into the heel to heel, but return to the leg to the start position by extending at the knee and swooping the leg back into extension (with a subtle rotational articulation).
All of the hip mobility shared will burn up the muscles to some degree, but this exercise will really set them ablaze.
Again, do your best to keep the upper body calm. Avoid excessive leaning or other compensations.
Stay strict, make the hips do the work.
Aim for 3-5 sets of 8-10 reps per side.
How to Make These Hip Mobility Exercises Harder
Slow down and increase the time under tension.
Test your ownership over the movement by moving slower. Try moving at a 3-count or 5-count pace. Add pauses when you find weak points and GRIND!
Add ankle weights.
Wearing 2-5lb ankle weights load will make each of these hip mobility variations significantly more difficult.
Especially on the 90/90 “around the world” variation. Your face will begin to melt onto your neck.
A 5lb ankle weight will feel like 25lbs when your leg is at full extension. 🔥
A simple pair of ankle weights serve a valuable purpose with mobility training, and if you didn’t find the bodyweight variations difficult, take a shot of whiskey because adding weight is going to increase the intensity quickly.
Consistently practicing active mobility drills helped me make gains with my lifts.
I fought the idea for years and talk about it frequently on this blog and in the description section of my YouTube videos.
I couldn’t touch the dragon squats for months. It got to a point where I wasn’t even sure my bony structure would allow me to perform a full range dragon squat. Ha. Regressions provided limited improvements.
My hips didn’t understand they could move into those “extreme” ranges without compromising safety. Our bodies are equipped with amazing safety features.
So I turned my attention to ramping up the mobility work (along with dragon squat regressions), and whammo… depth achieved.
From a usefulness perspective, video CRUSHES the written word.
I could write 800 words about an exercise, or show you a :30 second video and deliver more clarity.
I hope you view each video below and think, “Shit, that exercise looks fun/effective/challenging/engaging/different or applicable to my situation, I’ll try that next workout”.
Exposure to new ideas can change your attitude and enthusiasm about working out.
I used yoga blocks for the upper body Yoga Block Game in the video below, you don’t have to.
Use what you’ve got lying around the house (yoga blocks are extremely versatile, inexpensive and have a lot of uses).
Weight. Any object of weight will work to load these exercises. Common household items can be substituted in place of dumbbell or kettlebell. Use what you’ve got. If the weight is challenges the movement pattern without compromising safety, go for it.
In the meantime, look into getting yourself an adjustable kettlebell or dumbbell (adjustable fitness equipment are economical and space savers)
Quick Advice on Reps/Sets/Weight
Let’s address the two most common questions I get about most of my exercise videos:
“How many reps and sets do you recommend?
“What weight should I use?”
Good questions… but here’s the deal, only you know the answers to those questions.
I can suggest reps all day long.
But if you’re cheating the exercise on rep 3 of a 10 rep set because your ego wants to practice the exercise variation from my video, but what you really need is a variation 2-3 steps back in difficulty… well…
Same goes for weight selection.
Avoid the temptation to chase the “burn” during each work set and select a weight you can control every step of the way.
The Goldilock’s Rule for selecting weight:
Not too heavy, not too light… juuuuusssssstt right.
Take a step back and take an honest assessment of your strength and fitness level, movement quality, and familiarity with the exercise(s).
Ego-Free Guidelines to Apply to any exercise:
Start with lighter weight (move up in weight as needed)
Quality reps only
Get to know fatigue and what it doesn’t to movement quality
Move slow, move with control
Patience
Be in the moment, feel everything, remain mindful
Enough lead in.
Here are a 4 (home gym approved) exercises and a movement game worth experimenting with in your next workout.
Split Stance Cross Body RDL
Have you ever had to lift an object from the floor without being able to get into a picture-perfect deadlift stance/position?
Me too.
Stagger your stance and shift weight onto the front leg.
Lower the weight (kettlebell, dumbbell, etc) along the outside of the front shin bone until it touches the floor outside of the foot.
Pause briefly. Stand back up.
You should feel the bulk of the work from the front working leg hamstring up into the glute.
Slipping a little rotation into common movement patterns (hip hinge) is a good thing. (So is rain to make whiskey).
Aim for 3-5 sets of 6-8 reps per side.
Single-Leg Deadlift + Row
Coordination, balance, and timing are all put to the test with this exercise.
Grab the weight, hinge forward while balancing on one leg, row.
People get pleasure from bashing combinations like this because neither the deadlift or the row is “optimized”.
Interestingly, the same folks who poo-poo these exercises struggle to balance on one leg, sooooo….?
The purpose of this exercise is to be a movement challenge.
Balance on one leg, maintain shape and control while rowing an object of weight.
For perspective, this exercise variation isn’t my top pick to deadlift 500lbs from the floor. There are better variations.
Also for perspective, performing a row with a challenge amount of weight while holding a single leg hip hinge is a difficult little maneuver.
And how about the foot conditioning here?
Balancing on one leg is fantastic for strengthening the tiny little muscles underneath and surrounding the foot/ankle.
If you can, remove your shoes while you workout. Barefoot training is a really simple way to strengthen the feet.
Hybrid/non-traditional movements like this one offer up something different for your body unpack and navigate, which IS the benefit in and of itself.
Aim for 3-5 sets of 6-8 reps per side.
Yoga Block Game (Upper Body)
Objective: Push each yoga block out as far as possible.
I suggest going around the circle a few times because you’ll notice you’re able to push each block a few millimeters further on each attempt.
From my experience, when a normal linear set of an exercise transitions into a task or a challenge, people get competitive and the effort given increases.
The entire front side of your body is going to be burning like a bonfire on this one.
Arms, chest, core, etc. All of it… on 🔥
Aim for 2-3 attempts, either during the warm-up or workout.
Hollow Body Rock + Single Leg Squat
Hollow Body Rocks and Single Leg Squats (aka pistol squats) are two fantastic exercises on their own.
Single leg squats are my go-to squat pattern. I get a phenomenal training effect without needing a lot of equipment (for added weight) and there are bunch of progressive variations to further challenge mobility (ex: dragon squats).
Single leg squats transition well into everyday tasks. So much is done on one leg, it’s beneficial to train for it in the gym.
Hollow Body exercise variations link the upper and lower body together and might look easy from afar, but they‘re actually quite difficult.
As an introduction to Hollow Body work, try holding a Static Hollow Body position for 30 seconds x 4-5 rounds (1:1 work to rest periods).
Good luck. 👍🏼
Fusing Hollow Body Rocks and Single Leg Squats creates a whole new movement challenge.
The goal here is to make two exercises look like one exercise by creating smooth transitions.
Aim for 5 sets of 6 reps per leg.
Isolated Exercises into Movement Combinations
If you’ve checked out my YouTube or Instagram pages, you’ll notice how often I fuse 2, 3 or maybe 4 exercise together to create movement sequences and hybrid movements.
You can take simplest of exercises and morph them into a difficult movement combinations.
Always start by learning a movement pattern in isolation.
Give your body a chance to understand the exercise.
Your body will gradually make gains in strength, control and work capacity.
From there, explore fusing several exercises together, creating combinations, etc.
Down the road, play around with speeding up the tempo, change angles, twist/turn, change levels, use different training surfaces, add weight, etc.
Exercises like this is can provide a simple introduction to movement training and create a renewed interest in gym work.
Which exercises are you going to try out today?
Any of them? All of them?
Give them a try and leave me a comment down below.
Macebell training provides a unique variety of exercise options mainly because the macebell has a weight distribution, shape, and design different than any other piece of fitness equipment.
The exercises a person can integrate into their workout regimen using a macebell are unlike anything else.
Every piece of gym equipment is a tool with different applications and uses.
The macebell, being a non-traditional piece of equipment for the modern gym, creates an opportunity to explore unique movement patterns.
360s and 10-and-2 are fairly recognizable circular/swinging exercises popular on social media, touted improving shoulder mobility and core stability.
I can’t disagree, but macebell training can go a lot deeper than just two exercises.
The macebell can be repurposed and morphed into a tool to challenge very dynamic rotational movements that include footwork.
The landmine-like exercise in the video above was tough, even with a 25lb mace. Keep the arms extended at the elbows and reach as far out as possible. Breathe.
Torque and Velocity
Macebells create a fantastic opportunity to train in planes with torque and velocities that other common gym equipment simply cannot.
Each of these movements presents a different challenge.
Enjoy.
Gravediggers
Gravediggers mimick the motion of shoveling and work great as a warm-up drill or for conditioning.
Play around with hand position on the shaft of the macebell.
Moving the hands closer together can make a 15lb macebell feel like 30lbs.
Add a twist at the top of the Gravedigger, rotating from the waist to the shoulders.
Flowing movements like this can be performed for higher repetitions, anywhere from 8-15 reps per side, for multiple sets.
Gravedigger + Push-Up Flow
A gravedigger, except keep moving forward, setting the mace down softly for a push-up.
Back and forth you go.
Squat to Press
Squat down while raise the mace up.
Looks easy, but it’s not easy.
Stationary High/Low 360s
Alternating high and low 360s is one of my all-time favorite combinations.
The flow of this combinationon is addicting and the rotational aspect is very unique.
Be very, very, very aware of where the mace is positioned on the low swing.
If you bounce the head of the mace off of your feet or shins, it’s all over.
Even with lighter weight, you’re heading to the emergency room.
To help avoid this catastrophy, choke up higher on the mace, which basically turns the mace into a club (it’s shorter family member).
You’ll be able to relax your mind and find a rhythm.
Cross-Body Bicep Curls
Bicep curls using a macebell are freaking aggressive.
First, you’ve got navigate absorbing the force of the macebell traveling with speed through the middle (while switching hand position on the shaft of the mace).
Hit the brakes, slow it down.
Lower the arm into full extension, “throw” it back through the middle.
I love this hybrid bicep curl.
It’s a lot more engaging compared to a boring traditional bicep curl.
360 + Bicep Curl Combo
Linking the traditional macebell 360 exercise with the previous mentioned cross-body bicep curl creates a very approachable combination.
Core, shoulder mobility, biceps, force generation and absorption, etc.
It’s all here.
Rotational Skaters
Incorporating a little footwork with rotational movement brings us closer to the dynamic demands of sport and daily life.
This is a tough drill.
Firmly palm and grip the mass of the macebell while driving the hands inward toward each other to secure the macebell.
“Skate” and rip the macebell through the middle.
Get aggressive with rotary compoent, but remember you’ve got keep enough control to push and stick the landing.
Go with lighter weight. The video shows 15lbs.
Adex Adjustable Clubs and Maces
It’s nice to have a few different macebell weights on hand for different exercises.
For example, the macebell I’m going to condition with using 360s is WAY heavier than what I’m going to drill rotational skaters with.
The problem is buying a bunch of one-piece macebells is it gets expensive and will clutter up a gym space pretty quickly.
Keep the gym space as open as possible is best (in my opinion).
With the purchase of an Adex Adjustable Macebell you’ll be able to quickly adjust the weight ranging from 6-30lbs in increments depending on your strength/skill level, along with the exercise.
Remember, some exercises will require lighter (or heavier) weight.
Need to go heavier?
The Rhino add-on kit increases the club weight options to 45lbs and macebells to 50lbs respectively.
Above 50lbs and you’re going to be buying a custom macebell from somewhere.
Crawling patterns and kettlebell swings are two great exercises that work really well together inside of circuits.
Quick and saucy training stimulus.
Combining two exercises might sound limiting, but if you select the right exercises it can be a really effective way to train.
Workouts don’t need to be complicated to be effective. There doesn’t need to be a long list of exercises to work through.
Alternating between two non-competing movements allows for max energy to be plugged into each movement, improves time efficiency while keeping the work focused.
Let’s talk about crawling and kettlebell swings, shall we?
Crawling
Crawling exercises can be performed in almost any training space. Tiny hotel rooms, outside, or at home in the make-shift home gym.
6-8 feet of straightaway space can accommodate any crawling variation.
There are a hundred different ways to modify the crawl to fit your environment and training space.
However, as you gain strength and coordination with the patterns, consider increasing the challenge by introducing obstacles, crawling over, under and around different terrain creates a whole new challenge.
Crawling looks easy. Baby’s crawl without a problem, so adults shouldn’t have an issue, right?
The shoulders, chest, core, and hips tire quickly, which is not necessarily an indicator of an effective workout, but more so a point to make for folks who think crawling looks “too easy”.
Here are some notable benefits of crawling:
Spatial awareness
Total body strength and conditioning
Coordination
Confidence (movement skill education)
Minimalist (can be performed anywhere, anytime)
Scalable for beginners to elite movers
Easily adjusted to elicit different training effects
Pair well with other exercises (lower body, pulling, swings)
Natural movement other than lifting weights and linear cardio
Kettlebell Swings
Kettlebells are one of the most versatile pieces of gym equipment on the planet.
A single kettlebell is all that’s required to crush a workout featuring kettlebell swings.
Similar to crawling, kettlebell swings can be performed in extremely small spaces, outside, hotel rooms, etc.
Higher rep kettlebell swing workouts are fantastic for burning calories and accelerating fat loss. It’s essentially loaded conditioning, similar to metabolic conditioning.
Kettlebell swings will burn fat while doing a surprisingly great job at maintaining muscle mass.
Some bloggers would feel guilt writing something like that, but there are too many testimonials to argue otherwise.
Thousands people who’ve leveraged kettlebell swings for body transformation. With good nutrition and a caloric deficit, using higher volume kettlebell swings will blast fat.
You can see how the lizard crawl and bear walk differ with regard to hip position.
Hips stay high, arms straight with the Bear Walk.
The lizard crawl is a whole other situation. Lizard crawling drops the hips close to the floor, making this crawling variation a serious challenge.
Kettlebell Swing Variations
The video above demonstrates 3 basic kettlebell swing variations:
2-hand kettlebell swing
1-hand kettlebell swing
Hand-to-hand swing
There are a lot more variations to explore, but I would consider these to be the fundamentals.
We will pair these variations up with a crawling pattern for each of the nano-circuits shared below.
Nano-Circuit Training
Nano-Circuits incorporate 3 exercises or less.
They are simple, saucy, and focused.
Reducing the number of exercises in the circuit removes unnecessary thinking.
There’s no stopping to check what exercises come next, how many reps, etc.
You just go.
Here are a few ideas for you to try:
Forward/Backward Crawl + 2-Arm Kettlebell Swings
Accumulate 20 yards of forward and backward crawling.
After finishing the crawl, step up to the kettlebell and perform 10 swings.
Side-to-Side Crawl + Single Arm Kettlebell Swings
Accumulate 20 yards of side to side crawl.
Upon finishing the crawl, step up to the kettlebell and perform 10 reps of 1-hand swings.
FW/BW/Side-to-Side + Bear Walk + 2 -Arm Swings
Perform forward, backward, side-to-side crawl, bear walk for 10 yards each…
… step up to the kettlebell and bang out 10 reps of 2-arm swings.
Lizard Crawl + Hand to Hand Kettlebell Swings
Obliques are going to take a beating with this combo. The lizard crawl is one of the toughest crawling patterns. Lizard crawling might require shortening the crawl distance because of how aggressive it is. Play around with it. Perform 5 reps per arm with the hand to hand swings. Use a lighter kettlebell if needed.
Move with focus.
Not every exercise needs to be picture-perfect from the get-go, but DO NOT RUSH THE MOVEMENTS.
Slow down, focus, move with stability
Beginners will feel and look wobbly, which is why selecting an exercise variation of the appropriate difficulty level is so important.
Even with simple exercises, movement mechanics are rarely sexy in the early days.
No matter which exercise variations you choose, establish the discipline DO IT RIGHT, versus opting to do it fast, intensely or while versus blasting through it chasing burn.
Generally, moving slow to learn exercises and develop strength, mechanics, and coordination.
I think people chase fatigue by rushing through exercises far too early in the process.
Learn slow, create a solid foundation, then add in the sexy stuff.