No words. Just photos. Here is the kettlebell snatch explained through pictures.
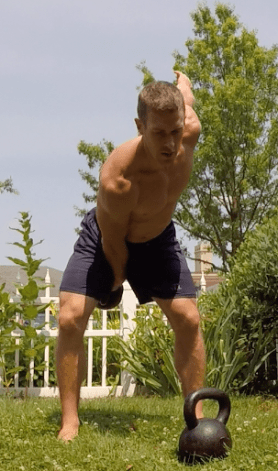


Cheers to the kettlebell snatch…
Kyle

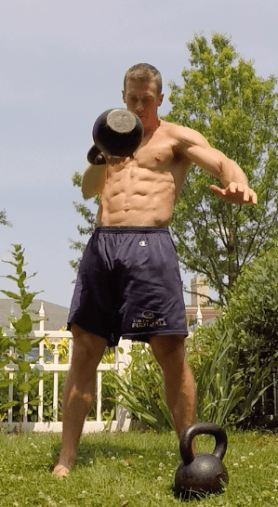
No words. Just photos. Here is the kettlebell snatch explained through pictures.
Cheers to the kettlebell snatch…
Kyle

In the gym, accelerating the process of fat loss is simple.
But, like anything unfamiliar, how to go about achieving fat loss can be confusing from the outside looking in.
What exercises should I choose? How many sets/reps of each? How much weight should I use? How many days per week? How long should the workout last?
These are all great questions. If you’re asking them, you’re on the right track.
In the gym, maximum metabolic disruption is the name of the game.
In 30-45 minutes, you should be able to train nearly every muscle, priming it for fat loss and lean muscle layering.
Do more work in less time to create a global training effect.
In some cases, you may do more work in the same amount of time, which is still a form of progress.
In a way, I tricked you into reading this article by including “best exercises” in the title.
For that, I sincerely apologize. But to be honest, saying one exercise is going to magically burn all the fat off your body is a complete lie.
One exercise won’t do it.
What we could say is some exercises are a much better choice for fat loss, and even going a bit further we could say the combination of several exercises in a workout session will give your body the best opportunity to eliminate unwanted fat.
Generally speaking, multi-joint compound exercises get more muscles working together are better than isolated exercises which have only one joint moving and fewer muscles.
Important thought: The best fast loss exercises are also the best exercises for almost any fitness goal.
Just as no single exercise is going to melt fat from your body, no single workout is going to burn all of the fat off your body.
A series of smart workouts will accelerate the fat loss process.
It’s all about creating a training effect.
There are a few time-tested methods to jumpstart the fat burning process:
“High” is going to vary from person to person. What may be “high” for me might be too high for you, or vice versa. Instead, I choose to refer to interval training as “high(er)”.
For the purposes of this article, let’s refer to high intensity interval training as cardio dominant activities where you exert at intensities that causes your body to go into oxygen debt during the intense work sets.
This type a training has a precise work:rest format that can be monitored by time or a heart rate monitor (beats per minute).
Rowing, biking, running are amazing activities for interval training which have a higher emphasis on cardio conditioning.
Resistance training with BIG movements like squats, swings, pressing and pulling increases the thermic effect of activity (calories burned during exercise) and metabolic rate. Resistance training also builds lean muscle which requires more energy to maintain and repair post-workout than fat tissue.
At risk of sound cliché, ground-based movement is the new kid on the block. It’s a brilliant paradigm shift in how practice fitness, building movement capacity and improving strength and cardio.
Ground-based movement is a very broad description for low position drills like crawling, rolling, bounding, hand balancing, yoga, etc. Much of the modern ground-based movement training has been led by Ido Portal and Mike Fitch (creator of Animal Flow).
The more inefficient you are at an exercise or series of exercises, the harder your body has to work to complete those exercises. Muscles fatigue faster and more energy (calories) is expended doing the work.
*** If you’re going to leverage inefficient exercise, make sure you have some kind of prior background experience with that exercise. Don’t jump into a set of kettlebell swings midway through a workout if you’ve never swung a kettlebell. This poses a high potential risk of injury. Not worth it.
Instead, re-visit exercises you haven’t included in your training sessions for a while. You’ll still know how to execute exercise technique, but your body will have lost it’s efficiency.
[No fat loss article would be complete without giving a head nod to importance of nutrition. Creating a caloric deficit, eating mostly plants with adequate amounts of protein and hydration with low/zero calorie beverages (aka: water) is in fact the magic behind much of losing body fat.
Keeping calorie expenditure higher than calorie intake, along with choosing nutrient-dense foods and beverages that will sustain your activity level and nourish your body post-exercise is the path to fat loss.]
Progressive Overload is a foundational principle to all movement training.
To help decide the appropriate amount of progressive overload needed for each exercise (and shape the structure of your workouts) it is important to establish a baseline of your movement capacity.
A baseline fitness test gives you information (however painful of a reality it might be) on where you are starting from, so a plan can be organized to make future progress.
A baseline fitness test can be very simple:
Once you’ve got a baseline, you can pinpoint not only the exercises, but sets and reps, time under tension, rounds, rest periods and duration.
Burpees are a logical choice for this list because they are a bodyweight exercise, which means you can do them anywhere and anytime.
Workout challenge: How fast can you complete 100 burpees?
I’d bet a lot of fat loss articles don’t include crawling as a valid form of exercise to burn fat, but it is.
Basic crawling variations like the bear, ape and crab are examples of beginner locomotion drills that will challenge your core and upper body endurance like little else.
Ground-based bodyweight workout programs like Animal Flow are built animal-based exercises, designed to reconnect your body’s natural ability to navigate movement on the floor.
Even if you’re tight on space, find a way to include crawling in your next workout. Over time, you’ll notice crawling more consistently will do wonders for increasing shoulder health, upper extremity endurance and integrated core control.
If you want to dive into the world of ground-based movement, check out Animal Flow.
Workout challenge: Bear crawling work capacity (4 rounds)
Turkish Get-Ups (TGU’s) is a layered approach to moving from lying flat on your back to
Go from lying on your back to standing as efficiently as possible… with weight in your hand. In slang terms, this what a turkish get-up accomplishes.
Inside of a turkish get-up, you’ve got many exercises: cross-body diagonal abdominal crunches, static overhead weighted holds, lunges, windmills, hip lifts.
A turkish get up is a movement sequence with many layers, all of which can be practiced on their own to enhance your TGU proficiency.
Workout Challenge: Complete 10 minutes of Turkish Get-Ups (continuous)
Even 1-2 minutes of aggressive snatches will leave you gasping. The design of the kettlebell and the exercise technique of the snatch allows for a natural flow from rep to rep.
Personally, I’ve rarely seen my heart rate climb as high as it does when snatching a kettlebell.
This means a large amount of work can be done in a short amount of time.
Workout Challenge: Secret Service Snatch Test (SSST)
Squat and press, squat and press, squat and press.
“Thrusters” are the combination of a squat and an overhead press. Fusing squats and presses together creates a massive training stimulus. Thrusters are pure work, which no real-time to rest between each repetition.
Thrusters can be performed using a variety of training tools: kettlebells, barbells, sandbags or dumbbells. All provide a slightly different look at the same exercise.
Workout Challenge: Every minute on the minute for 10 minutes, complete 10 thrusters.
Similar to kettlebell snatches, there is a tremendous amount of muscle tension throughout the entire arc range of motion in a kettlebell swing. Speed of repetition and muscles engagement create a training effect unlike any other fitness tool. When the hips get involved in an exercise, it usually means a global training effect.
Workout Challenge: Complete 15 sec swings, 15 sec rest for 24 rounds (12 minutes)
Mix up how you hold the sandbag when squatting. Bear hug, front rack, underarm hook and shouldering will challenge your body in very different ways.
Workout Challenge: Descending Sandbag Squats
Exercise regression is the path to your first chin-up/pull-ups and exercise progression is the path to building on that achievement. If you can’t yet execute a full range of motion chin-up/pull-ups, you’ve got a couple effective options: decrease the weight being pulled or practice one phase of the exercise.
Stretch band-assisted chin-ups/pull-ups will decrease the amount of weight you’re required to pull on each repetition, making the exercise more manageable. Wrap the band around the bar overhead, then down around the shin of a flexed knee or way down around your foot.
If don’t have a stretch band, you can still make gains by practicing one phase of the exercise, the eccentric or lowering phase. Start at the top of the chin-up/pull-up and lower yourself to the bottom as slowly as possible. Eccentrics are well-known for producing muscle soreness, you’ve been warned.
Workout Challenge: Perform a 1-Minute Chin-Up
Push-ups are my choice for best upper body pushing exercise. Pressing exercises can be split up into two categories: vertical and horizontal. Vertical pushing extends the arms overhead and horizontal pushing extends the arms out in front of the body.
Push-ups can be done anywhere, anytime with no equipment. The variations are seemingly limitless. The basic traditional push-up is a fantastic choice for metabolic workouts, as it requires little thought and set-up, yet worthy training stimulus to the core and pushing muscles of the upper body.
Workout Challenge: Perform 15 push-ups every minute on the minute for 10 minutes (150 total reps)
Lunging is unique because it has many variations. You could lunge front to back, side to side, rotationally, explosively, moving across a distance, on an incline or decline, or stationary if space is limited.
Adding external weight to a lunge will challenge the core and grip muscles. External weight could be placed in several positions: arms hanging at the sides, chest height in a racked position, arms extended overhead, resting on the shoulders or varied (one arm hanging down, the other supporting weight overhead)
If you want to go hands-free and make lunging more natural, a weight vest is a great option.
Being able to lunge successfully becomes more important as we age, to preserve and extend quality of life. Most times we get up off the floor into a standing position, we are essentially performing a variation of a lunge.
Splitting your stance (not to be mis-read as “splitting your pants”) reduces the width of your base of support which increases the instability. L
Generally speaking, if you want to make a lower body exercise more challenging without adding weight, here is how you do it:
Option 1: Narrow the distance of base of support (squats)
Option 2: Stagger the base of support (lunge)
Option 3: Stagger AND narrow the base of support (inline lunge)
Option 4: Partial support (rear foot elevated split squats)
Option 5: Unsupported Single leg base of support (single leg deadliest or pistol squat)
I know option 4 and 5 are not technically a lunges, but the point was to lay out a nice progression to follow.
Workout Challenge: How far/long can you lunge walk with 15 lbs (females) or 30lb (males) in each hand?
Rowing while supporting yourself in a high plank position is a humbling experience, particularly for your core muscles. Dragon flags and toe-to-bar are hyped as being incredible core strength builders, but high plank rows may make you rethink core training altogether.
Alternate each arm while rowing. For added challenge, pause the motion when the hand reaches your side, lower slowly. The body tension needed to perform this drill is incredible. You’ve got to be rigid from head to heel, front side and back side.
Workout Challenge: Perform 20 repetitions of high plank rows on each arm.
Most of the challenges require less than 15 minutes of your time, and will be a good eye opener to the possibilities. The workout challenges can also serve as baseline numbers to assess progress down the road.
The training options are only limited by your creativity.
Now you can mix and match these 10 exercise to create effective workouts.
Choose one exercise from each of the following movement patterns:
Hybrid movements like burpees or thrusters combine several movement patterns into one exercise, compounding the amount of work being performed. Most people will find hybrid exercises like thrusters to exhaust the body much quicker than if you performed a set of squats and overhead presses on their own.
Play around with reps. Vary them high, very them low. Generally, anywhere from 8-15 reps will provide a good training effect.
Personally, I prefer keeping the reps on the lower side so I can increase the amount of weight for each exercise. I have found the training effect to be profound with lower reps and higher loads.
Rounds are the cycles through each exercise and reps per exercise.
Generally speaking, a great workout at the right intensity should go anywhere from 4-8 rounds, rarely more.
If you’re able to push passed 8 rounds with ease, it’s probably time to increase the weight used or the complexity of the movement.
Again, this will vary depending on fitness level. However, 30-75 seconds is a good target amount of rest between working sets. As your body adapts to the stress, you’ll find it’s necessary to decrease the rest in order to keep progressing.
In tough workouts it might not feel like it, but the human body is brilliantly designed to adapt to physical stresses.
You train and break down, you recover, regenerate and grow.
Here’s another idea for resting between each round, descending rest periods.
For example:
Round 1: Rest 25 seconds
Round 2: Rest 35 seconds
Round 3: Rest 45 seconds
Round 4: Rest 55 seconds
Round 5: Rest 65 seconds
Round 6: Rest 75 seconds
Using this rest period structure, you’re challenging yourself harder on the front end of the workout since rest is far shorter but the work remains the same. As you progress through the rounds, your rest periods lengthen to accommodate the accumulating fatigue.
Don’t read this and forget about it. Read it, write it down and do it today or tonight.
You have everything you need to organize several of these exercises into a workout conducive for burning fat.
Don’t over think it. Choose exercises for each of exercises, 1-5 above and you’ve just designed a workout to torch fat.
Cheers to your workout…
Kyle


The Secret Service Snatch Test, which I’ll refer to as the SSST (so I don’t have to keep spelling it out) is a brutal workout.
More of a test of will power, really.
The SSST is a test of how many snatch reps can be accumulated inside of a 10 minute time limit usig a 24kg (53lb) kettlebell.
That’s it.
Set the timer for 10 minutes… and go.
Achieving your best finish in the SSST will require a combination of:
The courage aspect of conditioning tests like this is a huge determining factor of your score.
Are you able to center yourself, refocus your thoughts when the fatigue and discomfort pile on?
When I say “discomfort”, I’m primarily referring to the hand discomfort.
The micro motion between the palm of the hand and kettlebell handle gets worse sensitive as the minutes pass by.
Chalk helps, but only to a point. The more you stop to re-chalk the hands, the more time you’re losing where snatch reps could be completed.
Some people will crack because of the fatigue. Hitting 200+ snatch reps in such a short timeframe is aggressive.
There’s little… wait… likely no rest to be taken.
For those who have tested their conditioning in competition or periodicially in a training cycle, you know what redlining your engine’s capacity feels like.
Achieving a personal best with the SSST is going to require redlining.
If you’ve been wondering how to remove built up hand callouses, you’ve come to the right place. The SSST will remove skin in less than 5 minutes or your money back.
From a hand care standpoint, this isn’t a workout you’d want to try that frequently. Probably not even monthly. Testing your toughness 2-3 times per year is probably more than enough.
When I was really heavy into kettlebell training, I was testing my SSST 2-3 times per year at very sporadic times.
It’s not like you’re going to wake up and feel the desire to snatch hardcore for 10 minutes. I’d pick a day, maybe 7-10 days out where I knew I would be giving the SSST another attempt. Then I’d section off 1-2 days after for rest, recovery and hand caudling.
Best case scenario, you’ll have some juicy blisters on both hands. Worst case scenario, you can expect to rip plenty of skin.
This attempt shows approximately 238 repetitions. I say “roughly” because counting slow to 238 can cause your eyes to play tricks on you. So if you have 10 minutes to spare to watch the video, feel free to call me out if I did less or throw me a bone if I did more.
It’s an “approximation” because I’m too lazy to keep double checking the reps. Counting to 238 across 10 minutes is something I don’t have the attention span to do 3-4 times.
Some of the top dogs in the kettlebell community are snatching get around 270+ reps, documented through video.
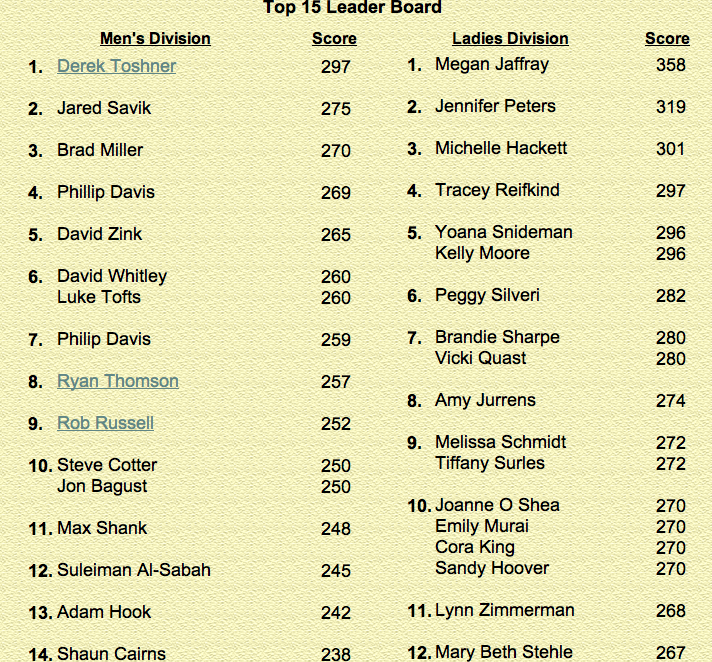
If you want to paste your name amongst the leaders, film it. It’s important to document your performance with un-edited video. No one cares about word of mouth reporting. Prove it.
In the early minutes of the test, I typically aim for 10 snatches per arm before switching.
Honestly, this is for counting reasons only. After watching the video, I start miscounting the number of snatches per arm pretty quickly.
The biggest mistake in this attempt was taking a break. It’s obvious why. When you’re timing and aiming for most reps, taking a break doesn’t help anything.
A combination of boiled over physical stress and mental conflict led me to resting for a brief time. Getting to the root of the why I stepped away, it’s purely mental. My body could have tolerated the pain, my mind talked me stopping.
Based on tempo, I’m guessing it cost me 5-10 reps at least.
It get’s hard to get your thoughts in order during a conditioning test like this. The mental governor is begging you to quit, your hands are pleading you to quit.
I could feel the skin loosening up, blisters forming and eventually the ripping on my hands towards the end. The impact of this impacted my outcome.
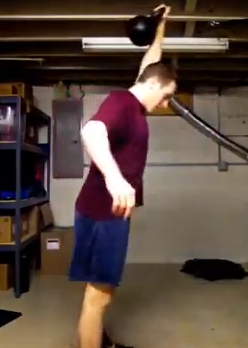
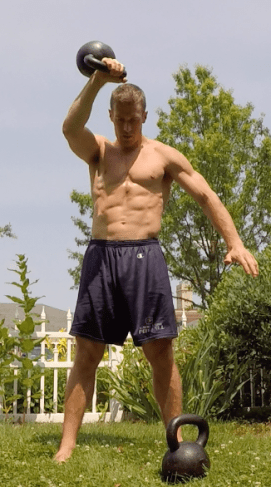
My posture at the top of the snatch is not great.
But, I’m going to cut myself some slack on this because the ceiling in my basement is exactly 7 feet 4 inches high at the lowest point of the trusses. When snatching indoors, I make sure I’m locking out in between the beams, just in case.
My personal decision to green light kettlebell snatches in my basement at this ceiling height were made based on snatch technique. The kettlebell turns over the hand prior to reaching full shoulder extension which the highest my hand will be.
Check out this post for a freeze frame depiction of the snatch.
My worst fear is bouncing the kettlebell off the trusses and losing control. Lord knows what comes next, but I have an idea.
The fatigue is so high during an SSST, it wouldn’t be good.
The forward body lean is a counterbalance to the kettlebell, but I also think it’s a precautionary measure to avoid impact with the ceiling. The kettlebell is not traveling straight up and down, it’s traveling in an arc.
Counterbalance like this is because the kettlebell is not traveling straight up and down, it’s traveling in a subtle arc.
I’m counterbalancing to avoid being thrown backward. On the downward descent, a slow motion video or a keen eye at full speed should show an opposite reaction, where I’m leaning back slightly as a counterbalance.
The obvious: Later in the SSST, technique erodes to ugliness and it’s survival time.
I accept the risk in this.
BODY FATIGUE IS A TECHNIQUE KILLER.
If you’re training MetCon, you must be able to look yourself in the mirror and accept the risk of doing so.
To my knowledge, it hasn’t been directly pinpointed in studies but injuries become more predictable as fatigue alters the control you have over your movement.
Performing a box jump when 100% fresh is a lot different than the same box jump after you’ve done 25 thrusters and a 500-meter row.
Plain and simple. If you accept the risk of your actions, then you’re taking ownership for the injury.
Decreasing the number of times I switch hands with the kettlebell would get me more reps. Every hand transition is essentially a lost repetition to the final tally and wasted energy in doing so.
If I was working longer sets per arm before switching, say 15-20 reps, I could gain an additional 10-15 snatches across the 10 minutes.
Years ago, the first time I attempted the SSST, I was hovering around 180-185 reps.
Kettlebell training was relatively new, snatch technique wasn’t as great and I was unfamiliar the demands of 10 minutes of torture.
The repetitions gained is progress. Progress is always the goal, no matter how small or large. A step forward is a step in the right direction.
Make sure you subscribe to my YouTube channel, where I detail the kettlebell snatch along with many other exercises discussed on this blog.
Cheers to The Secret Service Snatch Test,
Kyle

