Crawling exercises can be rehabilitative, restorative or performance-enhancing, which is pretty cool.
I say again, crawling on the floor, without any equipment, like a baby, can serve to heal and make you stronger.
Wild.
Crawling exercises deliver a plethora of benefits, including:
- Improving reflexive strength
- Brain stimulation (activate and stimulate)
- Integrating:
- Vestibular system (balance system)
- Proprioceptive system (self awareness in space system)
- Visual system
- Connects shoulders and hips using contra-lateral movement (opposite limb movement)
- Central nervous system reset (lower stress, recovery, etc)
- Great carry over to real world tasks
- Interesting, fun, challenging, a breath of fresh air
Obviously, I’m a fan of crawling during workouts and I think you’ll find a ton of value in it too.
Plus, it’s interesting, fun, challenging.
Bear Walk, Forward/Backward Crawl, Lizard Crawl
This article was created to share 3 of the best crawling exercises for any fitness level:
1) Bear Walk
2) Forward/Backward Crawl
3) Lizard Crawl
As you scroll through each of these exercises, take notice of the change in body position during each exercise.
In particular, the shoulders/chest/hips in relation to the floor.
Body position changes a lot with these exercises.
Bear Walk
The Bear Walk is a sem-inverted position that will challenge hand and foot coordination, hip flexibility, and shoulder strength.
During the Bear Walk, your body is working to control twisting and bending forces from your arms and legs.
Practiced regularly, bear walks can improve rotator cuff, scapular and spinal strength, along with positively impacting hamstring and calf flexibility.
Notice, this variation of the Bear Walk involves keeping the hips high and the arm/knees straight.
Wait, why is this referred to as a “walk” and not a “crawl”.
No clue.
Exercise names can be confusing.
If I were to name it, I’d call it “Downward Walking Dog”.
From a difficulty standpoint, Bear Walks are the most forgiving exercise to learn on this list.
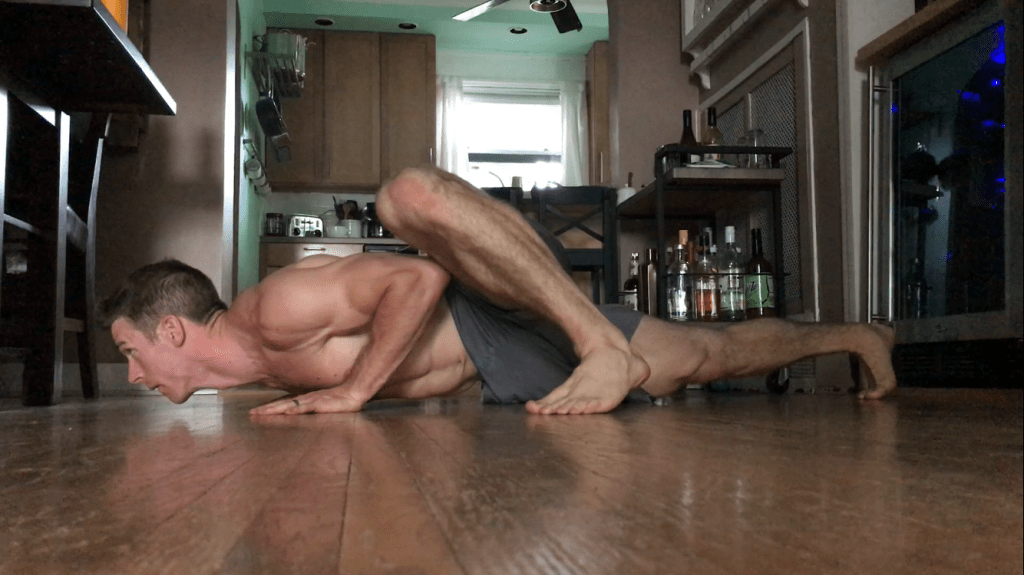
Forward/Backward Crawl
Forward and backward crawling is awesome for challenging the arms/shoulders, core and hips.
This crawling variation is excellent for improving reflexive strength.
My self-coaching cues for this exercise are simple… keep the spine parallel to the floor, avoid excessive movement through the torso while moving, quiet hand/foot contacts.
Another great cue is to “Imagine balancing a glass of water on your back. Don’t spill a drop”.
Better yet, place a shoe or a yoga block on your backside and balance that sucker for the duration of the crawl. That’ll keep you honest.
Or a wood dowel if you’re looking for insane honesty with this crawl.
As with any crawling pattern, move slow for greater benefit.
Slow movement requires more fine motor skill and the time under tension will creep up on you.
Animal Flow 2.0 refers to this pattern as “Beast”, and is where I first learned my technique cues.
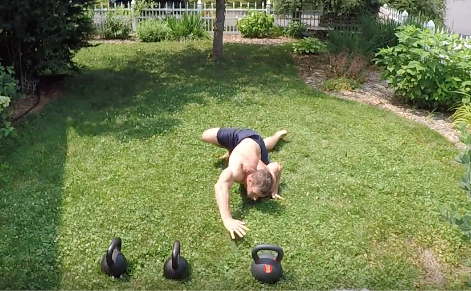
Lizard Crawl
The lizard crawl is a low-to-ground locomotion pattern that seriously challenge scapular mobility and stabilization, core control and hip mobility.
Lizard Crawl is a SUPER challenging patterns for the muscles. It takes your breath away when you’re first adapting to the demands.
Notice the how low my shoulders, torso and hips stay in relation to the ground.
I’m hovering 1-2 inches above the floor as I move forward.
Staying low makes this exercise extremely demanding for the muscles since you’re in a disadvantaged position.
First timers to lizard crawling will feel this in the days after. You’ll be sore.
This pattern is more similar to true resistance training compared to the Bear Walk and Forward/Backward Crawl described above.
Over the years I’ve substituted the lizard crawl in place of push-ups and other pressing exercises in workouts.
12 to 15 feet is all you will need to get a great stimulus. Practice each work set with focus, soft hand and foot contacts, moving the limbs with control.
Be sure to rest plenty in between effort, as this crawling pattern is more like resistance training.
Movement20XX (Vahva Fitness) does an excellent job describing lead-in exercises to the Bear Walk and the Lizard Crawl, leading up to mastery. The progressive design of Movement20XX program was a real draw for me.
“How to organize crawling in workouts?”
You cannot screw this up. Seriously. There is no right or wrong way to practice crawling in a workout.
If you’re a beginner, I would suggest practicing each of these crawling patterns while you are fresh.
Either as part of the warm-up or just after the warm-up, but get your crawling in before any resistance training or higher intensity exercise.
Practicing new exercises is best done FRESH, not fatigued. You can test yourself while under fatigue down the road.
Once you’re at the intermediate or advanced stage, you can get a little bit more creative with where you place crawling exercises in the workout.
Personally, I like to use crawling as an element of movement sequences, long duration movement flow, or as part of a conditioning circuit.
Try this simple combination:
Because crawling is bodyweight-based, it pairs up extremely well with equipment such as kettlebells and barbell work.
Crawling for Time or Distance
Each of these crawls can be performed for a set distance or time.
I’ve tried both options, and they both work really well.
For distance, 15-20 feet of slow tempo, technique focused crawling is plenty for a beginner.
I’m talking about a single set of 15-20 feet, then taking rest. Usually, rest periods should last 1.5-2x the time spent crawling.
Personally, I like to set a timer and crawl until it sounds. This way I can stay focused on my movement, instead of speculating how far I’ve crawled.
For a beginner, 3-5 sets of 30-40 seconds of continuous crawling is enough time to elicit a great training effect.
Intermediate/advanced trainees will likely need to increase the time and play around with slowing down the tempo, toying with other variations, etc.
Crawl for 5 minutes straight. 🤷♂️
New to ground based movement exercises?
Start adding ground based movements to your workouts, immediately.
Don’t wait.
Most folks simply aren’t used to doing movements like these on a regular basis.
In fact, crawling and other ground-based movements are a rarity in most workout routines.
To improve your coordination, mechanics and skill with anyone of these crawling patterns, it’s often a matter of practice and consistency.