Here’s why Turkish Get-Ups are one of the best kettlebell exercises:
Build coordination and spatial awareness
Train rolling patterns and cross-lateralization
Improves other lifts
Enhance shoulder mobility/stability
Promote upper and lower body stability
Adds lean muscle to the body in a functional way
Develop upper, lower, and trunk strength
Endless combinations, variations, and workouts
It can be used for a cardio training effect
Turkish Get-Ups are one of the best kettlebell exercises a person can learn, train, and progress. Turkish Get-Ups demonstrate integrated total body strength, stability/mobility, and control.
Kettlebell swings, snatches, and cleans are explosive exercises. These movements are ballistic and demand force production for maximum benefit. Turkish Get-Ups are on the other side of the spectrum. They’re a slow and controlled grind.
The following movements are woven into every repetition of Turkish Get Up:
Core rolling patterns
Windmill
Hip lift
Lunge
Dynamic shoulder stability (holding the kettlebell anterior, vertical, etc.)
In future posts, I’ll share variations that add other exercises to create a different training effect and challenge. Every segment of the Turkish Get-Ups allows an opportunity to add an exercise or tweak. The options are limitless.
The unique part of Turkish Get-Ups is the mirror effect of the exercise. The movement actions performed in the first half of the exercise are mirrored and reversed, returning to the floor. Therefore, you’re training the concentric and eccentric phases of each movement.
Learning, practicing, and building strength and work capacity with Turkish Get-Ups are worth your time. Over time (and with attention to essential factors like diet, hydration, sleep, etc.) Turkish Get-Ups can play a influential role in improving body composition (losing fat and building functional muscle), strength, coordination, and control.
Cossack Squats are single leg loaded exercise (mostly) that require a fair amount of mobility and strength.
Cossack Squats can be used as a warm up or a strength exercise depending on your preference. I use them both ways. Bodyweight-only reps during the warm-up is a nice way to grease up the hips before lifting. Adding weight increases the difficulty and will build strength.
The internets love to bicker about exercise technique, and Cossack Squat technique is no exception.
Here’s my two cents on body position of a Cossack Squat:
Outside shoulder-width stance (get the feet wide!)
Glute drops down INSIDE the working knee and foot
Chest tall, head up!
Foot stays flat on the floor for as long as possible (before going onto the heel)
Tar and feather me.
The front view of the working leg is in a similar position as a bilateral squat.
Adding Weight to Cossack Squats
Weight can be added to Cossack Squats exactly as you would any other exercise.
The opening video was to showed how to go about doing this.
After the bodyweight repetition, the weighted Cossack Squat incorporated using 12kg kettlebell.
From there, the load increased by roughly 4kg in each video clip. I finish the video using a front racked double 24kg kettlebell repetition.
If I were to go beyond 106lbs of added load, I’d take the following approach:
60lb weight vest + 24kg kettlebell
Loaded barbell (back squat or front racked position)
My loading options are based on the equipment I have available in my home gym. Use what you have!
The good news? Weight is weight. The body doesn’t care what you’re using for added weight.
To give you an idea on how to hold the barbell, check out this lower body mobility flow.
Swipe left for the full flow (and subscribe to my Instagram while you’re at it 😉)
The barbell rests on the shoulders while the lower body performs the work.
Bailing Out of a Rep
If you’re adding external load to any exercise, it’s important to know the “outs” should you need to bail on a difficult rep.
You can easily “ditch” a kettlebell being held in the goblet position. Just give it a little push forward and drop it on the floor. Make sure the floor you’re training on can handle the impact!
Using a barbell supported on the shoulders or in the front racked position, you’ll perform a similar maneuver. If the barbell is on the shoulders, allow the barbell to roll off of the shoulders while you move forward away from it. Using a front racked position, have the barbell roll forward and give it a little shove in the same direction as you move away from it backward.
You never know.
Alternatives to load the Cossack Squat
A heavier sandbag being held bear hug style increases the difficulty 10x. Bear hug sandbag exercises increase the difficulty of most exercises.
In general, heavy sandbag training is a brutally effective strength builder because you’re fighting to hold onto the sandbag as much as you are grinding through the lift.
Dumbbells can be used in the goblet style position. Palms together, one of the dumbbell resting on the hands. It’s a very comfortable position and a great way to add weight to the exercise.
Why practice Cossack Squats?
Expanding your arsenal of squatting variations will only help to make you a more skilled mover in daily life. The more control you have over movements and body positions, the more you’ll tap into those movements whenever you need them.
The more important Cossack Squat rep I’ll ever do. 👶
When you own a movement, you’ll use it. If you don’t, you’ll avoid it.
I use a bottom-up Cossack Squat variation almost daily with my kids. I’ll be playing with them on the floor and when it’s time to stand up, I grab them and WHAMMO! Cossack squat. It’s become an efficient and effective maneuver.
The more movements you own, the more freedom of movement you have.
This is hard for some folks to grasp, but trust me, it’s a really liberating pursuit and well worth your time. Especially as you get older. Preserving movement capacity as you age will keep you doing the things you love for longer.
Few things are more powerful.
Consistent practice will improve your Cossack Squat technique. Don’t expect to drop your ass to the floor on the first rep. Lowering to parallel might be difficult.
Start with a modified range of motion, or possibly assistance lowering down using a door, chair, couch, etc. Take note of where you feel tight, where body position begins to degrade, etc.
On each rep, move yourself through the largest range of motion that allows for sound technique.
Gotta start somewhere.
Mobility Training Accelerates the Process
In addition to practicing the Cossack Squat exercise, adding mobility exercises will strengthen and improve control in your hips and other joints that contribute to the exercise.
Hip articulation drills like CARs and internal and external work from the 90/90 position will further building strength and control that accelerates the achievement of exercises.
Mobility training is not promoted nearly enough. And when it is, it’s by trainers spitting jargon that most people cannot translate into “What’s in it for me?”
You don’t have to commit the entire workout to mobility drills, just a portion.
Adding 10-15 minutes of mobility focused exercises most days of the week will do wonders over time. I’m living proof of what micro-dosing mobility work will do. I rarely ever train mobility longer than 15 minutes in a workout.
At risk of sounding like a broken record, taking steps to improve active range of motion, strength and control improves EVERYTHING movement-wise. Including learning how to do new movements.
For me, mobility training makes new movement patterns feel like I’ve been there before. It decreases the learning curve. When you’re grooving new exercises, that’s a great thing.
MyDailyMobility is a follow-along mobility program I highly recommend for quality coaching in an easy-to-follow format.
Muscle Soreness to be Expected
Any new exercise has the potential to make you sore afterward.
It’s neither good nor bad, but a sign you did something you haven’t done before.
If this is your first time trying Cossack Squats, you can expect to be sore.
The muscles used might be getting stimulus they haven’t experienced before.
Here’s the rep scheme I went with for the Macebell exercises:
360 Swings x 10 per side
Gravediggers x 5 per side
I didn’t want to have type out the reps for each round, it’d be redundant.
Reps can and probably should vary from person to person. This will depend on your familiarity with the exercise, macebells and current fitness level.
Also, I do use specific equipment in this workout. Suspension trainer, barbell and landmine trainer. You don’t need this exact equipmetn to participate. Leave a comment below and I can help with substitutions.
Round 1 – Macebell 360 Swings + Push Ups
Round 1 of this workout kicks things off with a bang: 360 swings and push-ups.
10 reps of push-ups.
Keep each burst of exercise brief, constantly alternating between exercises.
Push-ups, are undefeated for building upper body pushing strength and muscle mass.
Many people stop exploring push-ups at the basic 2-arm variations. Progressing into single arm push-ups builds pushing strength, core stability and total body tension.
Gravediggers are the gym version of exaggerated shoveling. You’re “scooping” the macebell from low to high, up and overhead. While shoveling dirt, you’d never do this, but the gym isn’t the back yard.
Inverted rows are one of my favorite horizontal upper body pulling exercises. They’re resourceful, demand total body tension and can effectively balance out the pushing in one’s workouts.
Gravity creates the resistance. I stuck with bodyweight loading for this workout, but feel free to add or decrease weight to tailor the difficulty to you.
Round 4 – Gravedigger + Landmine Grapplers
Round 4… time to toss the barbell.
8 reps of landmine grapplers per side.
Landmine grapplers are a side to side, midline crossing exercise, and one of my favorite landmine exercises ever.
The landmine apparatus creates a whole new dimension of exercises and training options. I highly recommend looking into getting one if you’re curious. Great piece of equipment.
Round 5 – Macebell Swings + Deadlift
Round 5… deadlifts?
6 reps of traditional barbell deadlifts.
Yes, pre-fatigued, sub-maximal barbell deadlifts in round 5.
I’ll take the walk of shame. Shame…. shame… shame…
Know thyself, worry about thyself, not your neighbor. I know that I can handle 225lb barbell deadlifts x 6 reps handedly while under fatigue. Can you? If the answer is no, dial it back, use a kettlebell or consider an exercise like hip thrusts for this round.
8 reps of modified dragon flags and 6 reps of Pallof Press.
Modified dragon flag:
I used my sexy new Ancore Trainer to add resistance to the Pallof Press. The Ancore Trainer is an amazingly versatile and genius piece of home gym equipment. It’s a functional trainer shrunk down into a portable unit weighing about 5lbs. Attach it to almost anything and start training. Game-changer.
Assuming you don’t have an Ancore Trainer, use resistance bands or a cable machine.
Pallof Press is an anti-rotation core exercise, and a good one. Press the hands out, avoid any rotational deviation. Bring the hands back in.
You thought I was going to skip core exercises? Not a chance.
Summary
30 minutes of movement using the macebell and a variety of other exercises.
Very little rest and lots of work being performed in a relatively short amount of time.
I did this workout on a Saturday, where I knew Sunday was a non-exercise rest day. The volume of macebell 360 swings and gravediggers fried my grip and arms. I actually felt this workout for a few days after.
Any of the exercises can be adjust/modified to suit your space, equipment and know-how.
Leave a question in the comments section and I’ll help you with ANY questions.
The difference between a kettlebell swing and a macebell swing is profound, and damn it, I intend to show you the difference!
Kettlebell swings and macebell swings look nothing alike, although they are both called “swings”.
Both are amazing exercises to include in a workout regimen.
The information below will shed light on the differences between these two great movements.
Kettlebell Swings
Characteristics: Mobile hips, stabile shoulders, front-to-back pendulum/arcing motion, hip hinge (flexion/extension)
Grip for a kettlebell swing involves hands hooked around the handle, side by side. The handle of a kettlebell with be parallel with the floor.
Kettlebell grip
Kettlebell floats nearing the apex of the arc. “Float” meaning the hip snap/drive/extension powers the kettlebell out from between the legs and up the arc, where it has a split second of float (perceived weightlessness) before traveling back down the arc. During the float, you could literally let go of the kettlebell briefly, or at the very least, relax the grip.
Swings have been a staple exercise since they were first introduced to the Western culture back in the early 2000’s.
I use kettlebell swings A LOT. For going on nearly 14 years, kettlebell swings have shown up in my workouts 2-3 days per week, sometimes more or less. I swing using different variations (1-hand and 2-hand), weights, reps and sets.
There are an infinite number of ways to design a workout with kettlebell swings contributing to the session.
Macebell Swings
Characteristics: Stable hips, mobile shoulders, side-to-side circular motion, very little deviation from the standing position (subtle rotation and lateral lean)
Grip for a macebell swing involves stacking the hands near the bottom with fingers wrapped shaft of the macebell.
Macebell Grip
The macebell swing does experience a similar “floating”, but in a different way, and it’s a little harder to describe.
Macebell 360 swings complete a full circle with every repetition. As the head of the mace descends down, your job is to ready the body for what comes next. The head of the mace gets a taste of gravity’s pull as it travels down and across the midline (posterior). The hands grip tight and resist letting go. The mace “floats” after passing through the middle, traveling up the opposite side of the body. It’s brief, but there is a moment where you can ever so relax the body during the float.
Macebell training is still relatively undiscovered by Western culture, and many who do know about it consider it taboo training.
Using my crystal ball, I predict macebell training will experience a very similar rise to popularity. The circular exercises make for an amazing addition to workouts.
The shape and design is what makes the difference with both exercises and the grip.
The risk of losing your grip during kettlebell swings and macebell swings is about the same. Maintaining grip on the shaft of the macebell to be more difficult. As the head of the macebell whips around, the shaft wants to slide out your hands.
I relate it to hanging from a horizontal bar versus hanging from a rope. The vertical position of the rope can wear out the grip and make the hands feel really weak.
Use Both Kettlebell and Macebell Swings for Fitness
Combining both kettlebell swings and macebell swings into the same workout regimen will expand the ballistic movement experience, and build athleticism using different tools and completely different motions.
Here’s a sample workout:
This is one workout example (of thousands) that mix kettlebell and macebell swings with a few other key exercises (squats, push-ups, etc). It’s a density circuit, so you’re setting the timer and getting a ton of work done within a short time frame.
Fitness is about making gradual gains, exploring and expanding outward.
There are a lot of really useful tools to help make gains. Adding equipment like kettlebells and macebells adds variety to your workouts, options, while building new skills and overall health.
By including kettlebell swings and macebell swings in your daily workouts, you’d getting different benefits from both tools.
Be a skilled generalist, you’ll be happier overall.
And for heaven’s sake, explore and stay curious about different modes of exercise!
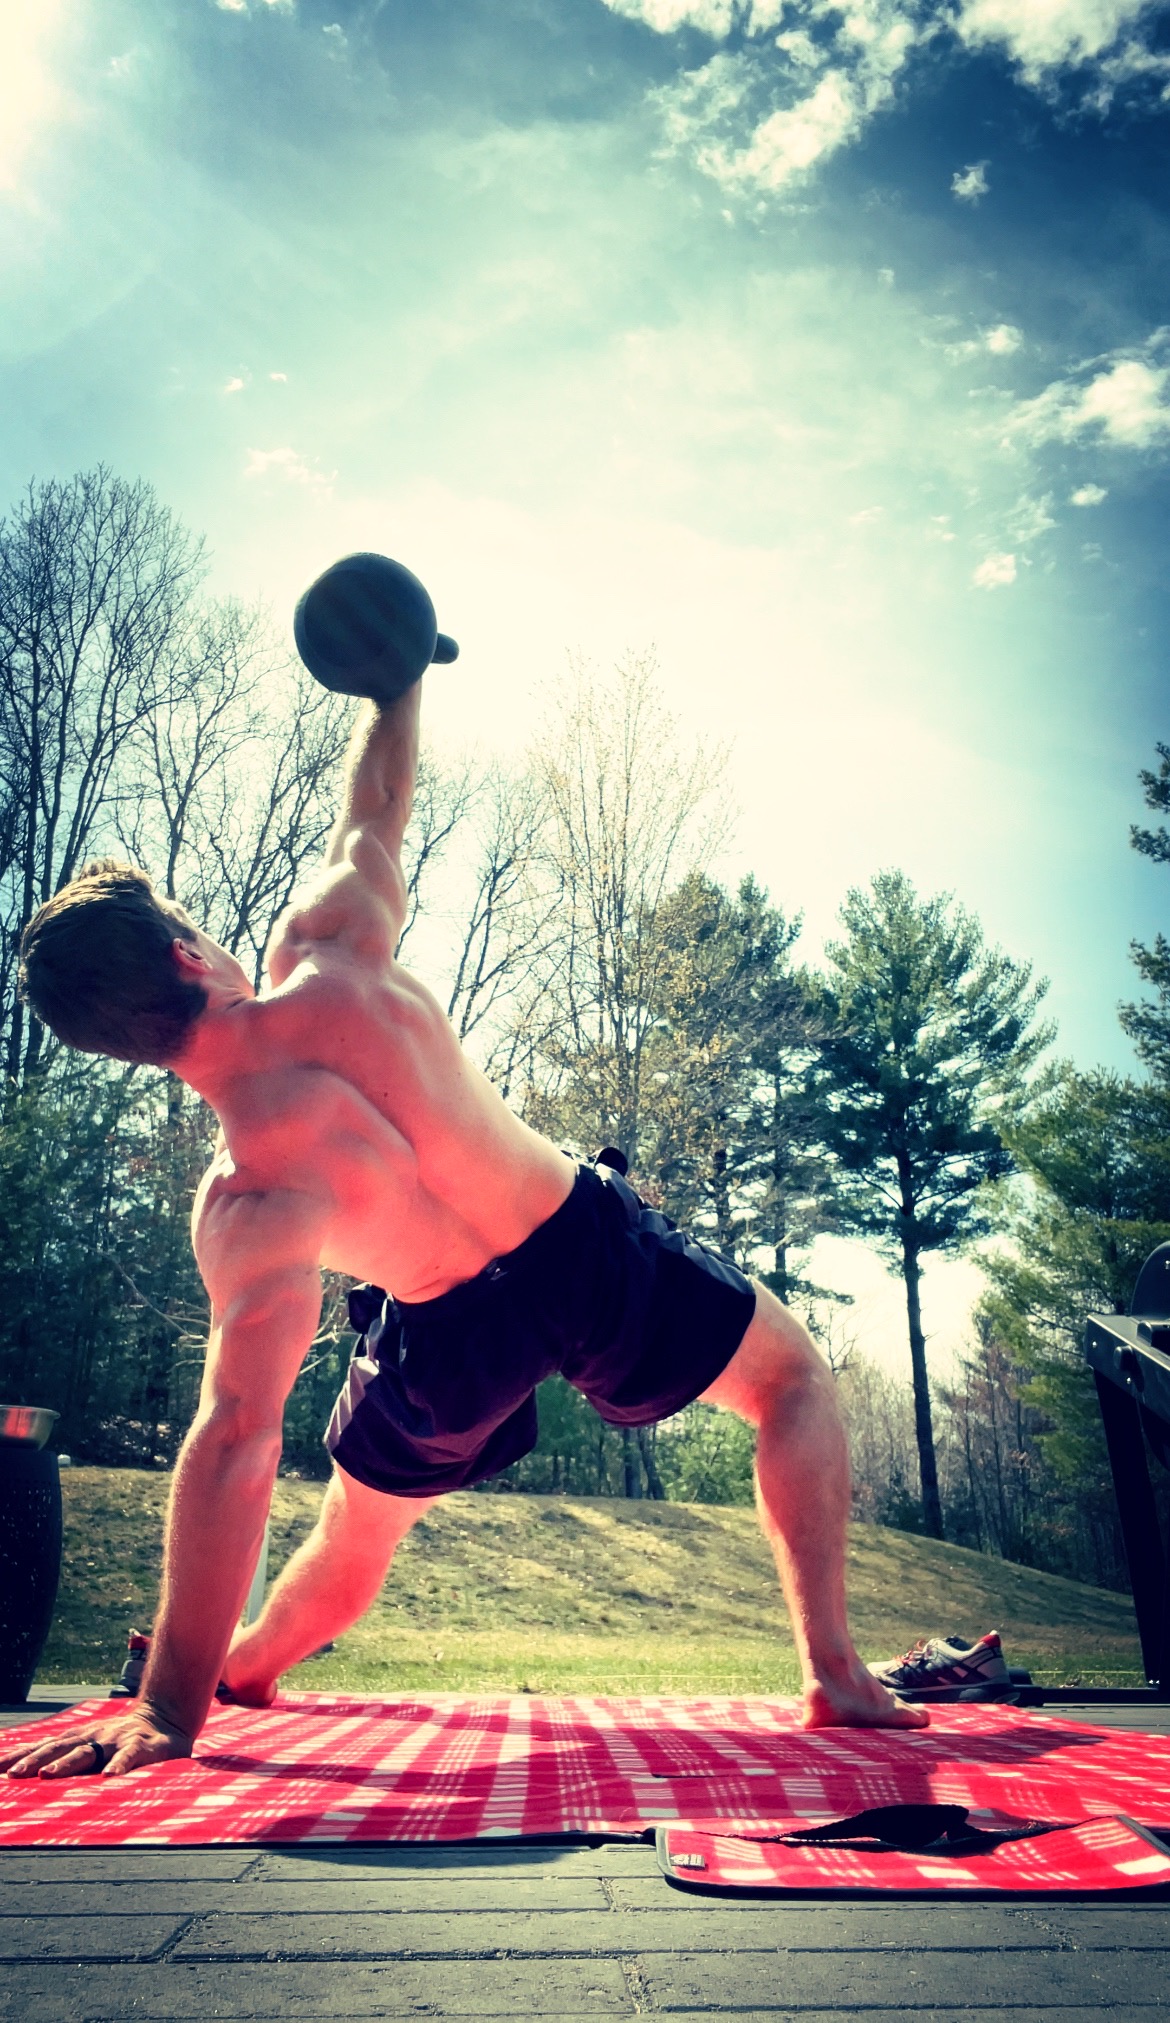
Two exercises, 1 workout. Rowing and Turkish Get Ups.
Today’s workout incorporates my favorite cardio machine, the rower, and an exercise which has become one of my all-time favorite total body strengtheners, Turkish Get Ups.
The rowing machine is a cardio machine that I have a true love-hate relationship with. Rowing provides a tremendous low-impact, high reward workout, regardless of the distance or intensity, therefore I love the training stimulus. I also hate rowing because it sucks my soul out of my body each and every time I use it.
Rowing is hell wonderful.
Turkish Get Ups show up on the Meauxtion blog in a lot of other posts. I love Turkish Get Ups. You should learn to love Turkish Get Ups.
The gist of Turkish Get Ups is to move from a laying position to a standing position, returning to back to the original laying position. While you’re moving, a shoe or weight (kettlebell, dumbbell, etc) is being supported using one arm. The weight starts out over the chest, but eventually ends up vertically overhead.
Turkish Get Ups build tremendous total body movement strength, and are great for reinforcing shoulder stability.
(At the bottom of this post I’ll share a link to other challenging Turkish Get Up variations worth exploring.)
Combining Turkish Get Ups and rowing into the same workout creates a total body training stimulus that is time efficient (30 minutes and you’re toast).
Note: The great part about mixing rowing with Turkish Get Ups is that it fills in a gap. Upper body pulling. Pulling is one motion not included in a traditional Turkish Get Up. One of the main features of rowing is the pulling. Match made in heaven.
Turkish Get Ups tax the legs to some extent, but not horribly. The lunge to stand up and down is the primary lower body movement in a Turkish Get Up (along with lifting the hip lift), and the overall volume of lunges performed is really low. If you’re performing 10 Turkish Get Ups on each side for a workout, that’s 10 reps of lunges per side.
For most people the lunge is not going to be the weakest link in the chain when selecting weight for Turkish Get Ups. The lunge is going to be challenging, especially stabilizing the weight overhead, but a sub-maximal effort. You can likely lunge quite a bit more weight compared to what you’ll use for TGUs (slang for the in-crowd).
Rowing is lower body intense, yet low impact. It’s low impact in comparison to activities like running or jumping rope. Low impact does not means it’s easy. Each stroke requires a big effort from the legs as you unhinge at the waist, extending the knees and hips (along with upper body pull). You’re driving hard with the legs to push away from the flywheel, creating powerful strokes.
Rowing experts might cringe at this statement, but I like to think about rowing strokes as being similar to a repetitive horizontal barbell clean, if such an exercise existed.
Anyways…
The main message is: Turkish Get Ups and rowing make a great pairing for a total body workout, without needing much time.
Cardio and strength in 30 minutes.
The Workout
Set a timer for 15 minutes, start performing Turkish Get Ups, alternating each side. Do not stop until the timer sounds. Of course, grab a drink and towel off the sweat, but keep moving.
Next, hop on the rower. You have a few options with the rowing portion of this workout:
10 sets of 250m distance
6 sets of 500m distance
No matter what distance you choose (or a mix of both) follow a 1:1 work to rest ratio for rest periods. If it takes 1:45min/sec to row 500m, you’re resting the same amount of time before starting the next round. If it takes you 55sec to row 250m, you’re resting 55sec before starting the next round.
Make no mistake, a 1:1 work to rest ratio is intense. Round 1 might easy, but rounds 4-5 definitely will.
Fatigue breaks people in half.
Note: If you need to take more rest in between rounds, you make that call and you take the rest that you need. I am only making the suggestion of 1:1, this is not the law.
Bonus Points: Vitamin D 🌞
Doing this workout outside, under the sun, will earn you bonus points.
Much has been written about the importance of maintaining adequate Vitamin D levels.
I live in Wisconsin. We are a translucent, see-through, pale skinned people coming out of Winter. The first 50+ degree day, we flock outside like it’s Summer. Brats, beer and completely underdressed, yet feeling comfortable and happy.
Warmer temperatures and the sun lifts moods in the Spring.
Moving the workout outside, limiting the clothing you’re wearing to allow the sun exposure to as much skin as possible is a nice little bonus.
Attempting to kill too many birds with one stone can create headaches, but this is a seamless tweak to the workout. Just get outside.
In general, if you can transition a portion or all of your workouts from inside to outside, you have an opportunity to reap the benefits of sunlight and the benefits of exercise.
That’s powerful stuff.
Equipment-wise, Concept2 is my rower of choice. It’s bulletproof and used by Olympians, so it’ll be good enough for the average Joe/Jane.
What I’m about to say regarding kettlebells isn’t completely true, but to some extent, weight is weight. Especially now, with the pandemic decimating most of the fitness equipment inventory, find what you can and buy it. I also have a responsibility to be sensitive to everybody’s financial situation. These kettlebells bridge the gap between cost and quality.
Remember, companies will charge you for shipping weights. So now your $1.50 per pound kettlebell is suddenly $2.75 per pound after shipping. Even heavier kettlebells (up to 70lbs) from Amazon bypass shipping costs with Amazon Prime.
Explore: Turkish Get Up Variations
Earlier in the post, I promised you Turkish Get Up Variations.
Rear foot elevated split squats (often called “Bulgarian Split Squats”) are a time-tested and resourceful exercise that are pure gold for building strong legs.
If you’ve got a stable surface roughly 18” high to prop your rear foot onto for support, you’re good to go.
Rear foot elevated split squats are more difficult (compared to bilateral squats) for two simple reasons:
The front leg is pushing against more weight.
Stability is decreased.
Back leg (rear foot) helps to stabilize, front leg pushes.
Rear foot elevated split squats are a supported squat, whereas pistol squats are an unsupported squat.
Rear foot elevated split squats (RFE-SS) are effective for improving single leg squat strength without requiring access to a bunch of weights or a gym, and while sparing the back.
Rear Foot Elevated Split Squat Technique
The Set-Up
Here’s how to get into a good start position for the rear foot elevated split squat.
TOP of the foot rests on the rear surface, not the ball of the foot.
Hot tips on technique:
Front leg does the work (not the back leg)
Back leg provides as little assistance as possible.
Lower down until the front leg (femur bone) is parallel to the floor.
“Kiss” the rear leg knee cap to the floor.
Drive through the heel/midfoot and EXPLODE back to the top
Head up, gaze 6-8 feet out in front of the working leg.
Inhale and pressurize before descending, exhale driving back to the top.
How many reps/sets/days per week?
3-5 sets of 3-6 repetitions using a challenging weight will provide a great stimulus.
Train this exercise 2 days per week to start, with 1-2 days of rest between each training day.
Put in the work, rest, recover, come back in a few days and attack it again.
Progressive Loading for Rear Foot Elevated Split Squats
Beginners can start with assisted or bodyweight only RFE-SS to acclimate to the demands of loading, balancing and stabilization required to train using a single leg.
Progressing forward from assisted and full bodyweight variations, just add weight.
Whether you’re a beginner, intermediate or advanced, adding weight progressively is the path to making gains.
Adding weight to rear foot elevated split squats using tiny increments is my preferred way to get the most out of the exercise.
It’s hard to argue with the effectiveness and simplicity of progressive loading.
Select a weight that you can control.
A lot of people make the mistake of going too heavy, and technique suffers. Reps should be quality, smooth and free of any compensations.
Start with light weight, perform a few reps. If you need to increase the weight, do it. If not, stay there and execute the reps and sets for the workout.
If you have access to weight equipment, here are a couple of ways to vary the exercise.
Adjust the position of the weight. Weight can be held in the suitcase position, front rack, bearhug, overhead, etc. The suitcase position is straightforward and best for beginners. The higher the weight goes (chest level, over head, etc) the more difficult it becomes to hold position.
A front racked barbell is also a brutal variation. Start light here.
Asymmetrical Loading. Only have 1 dumbbell or kettlebell? Perfect, use it. Hold it on the inside of your foot, outside, front racked position or overhead.
Get creative. Life is one big asymmetric party. Balance is for the birds.
No Equipment to Add Weight?
Beyond adding weight, there are other ways to modify the exercise to increase the challenge.
For people who are training at home or don’t have access to weight equipment, the following tweaks can be made to boost the difficulty.
Vary the tempo (slow down, fast up). Spend 5 seconds lowering to the bottom, pause for 1-2 seconds, explode back up.
Increase the range of motion by elevating the front foot. Even elevating a few inches will increase the range of motion on each repetition. Be careful to avoid elevating the front foot beyond the rear leg/hip flexors capacity to stretch on the way down.
Instability. Place front foot on an unstable surface. A pillow folded in half, BOSU ball, uneven surfaces, etc. Unstable training is not the end all be all, but our bodies should be conditioned to handle uneven terrain in the real world.
Add volume. Adding extra reps and sets is always an option. At some point, additional load will be necessary to keep making strength progress. Keep that in mind.
If you have resistance bands, you can loop the band underneath the front foot and around the shoulders to add resistance to the exercise.
Single Leg Training is Suffering
Single leg work sets are LONG.
Both legs must complete the designated number of reps in each set, the amount of time spent working is TWICE as long.
Finish 6 reps on the right side, switch legs and do 6 more reps on the left side. The work sets are extended.
You’re holding the weights for a lengthy amount of time, grip training is a nice byproduct.
Pure suffering.
The ability to get comfortable suffering is an added benefit to this style of training.
I’m careful not to come across with too aggressive of a hard ass tone on this blog, but holy cow, conditioning your body and mind to embrace discomfort during a workout is a CHARACTER BUILDER that will spill over to other areas of life.
By the numbers, you can get the same training stimulus with RFE-SS using half the weight as a bilateral squat.
If a person can barbell back squat with 300lbs, a RFE-SS can be loaded with a pair of 75lb dumbbells and achieve nearly the exact same training effect.
For those with cranky lower backs, RFE-SS is lower back friendly, assuming you hold weight at the side of the body and avoid going into excessive lumbar extension at the bottom.
I’m not suggesting you avoid stressing the lower back forever, but for those who have previously dealt with cranky back issues, this variation is a nice alternative to build lower body strength while minimizing the chance of re-injury.
“I don’t have access to a bench.”
You don’t need a bench.
What do you have laying around that can be used to set the top of your foot on?
The only reason so many videos exist of people performing rear foot elevated split squats using benches as the support surface, is because most of these videos are being shot inside of gyms.
Benches are a common piece of equipment in gyms and the top surface of a bench is rather soft so it won’t dig into the foot with or without shoes.
I’m big on training without shoes when it makes sense, foot directly in contact with the floor.
For people who exercise at home, the following items can be substituted if a bench isn’t an option:
Chair
Staircase
Sofa
Coffee Table
Suspension Trainer/gymnastics rings
Low plyo box
Toilet
Bar racked at a knee height
Tree stump or log
Literally anything that’s roughly 18 inches high and reasonably stable will work just fine.
The rear foot will, at times, need to apply pressure into surface it’s resting on to help maintain balance throughout the work set.
Dragon squats, lunges and horse stance are great exercises to help improve lower body strength and efficiency.
I went on a pretty solid run of posting lower body drills (dragon squats, curtsy airborne lunge, horse stance, etc) on my Instagram page, so I thought I’d repurpose those posts into a blog.
You can find and follow me at instagram here.
All of these posts depicted bodyweight leg exercises.
I find myself posting more and more bodyweight-based lower body exercises, using no equipment, just progressively challenging body positions/mechanics/timing.
2 years ago, I couldn’t fathom performing a full dragon squat.
I couldn’t even comprehend how my body was going to allow me to drop down to the floor with the hovering leg positioned behind my working leg.
Making progressive gains in mobility and literally feeling your body adapt to positions, stress and range of motion is a crazy experience, but it takes consistency, discipline and reflection.
One day you might feel a million miles from being able to perform an exercise. Fast forward 2 weeks, and you own it.
Lunge training, using ONLY bodyweight and added weight, has become a staple in my workouts over the last 6 months.
Almost daily, I noticed myself using some variation of a lunge pattern to perform basic tasks or play with my kids, and decided to commit to training lunges more regularly.
People sound off about how great the squat is for daily activity, and I’m not saying it isn’t, but the lunge is a workhorse for me.
After becoming a Dad, my reasons for training shifted a bit. Preserving my ability to get up and down from the floor with EASE became a priority.
I started thinking about when I have grandchildren. My life would be fullest if I’m able to maneuver up and down from the floor (where kids dwell in there younger years) without any issues.
The lunge pattern is an excellent way to make a transition from standing to the floor (and vice versa).
I used to dodge like the plague.
In reflection, this avoidance was two-fold:
Discomfort, not being as good at lunges as other exercises.
Perception that single leg squat practice was enough.
The number of times we avoid exercises because we either suck at them or the discomfort is overwhelming is humbling.
Notice in the video above, the number of variations I’m playing around with.
Extended stance, feet close together, knees way out over the toes, lateral lunge, reverse lunge, static hold/pause, rotational lunge, etc.
Lunges don’t have to be a dull experience.
Practice and acclimate to all lunge variations using simple variations first and progressive loading.
I had no clue that this exercise was called the “Curtsy Airborne Lunge”, until I started performing it and felt the need to assign it a name.
The curtsy airborne lunge is a phenomenal exercise regression that can help lead a person into a dragon squat.
Why?
Curtsy Airborne Lunges use similar mechanics. Lowering down, touching the knee cap to the floor on the outside of the working foot looks a lot like the initial lower phase of a dragon squat.
What makes this exercise a regression, is not having to deal with hovering the trailing.
Keeping the trailing leg off the floor during a full Dragon Squat is hard.
You’ll see what I’m referring to in the next video.
In my opinion, cold performance is the only thing that matters beyond competitive athletics.
Pretty bold statement, but whatever athletic qualities I can express at the snap of a finger, ice cold (no fancy 15 minute warm up, activation, core temp elevation, mobility, etc) with whatever clothes and footwear I’m wearing is my performance capacity.
Right?
I like to test cold performance periodically.
Cold performance efforts are, of course, at my own risk.
From any seated position, bring either leg in, foot close to the butt cheek, slight transfer of weight forward to steady myself and load the foot, push and stand.
Simple as that.
I added a 53lb kettlebell to the video above as a defense mechanism for the hecklers out there.
If you have ownership over a movement or range of motion, you’ll use it.
If you don’t, you’ll avoid it.
In the case of performing a Cossack Squat from the bottom position, I own it, so I use it A LOT.
The value of pursuing efficiency with a robust number of movement patterns and ranges is that it gets hardwired in your system. Practice these movements until you can hardly stomach another repetition, then transfer it to real life. The gym is a controlled environment where we can build our bodies to perform out in the real world.
It’s difficult to explain to people how liberating being able to move confidently however, whenever, wherever really is.
Zero aches. Zero pains. Zero restrictions. No second thoughts of “Can I do this?”.
When you own it, you just do it without hesitation.
Being able to access a wide array of movements and having control over a robust range of motion will seriously change your life. Lowering your susceptibility to injury is an often overlooked MAJOR benefit of building a body that can move well.
Regarding long holds in the horse stance, allow me to set the expectation for you. It’s a slow death. No way around that.
Turn gaze out into space with a blank stare and feel your soul drip out of your body, through your hips. Bonus points if you don’t moan softly or wince.
You develop a tolerance for the discomfort, and quite frankly, plowing through the discomfort is something you’ll have to acquire a taste for if you desire fitness.
This reality is left out of many fitness books.
The carryover from horse stance conditioning into Cossack Squat work has been profound.
The Macebell 360 swing is a high velocity, total body circular strength exercise that makes an “around-the-world” path of motion traveling in front and behind the body.
Macebell 360 swings are a fundamental exercise in the macebell training catalog.
Beginners, novice all the way up to elite macebell trainees use the 360 exercise.
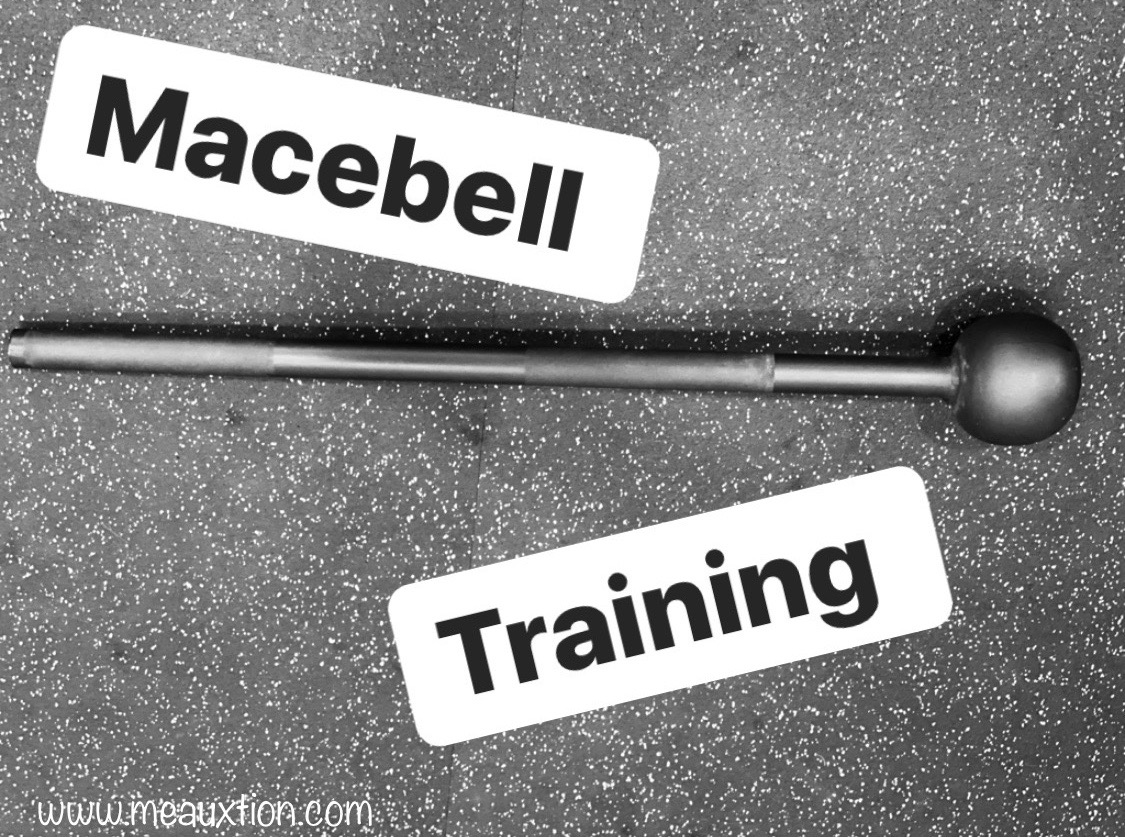
“Wait… What’s a Macebell?”
Macebell (sometimes referred to steel maces) is a dense ball of mass welded onto the end of a long steel handle.
The Macebell
The design of the macebell makes it a fantastic tool for circular movements like swings, because of the increased length of the handle (as compared the clubbells), creating a significant amount of torque.
Benefits of Macebell 360 Swings
I’m not going to spend a ton of time rattling off benefits, because listing benefits is a tired tactic to keep the reader’s attention on fitness blogs.
And I get it. You landed here looking to learn more about Macebell training and you want to know what’s in it for you.
I read websites on various topics (most recently on how to grow a lush lawn) thinking “What’s in it for me?”.
Here are a few notable benefits of Macebell 360 swings:
Improved grip strength
Cardio conditioning
Rotational core training
Builds resilient shoulders
Multi-planar exercises
Pairs extremely well with other modalities
Valid calorie-burning exercise (contributing to fat loss)
Fresh, challenging, engaging, different fitness training
Holding onto the macebell during swings and other exercises train the grip, pretty aggressively. Especially as the weight of the macebell increases (grip strength) or the higher rep sets are used (grip endurance).
Similar to kettlebell swings, macebell 360 swings are great to use for loaded cardio conditioning.
Core training should expand beyond flexion/extension and static stability exercises. Training the core for rotational performance using a macebell is FANTASTIC. Macebell 360 swings can boost rotational power while also training the body to resist rotational forces (anti-rotation).
The obliques get blasted during 360 swings, mainly due to the cross-body nature of the exercise.
I talk a little more about using the importance of using dedicated mobility exercises down below, but the macebell does articulate the shoulders through a more robust range of motion than 90% of other exercises in the gym.
Over time, the muscles and connective tissue surrounding the shoulder will gain strength, flexibility, and mobility.
Just be careful to avoid overstress these soft tissue structures 😬 (thus the recommendation to build mobility/strength using active mobility training)
Most exercises are performed in the sagittal and frontal planes (very linear), which is fine, but 3-dimensional fitness should include moving in the transverse plane.
Taking it a step further, workouts should include exercises and sequences that integrate all 3-planes in one shot.
Macebell 360 Swing Technique
Mace starts in a vertical position in front of the body, hands near the bottom.
Tip the head of the mace to one side, allow the sphere to begin “falling” through an arc behind the body.
As the head falls, raise the hands up, over and behind the head (diagonal pullover)
After the mace passes behind the butt, “pull” it out through the remaining arc, drawing the hands back over the shoulder and in front of the body.
Reset in step #1 position before starting the next rep.
Less reading, more viewing… watch the slow-motion video above.
Injury
What’s funny about macebell 360 swings, is that the torque and velocity (two great features of the exercise) are also what scares the living shit out of people when it comes to the risk of injury.
You smoke yourself with a macebell and you’re going to be gun shy for a little bit.
And I get it.
When my 15lb sand 25lb macebells arrived I couldn’t wait to get into the gym and start using them.
The excitement quickly faded after I skived the head of the macebell off of hip.
Without question, there are real dangers and consequences of swinging a mace, but a person can mitigate the risk of injury by practicing introductory exercises and acclimating to the demands of the swing gradually.
Every repetition, your body must produce force to get the macebell moving, but also stabilize and control the mace throughout the path of travel.
The purpose of this article is to share benefits, technique tips/tricks, and how to use macebell 360 swings in workouts.
Macebell exercises are not more “dangerous” as compared to barbell cleans, kettlebell swings, or jumping onto a box.
Learn the technique, work to improve it, you’ll be good.
Correcting Shoulder Mobility Problems with Macebell Exercises
Macebells are frequently recommended as a mobility training tool for the shoulders and thoracic spine, and this makes me cringe.
I do not endorse trying to use weighted exercises as miracle cures for improving mobility.
My personal opinion… if you don’t own the range of motion (actively) without weight, you shouldn’t use weight to pull you into that range of motion.
Seems like a recipe for disaster.
Can 360 swings improve your shoulder mobility and function? Yeah, they can.
Is it a good idea to bypass mobility drills like CARs, prone swimmers, and other slow and controlled mobility drills in favor of twirling weight around your body?
In my humble opinion, no.
Take this as a word of caution.
You might be fine… but then again… you might not.
If throughout any part of the range of motion, the stress of the macebell swing (torque, velocity, acceleration and deceleration, shoulder position, etc) exceeds tissue tolerance, the risk of injury is increased.
The most vulnerable position is likely to be just before, during, and after the shoulders are extended (hands behind the neck) while the macebell is moving behind the body, this can be a compromised position.
And to be fair to macebell training, using a piece of weighted equipment in hopes of improving mobility isn’t just a macebell cautionary tale.
I give the same word of caution to every other piece of equipment, exercise, or activity.
Advice: Work to improve mobility BEFORE swinging the mace, not while swinging the mace.
MyMobilityDailyis my top choice to learn effective mobility solutions that leverage FRC principles (functional range conditioning). The program is streamed to your home and workouts are constantly being updated.
Selecting a Macebell Weight
Start with a 10lb or 15lb macebell, but over time you will need to increase the weight to continue challenging your body.
Lighter is better in the beginning. A lightweight mace will give you more control and create more space for technical errors.
Size up in weight with time and practice.
Most macebells, one-piece and adjustable options, get heavier by 2.5 or 5lb increments.
The human body adapts quickly to repetition and repeated stress.
Light/Midweight Macebells = Higher reps
Heavy Macebells = Low reps
Same as lifting weights.
Creating Workouts Using Macebell 360 Swings
Here’s a common question I get:
I don’t recommend ONLY using Macebell 360 swings as the entire workout.
You could, but there are so many other great exercises and mobility drills, why isolate yourself to just one?
As part of a workout? Yes. Just not the whole thing.
Now with that being said, you can test your cardio and strength with longer duration sets. I’ve performed Macebell 360 swings for 8+ minutes without rest, alternating 10 reps in both directions and switching my grip periodically. Tough little workout.
Throughout any given week, I’ll strength train (2-3 sessions), condition (2-3 sessions) and ALWAYS include mobility work of some kind.
When I’m working macebell drills, it’s common practice to include bodyweight movements. Bodyweight training pairs extremely well with just about any gym equipment (smooth transitions, variations, accessibility, etc)
Everywhere you go, bodyweight training is an option.
👉 Vahva Fitness “Movement20XX”is currently my top program pick for learning how to move your body against gravity.
Here’s a shortlist of great bodyweight exercises to pair up with the Macebell: push-ups, hollow body rocks, crawling variations (forward, backward, lateral, lizard, etc) ground-based movement training, dive bombers, chin-ups, pull-ups, rows, squat/lunge/hip hinge variations, etc.
Save your grip. If you are going to include exercises drain your grip (deadlifts, pull-ups, rows, etc), think it through.
Grip integrity is crucial while swinging the mace. You let go of that sucker and it’s destroying whatever it hits.
If grip fatigue is a concern, consider skipping pulling exercises like horizontal rows and vertical pull-ups while you’re swinging, or simply shuffle those exercise to the back of the workout once swing practice is finished.
Non-competing exercises. Unlike some exercises, Macebell 360 swings don’t suck away energy from other activities in a workout.
Sure, every effort in the gym is going to drain the fuel tank a little bit, but swings have more of a flow-like element to them, with less time under tension versus grinding exercises like squats, push-ups, and pulling exercises.
Reps. I like 8-10 reps per side for beginners and novice. After the last rep, rest for a little bit before starting the next set.
Over time, feel free to increase the reps per side (15+) and the reps per set (30, 40, 50+ reps).
I like to accumulate reps in a session.
Accumulating 100 swing reps per workout is not unreasonable and spread across several workouts per week, this is a great way to improve swing technique through volume, acclimation, and constant technique refinement.
You have to practice, practice, practice to play well.
Macebell 360 swings are good to go for higher rep work sets.
Set a timer for 10 minutes and work until it sounds, or, aim for 6-8 rounds with limited rest (:30-:45 seconds) between each round.
I’ve worked up to no rest for the entire 10-minute work set, remaining cognizant of my technique and fatigue level throughout.
*** Setting a timer and getting to work is a favorite exertion strategy of mine. It allows for all focus to be directed toward technique/mechanics, body position, and timing.
If at any point swing technique begins to unravel (fatigue kills technique) or grip integrity diminishes and compromises safety… REST!
If you’re looking for cardio combinations, well, you came to the right place.
I LOVE using macebell 360 swings inside of conditioning circuits.
This cardio circuit is a personal favorite:
Macebell 360 Swings x10 each side
200m SkiErg
Hip Thrust x15
If you don’t have access to a SkiErg, substitute wave drills with battling ropes (or next-generation reactive training tool: InertiaWave), towel snaps, or medicine ball slams.
But I’d recommend saving up for a SkiErg, it’s an incredibly unique and versatile piece of cardio equipment with a small footprint for home gyms with limited space.
Public Service Announcement: Are you hip thrusting yet? (sounds kinda kinky, “that’s what she said”) If not, add hip thrusts to your workout regimen. Hip thrusts should be categorized as a primary exercise in my book (similar to deadlifts, squats, pull-ups, etc). They’re AWESOME for building strong glutes and hamstrings.
Advanced Macebell 360 Variations
“Advanced” describes any variation beyond the basic Macebell 360 swing.
Advanced variations introduce an additional technical element or movement that increases the challenge and training stimulus, making them more difficult.
Here a few cool variations:
Macebell 360 High/Low Swings
By far, this is my favorite macebell combination.
The flowing nature, swinging high and low in front of the body and behind, makes this combination challenging and addicting.
Start with lighter weight to feel out the demands and smooth out the technique of the combo.
Over time, you can increase the weight used and get the entire body twisting and turning.
🦴 Foot Fracture Saving Tip: Choke up on the macebell or flex at the elbows to keep the head of the mace away from the feet, or you risk DESTROYING your foot bones.
Macebell 360 Swing to Bicep Catch
If you like adding bicep work into your gym sessions, you’ll love this exercise.
Slowing down a speeding macebell using an eccentric variation of a bicep curl is AGGRESSIVE.
On top of slowing it down, reverse the action and “throw” the macebell back into orbit by curling it back up.
Macebell 360 Swings vs Kettlebell Swings
Having read through this article, you’re now familiar with Macebell 360 swings. In the kettlebell training world, kettlebell swings are a close relative to the macebell 360.
Macebell and kettlebell training are both ballistic drills, which are great for power development and conditioning (among other athletic traits).
During 360 swings, the macebell crosses the midline of the body from left to right and right to left on every rep, where the kettlebell swings pass between the legs from front to back in a pendulum-like fashion.
Two different paths of travel train different muscles.
For reference, here are kettlebell swings:
One of the glaringly obvious differences between a macebell and kettlebell is in the design.
A 40lb macebell and kettlebell weigh exactly the same when placed on a weight scale, however, after lifting a 40 lb macebell, 10 out of 10 people would agree it feels 15-20lbs heavier.
It’s pretty bizarre.
The kettlebell? Pretty balanced piece of equipment.
Macebells and kettlebells have a different distribution of weight, handles and therefore each piece of equipment creates a unique training experience.
At some point, I’ll write up a “Kettlebell Training vs Macebell Training” article.
Instead of playing favorites, I suggested designating each tool to play to their respective strengths and “best” exercises and uses in the gym.
Where to find/buy Macebells
I originally purchased my 15lb and 25lb from Amazon after doing extensive research.
Most macebells are designed exactly the same, so it became a cost situation.
Similar to lifting weights, Macebell training requires progressive loading across time to make gains and avoid plateauing.
The Adex Macebell is brilliantly constructed and allows for incremental changes in weight from 5lbs to 50lbs.
If you were to buy individual (one-piece) macebells in all of these sizes, they’d suck up a ton of valuable gym space while spending 4-5x the money in the end.
Now, if you’re going to be working sledgehammer drills against a tire with the macebell, I recommend using a one-piece macebell for that.
From a usefulness perspective, video CRUSHES the written word.
I could write 800 words about an exercise, or show you a :30 second video and deliver more clarity.
I hope you view each video below and think, “Shit, that exercise looks fun/effective/challenging/engaging/different or applicable to my situation, I’ll try that next workout”.
Exposure to new ideas can change your attitude and enthusiasm about working out.
I used yoga blocks for the upper body Yoga Block Game in the video below, you don’t have to.
Use what you’ve got lying around the house (yoga blocks are extremely versatile, inexpensive and have a lot of uses).
Weight. Any object of weight will work to load these exercises. Common household items can be substituted in place of dumbbell or kettlebell. Use what you’ve got. If the weight is challenges the movement pattern without compromising safety, go for it.
In the meantime, look into getting yourself an adjustable kettlebell or dumbbell (adjustable fitness equipment are economical and space savers)
Quick Advice on Reps/Sets/Weight
Let’s address the two most common questions I get about most of my exercise videos:
“How many reps and sets do you recommend?
“What weight should I use?”
Good questions… but here’s the deal, only you know the answers to those questions.
I can suggest reps all day long.
But if you’re cheating the exercise on rep 3 of a 10 rep set because your ego wants to practice the exercise variation from my video, but what you really need is a variation 2-3 steps back in difficulty… well…
Same goes for weight selection.
Avoid the temptation to chase the “burn” during each work set and select a weight you can control every step of the way.
The Goldilock’s Rule for selecting weight:
Not too heavy, not too light… juuuuusssssstt right.
Take a step back and take an honest assessment of your strength and fitness level, movement quality, and familiarity with the exercise(s).
Ego-Free Guidelines to Apply to any exercise:
Start with lighter weight (move up in weight as needed)
Quality reps only
Get to know fatigue and what it doesn’t to movement quality
Move slow, move with control
Patience
Be in the moment, feel everything, remain mindful
Enough lead in.
Here are a 4 (home gym approved) exercises and a movement game worth experimenting with in your next workout.
Split Stance Cross Body RDL
Have you ever had to lift an object from the floor without being able to get into a picture-perfect deadlift stance/position?
Me too.
Stagger your stance and shift weight onto the front leg.
Lower the weight (kettlebell, dumbbell, etc) along the outside of the front shin bone until it touches the floor outside of the foot.
Pause briefly. Stand back up.
You should feel the bulk of the work from the front working leg hamstring up into the glute.
Slipping a little rotation into common movement patterns (hip hinge) is a good thing. (So is rain to make whiskey).
Aim for 3-5 sets of 6-8 reps per side.
Single-Leg Deadlift + Row
Coordination, balance, and timing are all put to the test with this exercise.
Grab the weight, hinge forward while balancing on one leg, row.
People get pleasure from bashing combinations like this because neither the deadlift or the row is “optimized”.
Interestingly, the same folks who poo-poo these exercises struggle to balance on one leg, sooooo….?
The purpose of this exercise is to be a movement challenge.
Balance on one leg, maintain shape and control while rowing an object of weight.
For perspective, this exercise variation isn’t my top pick to deadlift 500lbs from the floor. There are better variations.
Also for perspective, performing a row with a challenge amount of weight while holding a single leg hip hinge is a difficult little maneuver.
And how about the foot conditioning here?
Balancing on one leg is fantastic for strengthening the tiny little muscles underneath and surrounding the foot/ankle.
If you can, remove your shoes while you workout. Barefoot training is a really simple way to strengthen the feet.
Hybrid/non-traditional movements like this one offer up something different for your body unpack and navigate, which IS the benefit in and of itself.
Aim for 3-5 sets of 6-8 reps per side.
Yoga Block Game (Upper Body)
Objective: Push each yoga block out as far as possible.
I suggest going around the circle a few times because you’ll notice you’re able to push each block a few millimeters further on each attempt.
From my experience, when a normal linear set of an exercise transitions into a task or a challenge, people get competitive and the effort given increases.
The entire front side of your body is going to be burning like a bonfire on this one.
Arms, chest, core, etc. All of it… on 🔥
Aim for 2-3 attempts, either during the warm-up or workout.
Hollow Body Rock + Single Leg Squat
Hollow Body Rocks and Single Leg Squats (aka pistol squats) are two fantastic exercises on their own.
Single leg squats are my go-to squat pattern. I get a phenomenal training effect without needing a lot of equipment (for added weight) and there are bunch of progressive variations to further challenge mobility (ex: dragon squats).
Single leg squats transition well into everyday tasks. So much is done on one leg, it’s beneficial to train for it in the gym.
Hollow Body exercise variations link the upper and lower body together and might look easy from afar, but they‘re actually quite difficult.
As an introduction to Hollow Body work, try holding a Static Hollow Body position for 30 seconds x 4-5 rounds (1:1 work to rest periods).
Good luck. 👍🏼
Fusing Hollow Body Rocks and Single Leg Squats creates a whole new movement challenge.
The goal here is to make two exercises look like one exercise by creating smooth transitions.
Aim for 5 sets of 6 reps per leg.
Isolated Exercises into Movement Combinations
If you’ve checked out my YouTube or Instagram pages, you’ll notice how often I fuse 2, 3 or maybe 4 exercise together to create movement sequences and hybrid movements.
You can take simplest of exercises and morph them into a difficult movement combinations.
Always start by learning a movement pattern in isolation.
Give your body a chance to understand the exercise.
Your body will gradually make gains in strength, control and work capacity.
From there, explore fusing several exercises together, creating combinations, etc.
Down the road, play around with speeding up the tempo, change angles, twist/turn, change levels, use different training surfaces, add weight, etc.
Exercises like this is can provide a simple introduction to movement training and create a renewed interest in gym work.
Which exercises are you going to try out today?
Any of them? All of them?
Give them a try and leave me a comment down below.
Macebell training provides a unique variety of exercise options mainly because the macebell has a weight distribution, shape, and design different than any other piece of fitness equipment.
The exercises a person can integrate into their workout regimen using a macebell are unlike anything else.
Every piece of gym equipment is a tool with different applications and uses.
The macebell, being a non-traditional piece of equipment for the modern gym, creates an opportunity to explore unique movement patterns.
360s and 10-and-2 are fairly recognizable circular/swinging exercises popular on social media, touted improving shoulder mobility and core stability.
I can’t disagree, but macebell training can go a lot deeper than just two exercises.
The macebell can be repurposed and morphed into a tool to challenge very dynamic rotational movements that include footwork.
The landmine-like exercise in the video above was tough, even with a 25lb mace. Keep the arms extended at the elbows and reach as far out as possible. Breathe.
Torque and Velocity
Macebells create a fantastic opportunity to train in planes with torque and velocities that other common gym equipment simply cannot.
Each of these movements presents a different challenge.
Enjoy.
Gravediggers
Gravediggers mimick the motion of shoveling and work great as a warm-up drill or for conditioning.
Play around with hand position on the shaft of the macebell.
Moving the hands closer together can make a 15lb macebell feel like 30lbs.
Add a twist at the top of the Gravedigger, rotating from the waist to the shoulders.
Flowing movements like this can be performed for higher repetitions, anywhere from 8-15 reps per side, for multiple sets.
Gravedigger + Push-Up Flow
A gravedigger, except keep moving forward, setting the mace down softly for a push-up.
Back and forth you go.
Squat to Press
Squat down while raise the mace up.
Looks easy, but it’s not easy.
Stationary High/Low 360s
Alternating high and low 360s is one of my all-time favorite combinations.
The flow of this combinationon is addicting and the rotational aspect is very unique.
Be very, very, very aware of where the mace is positioned on the low swing.
If you bounce the head of the mace off of your feet or shins, it’s all over.
Even with lighter weight, you’re heading to the emergency room.
To help avoid this catastrophy, choke up higher on the mace, which basically turns the mace into a club (it’s shorter family member).
You’ll be able to relax your mind and find a rhythm.
Cross-Body Bicep Curls
Bicep curls using a macebell are freaking aggressive.
First, you’ve got navigate absorbing the force of the macebell traveling with speed through the middle (while switching hand position on the shaft of the mace).
Hit the brakes, slow it down.
Lower the arm into full extension, “throw” it back through the middle.
I love this hybrid bicep curl.
It’s a lot more engaging compared to a boring traditional bicep curl.
360 + Bicep Curl Combo
Linking the traditional macebell 360 exercise with the previous mentioned cross-body bicep curl creates a very approachable combination.
Core, shoulder mobility, biceps, force generation and absorption, etc.
It’s all here.
Rotational Skaters
Incorporating a little footwork with rotational movement brings us closer to the dynamic demands of sport and daily life.
This is a tough drill.
Firmly palm and grip the mass of the macebell while driving the hands inward toward each other to secure the macebell.
“Skate” and rip the macebell through the middle.
Get aggressive with rotary compoent, but remember you’ve got keep enough control to push and stick the landing.
Go with lighter weight. The video shows 15lbs.
Adex Adjustable Clubs and Maces
It’s nice to have a few different macebell weights on hand for different exercises.
For example, the macebell I’m going to condition with using 360s is WAY heavier than what I’m going to drill rotational skaters with.
The problem is buying a bunch of one-piece macebells is it gets expensive and will clutter up a gym space pretty quickly.
Keep the gym space as open as possible is best (in my opinion).
With the purchase of an Adex Adjustable Macebell you’ll be able to quickly adjust the weight ranging from 6-30lbs in increments depending on your strength/skill level, along with the exercise.
Remember, some exercises will require lighter (or heavier) weight.
Need to go heavier?
The Rhino add-on kit increases the club weight options to 45lbs and macebells to 50lbs respectively.
Above 50lbs and you’re going to be buying a custom macebell from somewhere.