The Rear Foot Elevated Split Squat

Motion

Rear foot elevated split squats (often called “Bulgarian Split Squats”) are a time-tested and resourceful exercise that are pure gold for building strong legs.  

If you’ve got a stable surface roughly 18” high to prop your rear foot onto for support, you’re good to go.  

Rear foot elevated split squats are more difficult (compared to bilateral squats) for two simple reasons:

  1.  The front leg is pushing against more weight.
  2.  Stability is decreased.

Back leg (rear foot) helps to stabilize, front leg pushes.  

Rear foot elevated split squats are a supported squat, whereas pistol squats are an unsupported squat.

Both supported and unsupported single leg squat variations have their place in a workout program.

Rear foot elevated split squats (RFE-SS) are effective for improving single leg squat strength without requiring access to a bunch of weights or a gym, and while sparing the back. 

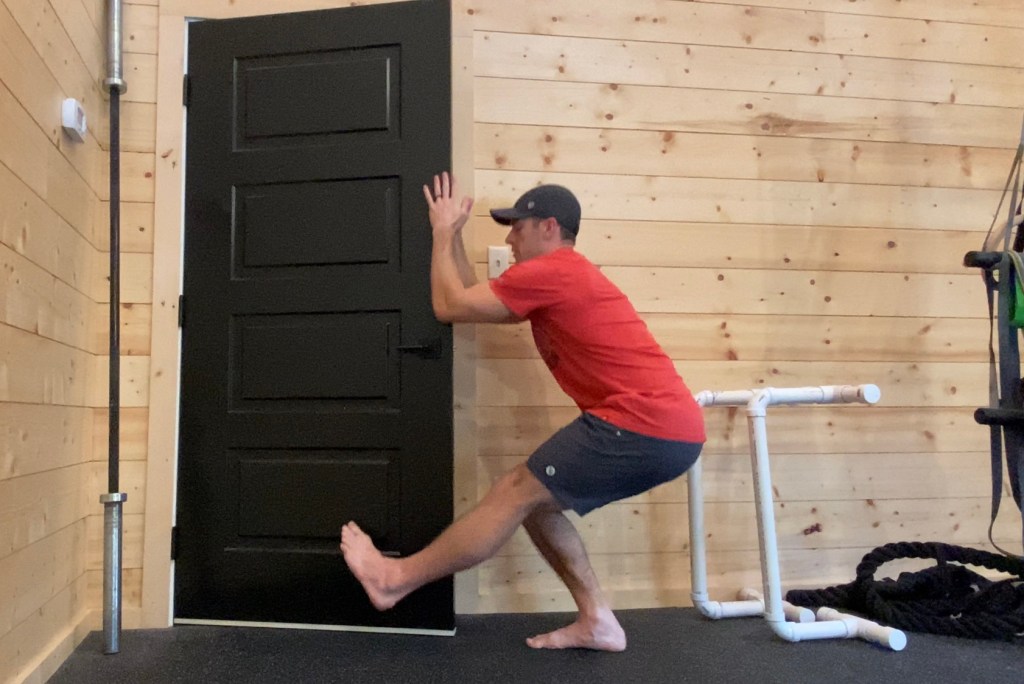
Rear Foot Elevated Split Squat Technique

The Set-Up

Here’s how to get into a good start position for the rear foot elevated split squat.

TOP of the foot rests on the rear surface, not the ball of the foot. 

Hot tips on technique:

  •  Front leg does the work (not the back leg)
  •  Back leg provides as little assistance as possible.
  •  Lower down until the front leg (femur bone) is parallel to the floor.
  • “Kiss” the rear leg knee cap to the floor.
  •  Drive through the heel/midfoot and EXPLODE back to the top
  •  Head up, gaze 6-8 feet out in front of the working leg.
  •  Inhale and pressurize before descending, exhale driving back to the top. 

How many reps/sets/days per week?

3-5 sets of 3-6 repetitions using a challenging weight will provide a great stimulus. 

Train this exercise 2 days per week to start, with 1-2 days of rest between each training day.

Put in the work, rest, recover, come back in a few days and attack it again.  

Progressive Loading for Rear Foot Elevated Split Squats

Beginners can start with assisted or bodyweight only RFE-SS to acclimate to the demands of loading, balancing and stabilization required to train using a single leg.  

Progressing forward from assisted and full bodyweight variations, just add weight.  

Whether you’re a beginner, intermediate or advanced, adding weight progressively is the path to making gains.  

Adding weight to rear foot elevated split squats using tiny increments is my preferred way to get the most out of the exercise. 

It’s hard to argue with the effectiveness and simplicity of progressive loading.   

Select a weight that you can control.  

A lot of people make the mistake of going too heavy, and technique suffers.  Reps should be quality, smooth and free of any compensations. 

Start with light weight, perform a few reps.  If you need to increase the weight, do it.  If not, stay there and execute the reps and sets for the workout.  

If you have access to weight equipment, here are a couple of ways to vary the exercise.

Adjust the position of the weight.  Weight can be held in the suitcase position, front rack, bearhug, overhead, etc. The suitcase position is straightforward and best for beginners.  The higher the weight goes (chest level, over head, etc) the more difficult it becomes to hold position.  

Holding a dumbbell or kettlebell goblet style works great!  

A front racked barbell is also a brutal variation.  Start light here. 

Asymmetrical Loading.  Only have 1 dumbbell or kettlebell?  Perfect, use it.  Hold it on the inside of your foot, outside, front racked position or overhead.  

Get creative.  Life is one big asymmetric party.  Balance is for the birds. 

No Equipment to Add Weight? 

Beyond adding weight, there are other ways to modify the exercise to increase the challenge.  

For people who are training at home or don’t have access to weight equipment, the following tweaks can be made to boost the difficulty.  

Vary the tempo (slow down, fast up).  Spend 5 seconds lowering to the bottom, pause for 1-2 seconds, explode back up.  

Increase the range of motion by elevating the front foot.  Even elevating a few inches will increase the range of motion on each repetition.  Be careful to avoid elevating the front foot beyond the rear leg/hip flexors capacity to stretch on the way down.  

Instability.  Place front foot on an unstable surface.  A pillow folded in half, BOSU ball, uneven surfaces, etc.  Unstable training is not the end all be all, but our bodies should be conditioned to handle uneven terrain in the real world.  

Add volume.  Adding extra reps and sets is always an option.  At some point, additional load will be necessary to keep making strength progress.  Keep that in mind.  

If you have resistance bands, you can loop the band underneath the front foot and around the shoulders to add resistance to the exercise. 

Single Leg Training is Suffering

Single leg work sets are LONG. 

Both legs must complete the designated number of reps in each set, the amount of time spent working is TWICE as long. 

Finish 6 reps on the right side, switch legs and do 6 more reps on the left side.  The work sets are extended.  

You’re holding the weights for a lengthy amount of time, grip training is a nice byproduct. 

Pure suffering.  

The ability to get comfortable suffering is an added benefit to this style of training.  

I’m careful not to come across with too aggressive of a hard ass tone on this blog, but holy cow, conditioning your body and mind to embrace discomfort during a workout is a CHARACTER BUILDER that will spill over to other areas of life.  

Less Weight and Spare the Lower Back

By the numbers, you can get the same training stimulus with RFE-SS using half the weight as a bilateral squat.  

If a person can barbell back squat with 300lbs, a RFE-SS can be loaded with a pair of 75lb dumbbells and achieve nearly the exact same training effect.

For those with cranky lower backs, RFE-SS is lower back friendly, assuming you hold weight at the side of the body and avoid going into excessive lumbar extension at the bottom.  

I’m not suggesting you avoid stressing the lower back forever, but for those who have previously dealt with cranky back issues, this variation is a nice alternative to build lower body strength while minimizing the chance of re-injury.  

“I don’t have access to a bench.”

You don’t need a bench.  

What do you have laying around that can be used to set the top of your foot on?  

The only reason so many videos exist of people performing rear foot elevated split squats using benches as the support surface, is because most of these videos are being shot inside of gyms.

Benches are a common piece of equipment in gyms and the top surface of a bench is rather soft so it won’t dig into the foot with or without shoes.  

I’m big on training without shoes when it makes sense, foot directly in contact with the floor.  

For people who exercise at home, the following items can be substituted if a bench isn’t an option:

  •  Chair
  •  Staircase
  •  Sofa
  •  Coffee Table
  •  Suspension Trainer/gymnastics rings
  •  Low plyo box
  •  Toilet
  •  Bar racked at a knee height
  •  Tree stump or log

Literally anything that’s roughly 18 inches high and reasonably stable will work just fine.  

The rear foot will, at times, need to apply pressure into surface it’s resting on to help maintain balance throughout the work set.  

How to Improve Your Single Leg Pistol Squat at Home Using a Door

bodyweight training

When you’re training at home, anything can be used for a workout.

Dowels, brooms, countertops, tables, chairs, sofas, coffee tables, stairs, etc.

Use it all, you’ll get the exact same training stimulus as you would in a fully outfitted gym.

Home gym workouts thrive from being resourceful, especially if you don’t have a lot of equipment on hand.

Fortunately, a door (or door frame) can be used to help learn and progress a number of different exercises.

In this video, I discuss how to use a door to work through a variety of single leg pistol squat progressions.

https://youtu.be/d4Okl_f23zw

Decreasing or increasing the demands of an exercise doesn’t always be related to subtracting or adding load, but it’s a really simple adjustment to make, and also nice for quantifying progress.

Here’s a series of single leg pistol squat variations, covering beginner, intermediate all the way to advanced.

I hope you find these instructions to be simple, yet effective. Single leg squats are an incredible exercise to practice on a regular basis. Single leg squats can be trained 2-3 days per week, leading to impressive gains over time.

Beginner| Fully Assisted On the Way Down and Up

Grab the door itself, or ideally the door handle, using both hands. Use upper body to help guide you into the bottom of the squat and back up to the top. This beginner variation allows for decreasing weight moved, more stability and balance.

3-5 sets of 5-6 reps

Intermediate| Slow Lowering with Limited Assistance, Full Assistance on the Way Up

Use minimal upper body assistance on the eccentric (lowering phase), really slowing down the descent as much as possible. Once you’re at the bottom, the upper body can assist with standing back up.

Eccentric focused exercises can increase muscle soreness significantly in the days that follow, just a heads up.

3-5 sets of 5-6 reps

Intermediate| Lower down with NO Assistance, MINIMAL Help on the Way Up

Time to let go of the door and lower to the bottom of the squat without assistance. You feel shaky, wobbly and maybe even weak. This is normal. You’re building strength, control and coordination with this pattern!

Slow down the descent as much as you can.

3-5 sets of 5-6 reps

Once at the bottom, use minimal assistance to stand up. Challenge yourself here, you dictate the intensity of the exercise, make a choice to ramp up the intensity. Go for it.

Intermediate/Advanced| Pancake Hands on the Door for Balance Only

Slide the hands along each side of the door, stabilizing the motion. The hands are there to prevent you from falling to one side or the other, NOT to reduce the load.

If having two hands on the door feels unnatural, and it may, try using one hand, thumb on one side and the other fingers on the opposite side. Use a feather light touch on the way down and up.

3-5 sets of 5-6 reps

Advanced| Freestanding, Unsupported Single Leg Pistol Squat

Congratulations, you made it. A freestanding, unsupported, zero help single leg pistol squat.

People like to joke about pistol squats being a circus trick, but there a demonstration of single leg strength, stability, mobility and athleticism.

Once you own a single leg squat, you’d be surprised how often use it stand up from the floor. It’s quick and efficient.

Lastly, single leg training is back-friendly.

This is not a recommendation to ignore researching corrective strategies to address the back pain and train around it forever.

In a world where every other person has suffered some sort of back tweak or injury, single leg training is extremely forgiving and often a great option for people.

Some folks may need to limit the range of motion to acclimate to this freestanding single leg squat, and that is ok. Grab a chair and lower down until your butt contacts the seat. Touch and stand back up.

Weighted Single Leg Pistol Squat

https://youtu.be/FW-Qj-aSPiI

Increasing the load beyond bodyweight is the next logical progression.

I’ve added weight by using kettlebells, dumbbells, barbell, sandbag, weight vest, and so on.

Whatever you choose as weight really doesn’t matter. Weight is weight. Gravity doesn’t discriminate. What’s important is that it’s comfortable to hold onto.

Adding weight to exercises is trial and error at times. You want to add enough to challenge each rep in the set, but not too much that you’re unable to control the movement or find yourself compensating/cheating to complete the reps.

We’re always toeing the line here.

Hope you enjoyed this… give the blog a follow and certainly check out the Meauxtion YouTube channel.

How to Make Bodyweight Push-Ups and Squats Exercises Harder

Motion

Bodyweight-based exercises can (and should be) progressed similar to traditional resistance-based exercises.

The SAID Principle (specific adaptations to imposed demands) applies to everything done in the gym.

Cardio, weight training, Yoga, stretching and mobility work.

If you do what you always did, you’ll get what you alway got.  

In other words, gains will come to a screaching halt when your body becomes efficient at handling the stress being placed upon it.  

And to be clear, developing efficiency is not a bad thing.  You don’t want every physical experience in life to redline your system.  

We attack goals in the gym so the sub-maximal events of real life seem easy.  

Anyways, with bodyweight trainig, more specifically push ups and squats, one simple, effective and resourceful way to make impressive gains in strength and coordination and progress is to pursue unilateral variations.  

One arm push ups and single leg squats.  

More pressure must be applied o achieve the next set of goals.  

Switch things up, bust out of the comfort zone and embrace the next challenge.  It’s the only way to move forward

A simple and effective way bust progression bodyweight exercises is by transitioning the exertion from 2 limbs to 1 limb.  

Bilateral to unilateral.  

The squat pattern goes from a traditional bilateral air squat to a single leg squat, sometimes referred to as “pistol squats”.

2-arm push ups transition to 1-arm push ups.  

Single arm push ups are one of my favorite upper body strength builders.  I avoided them for a really long time because they seemed like a circus exercise.  

When I committed to more palatable progressions leading to the single-arm push-up, my opinion changed completely.

Single limb training makes SO MUCH SENSE.  

A lot of life and sport require single limb performance.  Yes, ideally we execute tasks using two arms and two legs, but it’s not always the situation.

Walking, running and climbing stairs are great examples of where single leg performance shines.  

Plus, training one side at a time can reveal some major asymmetries that you otherwise wouldn’t notice.  

One-arm push-ups are also secretly one of the great core training exercises.   

It’s amazing how incredibly sore the torso musculature can be in the days following one arm push up training.  The obliques in particular.  Tender to the touch.  

Side-note:  Mobility training with change your life…

MyMobilityDaily.com

If you desire ongoing progress from your workout time, increasing the challenge steadily is a necessity.

The human body is a brilliant adaptation machine.  It will reshape, re-organize, re-calibrate in order to adapt to stress.

Activities that once seemed impossible become possible through the process.

Fitness is amazing when you think about it from that perspective.

If you’re willing to put in the time and work, you can have ANY result you want.

We, adults, need these reminders.

You were born to move, move well and move A LOT.

Anyways, nothing creates enormous self-inflicted frustration like performing the same exercise for the same reps/sets/tempo day in and day out and expecting a different outcome.

It’s like smashing your hand with a hammer over and over, expecting the next impact to feel good versus elicit extreme pain.

The body becomes so efficient that it’s no longer work.

And it’s not your body’s fault for having this built-in efficiency mechanism.  Building efficiency is a good thing.  We don’t always want to feel like we are redlining the system while doing basic tasks.

Push-ups and squats are two essential exercises that can add value to anyone’s workout regimen.

One effective way to progress the basic bodyweight exercises like the push-up or squat is by migrating toward single limb variations, also referred to as unilateral training.

Unilateral exercise = one arm or leg does all the work
Bilateral exercise = two arms/legs do all the work

Bilateral exercises distribute the weight evenly between both limbs.  Each leg is moving 50% of the load.

Unilateral training requires one limb to move the entire load through the range of motion.

In addition, decreasing the base of support creates a significant balance challenge that amplifies as the muscles tire during the work set.

Indirectly, one arm push-ups rank extremely high on the effective core training exercise list.

I would put one arm push-ups up against almost any other isolated core exercise.

Maintaining rigidity from head to heel will blow apart your mid-section. Expect soreness in the days following.

People often get confused with how to make bodyweight-based exercises harder, often opting to add reps versus increase the load. High repetition work sets can provide benefit, but transitions the effort toward work capacity and endurance gains, versus strength.

Endurance training = higher repetitions, low load, and extended work sets.

The lower the load, the more reps can be achieved because the muscles are challenged as aggressively.

I’m not bashing endurance-oriented training.  It certainly has it’s benefits.  I actually engage in aerobic-based training 2-3 days per week, which is night and day different from what I used to employ for cardio training.  It used to be high-intensity intervals all day every day.

But that isn’t sustainable, and I think for a lot of people it’s doing more harm than good, despite the same EPOC after-burn studies authors keep twisting and referencing in their books.

In the time it takes to burn an extra 100 calories via blowing my body apart in a HIIT session, I’ll instead choose to take 3 fewer bites of calorie-dense food.

Talk about time savings.

Anyways…

… a lot of people use the wrong rep and loading schemes to achieve goals.

You can dig a 20-yard trench with a screwdriver.

However, we can both agree there are probably better tools for the job.

High repetition/low load work sets will do very little to increase strength.

You might feel tired with burning muscles, but increased strength is not the end-product of these efforts. 

For now, ditch the high rep/low load schemes.  Increase the loading, lower the reps, take more rest, get aggressive.

If building lean muscle and optimize movement is of interest to you, is strength is a critical physical characteristic to improve.

This is a blind and generalized statement, but I do honestly believe most people would be happier with results (both from a time investment and effort perspective) from gym work if steps were taken to increase the intensity/loading of the exercise, versus piling on more volume.

Unilateral training is a great way to do this.

A large chunk of life’s daily tasks requires single limb performance.

Why not load unilateral movements during workouts?

It’s resourceful, both from an equipment and time standpoint.

The return on investment is significant.

One-arm push-ups and one leg squats effectively increase the load of the working limb while simultaneously decreasing the base of support.

Transitioning from bilateral to unilateral squat requires navigating instability through the range of motion.

The stabilizing muscles of the hips have to get involved, the intrinsic muscles of the feet contribute as well.  Yes, your feet have muscles and they are vitally important. 

Staying balanced on the way down and up is difficult.

In time with practice and exposure to the balance requirements of single leg squats, your body will develop an understanding of how remain stable on each repetition.

Adaptation is a beautiful thing, but it takes time, patience and plenty of practice.  A lot of people give up before known benefits have time to take shape.

In the beginning, bodyweight alone will be sufficient to receive a training effect for single limb exercises.

But in time, the body will become efficient and adding weight, adjusting the tempo or increasing reps will become necessary for further gains.

Don’t underestimate the impact of adding 3-5 seconds to the eccentric descent of an exercise.  It will humble the hard asses of the world, and it takes discipline to slow down the tempo of a movement to savor the pain.

The nice part about adding load to unilateral exercises is you shouldn’t need much weight to challenge yourself.  Adding 10-15lbs in the form of a kettlebell, dumbbell, sandbag, small child or a spare weight plate will be enough to shock the system.

Add enough weight to challenge the movement, but not so much that it degrades technical form and posture.

In a real-world chaotic situation, anything goes to survive.  In the controlled environment of the gym, form matters.

The end goal of exercising is betterment, not injury and regression.

Compared to the sheer amount of equipment needed to strength training using bilateral squats, single-leg training can be very resourceful.  Very little goes a long way.


Pistol Squat Progressions For Beginners

Motion

Screen Shot 2017-06-14 at 6.14.58 AM

Pew, pew, pew… pistol squats.

There are few exercises that accomplish more for functional lower body performance than single leg squats, aka “pistol squats’.  They’ve been referred to as the “king of lower body strength training”, and I cannot disagree.  

Here are some key benefits of pistol squat training:

  • Improve single leg performance (strength, balance, stability, etc)
  • Challenge movement complexity beyond regular squats
  • Training body control and coordination
  • Low reps, high reward
  • Mind/body focus
  • Assessment for movement deficits (strength, balance, flexibility, etc)
  • Portable strength (you can do them anywhere)

I’ll expand on each of these benefits in a separate article.  For now, the takeaway is pistol squats are a potent lower body performance enhancer, connect the mind and body to a greater degree, progress body control and coordination, and you can practice them anywhere.  

Symmetry

Building symmetrical strength, balance, and coordination between the right and left sides of the body provides immediate and noticeable benefits to performance in daily life and sport.  Bilateral squats are not bad, but they can mask deficits and encourage compensations.  Your body is extremely good at finding a way to complete exercises by any means necessary, even if the movement is full of compensations. 

For a lot of people, one of the great payoffs in practicing physical fitness is that one moment when you realize a physical task was executed that wasn’t previously possible.  Surprisingly yourself physically is rewarding.

“Oh, I can do that now”.

Unknowingly, many daily tasks are performed on one leg.  Improving one’s ability to perform on one leg makes doing anything on two legs that much more efficient.

Personally, increasing my focus on improving pistol squat performance has saved my lower-back, and served as a door opener to more advanced movement flows.  

More so, single leg training brought to light my own right/left performance deficits.  I won’t say I became a better person once I cleaned up my asymmetries, but my performance saw improvement and nagging irritations went away.  

If you find yourself unable to mirror a range of motion, or lift a similar amount of weight on one side of the body but not the other, it’s worth investigating why these differences exist.  

It could be because of favoritism.  Right/left side favoritism is common.  I have it, you have it, we all have it. Repetitively completing tasks using the same arm or leg can slowly create imbalances, which may or may not manifest into acute or chronic issues down the road.

Examples:  Stepping up or down a ladder with the same leg, using the same arm for heavy lifting or carrying, slinging the work bag over the same shoulder, driving with the same hand on the steering wheel tilted to the same side.

I’m not saying audit your entire life and become a hypochondriac with these things, just be aware favoritism exists.

Though it is important to practice traditional bilateral squats (2-legs), single leg training, even if only using one’s body weight, addresses gaps left unfilled by regular squats.  

Balancing on one leg requires hip stabilizers to wake up and participate.  This is a positive for those who sit for long periods throughout the day. 

Leverage Exercise Progression

For a beginner, a full round of pistol squats may seem unachievable, and only for the “fit”.  This is bullshit.  

The “fit” didn’t enter this world sporting six-packs while ripping out pistol squats, just as the wealthy (typically) haven’t always been wealthy.  The simple truth is your body isn’t acclimated to the mechanics of the pistol squats yet.  Leveraging proper exercise progression and dedicated practice, a full pistol squat is a lot closer than you’d think.

If you’re unable to execute a pistol squat, the simple truth is that your body isn’t acclimated to do so.  It’s a sign you may be lacking strength, flexibility or coordination, all of which can be improved quickly through proper exercise progression and practice.

You’re a lot closer to doing pistol squats than you think.

With proper progression and some tenacity for achievement, the human body adapts to be strength and new patterns quickly.  

The power of progression is why I continue to demonstrate progression roadmaps leading to these “big bang for your buck” exercises.

All 3 of the following exercise progressions can be used regardless if you’ve been squatting with two-legs or using supported single leg squat variations.  Though these exercises are a nice stepping stone, they are not necessary if the exercise is regressed back far enough to be manageable.

Variation #1:  Suspension Trainer Assisted Pistol Squats

Use the suspension trainer to guide your body into and out of the squat.  Grip the handles with intent and use the arms to lessen the intensity as needed.  Slowly ask your legs to do more work as you gain strength.  

3-5 sets of 5-8 reps per leg

Variation #2:  Pinch Grip Assisted Pistol Squats

This pistol squat progression is demonstrated using a squat rack, but a door frame will work just as well.  Grip the rack or doorframe with your fingertips, lower into the squat and back up, assisting as needed.  Slowly soften the grip as you become more efficient.  Move to a 2 or 3 finger pinch grip to increase the challenge.  

3-5 sets of 5-8 reps per leg

Variation #3: Dowel Assisted Pistol Squats

The dowel acts as unstable assistance in this progression.  This unstable assistance provides an introduction to a training effect similar to an unassisted pistol squat.  Maintaining balance throughout the range of motion will have the hip, knee, and core stabilizers working overtime.  

Expect to feel soreness in the days from maintaining balance throughout the work set. 

3 sets of 4-6 reps per leg

All three of these exercises should be used as progressions to a fully unsupported single leg pistol squat.   Keep in mind that each exercise demonstrates a full range of motion.  

Select a progression according to your current fitness level.  Aim to graduate to the next most difficult progression as you gain strength and efficiency. 

If this article was helpful, leave me a comment, or check out others like it.

Next steps?  Get after it.  

Cheers, 

Kyle 

SaveSave

Bodyweight Training Works, Go To The Next Progression!

bodyweight training

Just when you think bodyweight training is worthless, let me quickly restore your faith.

I know what you’re missing.  It’s the same thing most people are missing when they are looking to leverage bodyweight exercise to boost strength, boost power or burn fat.

It’s called progression.

Progression can mean a few different things:

1)  Load progression (increase in weight)

2)  Skill progression (increase in motor skill demand)

I chose to limit the progressions to loading and skill.  Could you say volume is a progression?  Of course, but I am convinced that MORE VOLUME IS NOT WHAT MOST PEOPLE ARE LACKING WITH BODYWEIGHT TRAINING PLATEAUS.

Just the thought of marathon sets of exercises that you are already good at makes me cringe.  I’m guilty of avoiding essential increases in loading or skill in favor of more volume also.  It’s soothing to your ego knowing that you can dominate a bulk set of push ups or squats.  I’ve been there, I know first hand.  Comfort feels good.

But comfort doesn’t get your stronger, leaner or more athletic.  Especially if you’ve got lofty strength or aesthetic goals and you’re attempting to leverage bodyweight training to get there.

So, progression is probably what you are lacking, but the great news is that once you have identified that proper progression is the missing link, the solution becomes rather simple.

Take the push up for example.  If you can rip out 20-30 bodyweight push ups no problem, you need to take the next step to either a)  rear foot elevated push ups, b)  externally loaded push ups c) 1-arm push ups.

In some instances, I am going to suggest going straight to 1-arm push ups to restore that faith.

Why?  Because the first time you set up and lower yourself into the bottom of a 1-arm push up, your eyeballs are going to feel like they are going to pop out of your skull, catching on your orbital bones.  Seriously, you’ll feel like a weakling.  The point of sending you to the 1-arm push up gallows is to expand your thought process to how effective bodyweight training can be if you’re willing explore new realms.

Generally, a lot of people who are great at strict 1-arm push ups also have incredible upper body strength and as a byproduct, a decent physique.

The junction where functional performance meets physique is an ideal point for most people.  It really stinks to be all show and no go or all go and less than ideal show.  But who am I to make that statement, because if you enjoy either one of those scenarios, it is your prerogative to embrace that happiness.

So as I mentioned, 1-arm push ups aren’t necessarily where I want you to start working your progressions, because the point of exercise progressions is to make one’s way from one challenging movement to the next, progressing as fast as your strength, stability and motor control can tolerate.

In school, most people don’t go straight into Calculus, right?  They have to work through the progressions of basics of mathematics before they earn the right to tackle Calculus.

Bodyweight training, heck, all forms of physical effort work in the same way.

The above example involved upper body pressing, more specifically the push up.

However, progressing the lower body, particularly the squat can be just as simple.

As a beginner, you might start with improving your technique, strength and work capacity in the basic bodyweight squat.  After improving the aforementioned qualities, you will need to move on to higher level variations of the squat.  If you’re adamant about staying true to a minimalistic fitness approach like bodyweight exercise only, the next progression might be to elevate one leg onto a bench or other form of support, and perform what many call Bulgarian split squats, or rear foot elevated-single leg squats.

RFE split squats remove one foot from the base of support while simultaneously increasing the loading on the working leg.  Instead of two legs contracting to move your body up and down, you’ve now got one leg doing the work, an obvious increase in loading.

The next progression from the RFE split squat are either assisted bodyweight pistol squats or full bodyweight pistol squats.  I mentioned assisted bodyweight pistols because it might be helpful to hold on to something while you allow your body to “feel” the mechanics of an unsupported squat.  There’s no shame in assisting yourself until you’re physically read to let go and go for the fully unsupported bodyweight pistol.

As it stands right now, bodyweight pistol squats are the greatest lower body strength exercise known to man.  That’s a big and bold statement, but I cannot dream up another exercise that accomplishes as much as the free-standing pistol squat.  A bodyweight pistol is just the beginning, because adding load and varying duration of time under tension dropping into and out of the “hole” can both work to advance your performance.

It can be quite interesting to observe the right side/left side differences in balance, strength, stability and skill acquisition.

For me personally, I have found that my right side, which is my non-dominant leg, is much stronger than my left side.

So the bottom line is this… bodyweight training is phenomenal.  Just because you don’t have access to weights or you’re simply looking to switch up your training routine, doesn’t mean that you have to sacrifice results.  The key is to understand your current performance, your goals and then choose the right progression to accelerate your arrival at the next level of performance and goal achievement.

Make sure that you are tracking your performance from workout to workout.  It’s important for tracking progress and creating the next plan of attack.


Cheers to bodyweight movement…


KG