Single-leg squats, also know as unilateral squats, involve working the squat pattern using one leg at a time. Single-leg squats offer several benefits over bilateral squats, where both legs are used simultaneously.
Here are some of the benefits of unilateral squats:
Increased stability and balance: Unilateral squats require more stability and balance than bilateral squats. When you work one leg at a time, your core and stabilizing muscles have to work harder to keep you balanced.
Correcting muscle imbalances: Unilateral squats can help correct muscle imbalances between your legs. If one leg is stronger than the other, unilateral squats can help bring the weaker leg up to speed and create more balance in your lower body.
Reduced risk of injury: Unilateral squats require less weight than bilateral squats and can reduce th strain on the lower back and knees. Improving balance and stability is a great way to reduce unwanted injuries.
Improved sports performance: Many sports require unilateral movements, such as running, jumping, and cutting. Incorporating unilateral squats into your workout routine can help improve your performance in these activities.
Greater variety in your workout: Unilateral squats can add variety to your workout routine, which can help keep you motivated and engaged.
While bilateral squats are an excellent exercise for building lower body strength, unilateral squats offer unique benefits that can help improve your balance, stability, and overall lower body strength.
Supported vs. Unsupport Single-Leg Squats
Supported single-leg squats and unsupported single-leg squats are unilateral exercises that focus on the lower body, but there are some key differences between the two.
Supported single-leg squats, also known as assisted single-leg squats, are performed with external support to help maintain balance and stability. This support can come from a wall, a bench or chair, a resistance band, or a TRX suspension trainer, among other tools. Using a support, it’s easier to maintain proper form and technique. The support can also be used to provide additional resistance by pushing against it (for assistance) during the concentric phase of the movement.
Unsupported single-leg squats are performed WITHOUT any external support, relying entirely on your balance and stability. Pistol squats are one of the most popular unsupported single-leg squat exercises. During a Pistol Squat, you must maintain a stable base of support on one leg while lowering their body into a deep squat position, then rising back up to the starting position.
* Note: You may need to modify the exercise by holding onto a support or reducing the squat depth.
Beginners should start with supported single-leg squat variations to limit the complexity often associated with maintaining balance. Split squats and rear foot elevated split squats are two options that beginners will find challenging and manageable.
How Many Workouts Per Week Should Include Single-Leg Squats?
This is a great question and one that you should be asking. But here’s the unpopular, middle of the road response…
The frequency of performing single-leg squats to improve strength and performance can vary depending on individual fitness level, goals, and other factors such as recovery time.
Start with 2 days per week and separate training days by 48-72 hours, to allow for recovery from the stress. Give your body an opportunity to recover properly before the next workout. You’ll reduce muscle soreness, increase peformance in the next session (because your body isn’t depleted from the previous workout) and you’ll maintain a higher level of enjoyment.
How Many Sets & Reps of Single-Leg Squats Should I do?
For beginners, start with 2-3 sets of 6-8 reps of supported single-leg squats, gradually increasing the number of sets, reps or adding weights as you become stronger and more comfortable with the exercise. The rep scheme is generalized, and you may find lower reps are more appropriate.
The number of sets and reps you utilize can also be tailored to achieve different goals. Increasing the reps and each works at lens itself well to work capacity and endurance. However, if your goal is to build strength, keep the repetitions low and the weight high.
Supported single-leg squat variations (split squats, rear foot elevated split squats or assisted pistol squats) allow for acclimation to the balance and stability demands. The goal is to groove the pattern and create a training stimulus, not spend the whole workset hopping around or falling over.
Rear foot elevated split squats (often called “Bulgarian Split Squats”) are a time-tested and resourceful exercise that are pure gold for building strong legs.
If you’ve got a stable surface roughly 18” high to prop your rear foot onto for support, you’re good to go.
Rear foot elevated split squats are more difficult (compared to bilateral squats) for two simple reasons:
The front leg is pushing against more weight.
Stability is decreased.
Back leg (rear foot) helps to stabilize, front leg pushes.
Rear foot elevated split squats are a supported squat, whereas pistol squats are an unsupported squat.
Rear foot elevated split squats (RFE-SS) are effective for improving single leg squat strength without requiring access to a bunch of weights or a gym, and while sparing the back.
Rear Foot Elevated Split Squat Technique
The Set-Up
Here’s how to get into a good start position for the rear foot elevated split squat.
TOP of the foot rests on the rear surface, not the ball of the foot.
Hot tips on technique:
Front leg does the work (not the back leg)
Back leg provides as little assistance as possible.
Lower down until the front leg (femur bone) is parallel to the floor.
“Kiss” the rear leg knee cap to the floor.
Drive through the heel/midfoot and EXPLODE back to the top
Head up, gaze 6-8 feet out in front of the working leg.
Inhale and pressurize before descending, exhale driving back to the top.
How many reps/sets/days per week?
3-5 sets of 3-6 repetitions using a challenging weight will provide a great stimulus.
Train this exercise 2 days per week to start, with 1-2 days of rest between each training day.
Put in the work, rest, recover, come back in a few days and attack it again.
Progressive Loading for Rear Foot Elevated Split Squats
Beginners can start with assisted or bodyweight only RFE-SS to acclimate to the demands of loading, balancing and stabilization required to train using a single leg.
Progressing forward from assisted and full bodyweight variations, just add weight.
Whether you’re a beginner, intermediate or advanced, adding weight progressively is the path to making gains.
Adding weight to rear foot elevated split squats using tiny increments is my preferred way to get the most out of the exercise.
It’s hard to argue with the effectiveness and simplicity of progressive loading.
Select a weight that you can control.
A lot of people make the mistake of going too heavy, and technique suffers. Reps should be quality, smooth and free of any compensations.
Start with light weight, perform a few reps. If you need to increase the weight, do it. If not, stay there and execute the reps and sets for the workout.
If you have access to weight equipment, here are a couple of ways to vary the exercise.
Adjust the position of the weight. Weight can be held in the suitcase position, front rack, bearhug, overhead, etc. The suitcase position is straightforward and best for beginners. The higher the weight goes (chest level, over head, etc) the more difficult it becomes to hold position.
A front racked barbell is also a brutal variation. Start light here.
Asymmetrical Loading. Only have 1 dumbbell or kettlebell? Perfect, use it. Hold it on the inside of your foot, outside, front racked position or overhead.
Get creative. Life is one big asymmetric party. Balance is for the birds.
No Equipment to Add Weight?
Beyond adding weight, there are other ways to modify the exercise to increase the challenge.
For people who are training at home or don’t have access to weight equipment, the following tweaks can be made to boost the difficulty.
Vary the tempo (slow down, fast up). Spend 5 seconds lowering to the bottom, pause for 1-2 seconds, explode back up.
Increase the range of motion by elevating the front foot. Even elevating a few inches will increase the range of motion on each repetition. Be careful to avoid elevating the front foot beyond the rear leg/hip flexors capacity to stretch on the way down.
Instability. Place front foot on an unstable surface. A pillow folded in half, BOSU ball, uneven surfaces, etc. Unstable training is not the end all be all, but our bodies should be conditioned to handle uneven terrain in the real world.
Add volume. Adding extra reps and sets is always an option. At some point, additional load will be necessary to keep making strength progress. Keep that in mind.
If you have resistance bands, you can loop the band underneath the front foot and around the shoulders to add resistance to the exercise.
Single Leg Training is Suffering
Single leg work sets are LONG.
Both legs must complete the designated number of reps in each set, the amount of time spent working is TWICE as long.
Finish 6 reps on the right side, switch legs and do 6 more reps on the left side. The work sets are extended.
You’re holding the weights for a lengthy amount of time, grip training is a nice byproduct.
Pure suffering.
The ability to get comfortable suffering is an added benefit to this style of training.
I’m careful not to come across with too aggressive of a hard ass tone on this blog, but holy cow, conditioning your body and mind to embrace discomfort during a workout is a CHARACTER BUILDER that will spill over to other areas of life.
By the numbers, you can get the same training stimulus with RFE-SS using half the weight as a bilateral squat.
If a person can barbell back squat with 300lbs, a RFE-SS can be loaded with a pair of 75lb dumbbells and achieve nearly the exact same training effect.
For those with cranky lower backs, RFE-SS is lower back friendly, assuming you hold weight at the side of the body and avoid going into excessive lumbar extension at the bottom.
I’m not suggesting you avoid stressing the lower back forever, but for those who have previously dealt with cranky back issues, this variation is a nice alternative to build lower body strength while minimizing the chance of re-injury.
“I don’t have access to a bench.”
You don’t need a bench.
What do you have laying around that can be used to set the top of your foot on?
The only reason so many videos exist of people performing rear foot elevated split squats using benches as the support surface, is because most of these videos are being shot inside of gyms.
Benches are a common piece of equipment in gyms and the top surface of a bench is rather soft so it won’t dig into the foot with or without shoes.
I’m big on training without shoes when it makes sense, foot directly in contact with the floor.
For people who exercise at home, the following items can be substituted if a bench isn’t an option:
Chair
Staircase
Sofa
Coffee Table
Suspension Trainer/gymnastics rings
Low plyo box
Toilet
Bar racked at a knee height
Tree stump or log
Literally anything that’s roughly 18 inches high and reasonably stable will work just fine.
The rear foot will, at times, need to apply pressure into surface it’s resting on to help maintain balance throughout the work set.
I post A LOT about bodyweight fitness, mostly because it’s been incredibly eye opening to see how far a person can go using nothing but body against the earth’s gravitational pull.
The purpose of this article is to share information about how to go about using bodyweight ONLY squats to build strength and movement capacity.
Progressive bodyweight training is one of the most overlooked methods in fitness.
Exercises like squats, lunges and step-up variations are all INCREDIBLE for improving leg strength.
This article is focused on strengthening the legs using bodyweight ONLY squats.
The problem with a large majority of the information being shared about bodyweight fitness, is that the exercise variations do not contribute to gaining strength.
It’s hard to know if the authors don’t own advanced bodyweight exercises (therefore avoid sharing tips) or if they simply don’t know the progressions.
Either way.
Here’s a classic example of a difficult bodyweight squat challenge that is MEDIOCRE (at best) for improving leg strength…
300 reps bodyweight air squats
Performing 300 continuous bodyweight air squats (a basic 2 legged bodyweight squat) is definitely challenging, but it does little to improve strength.
100 reps in, you’ll wonder why you’re doing it.
By definition, “strength” is the extent to which muscles can exert force by contracting against resistance.
The more you resistance your muscles can contract and overcome, the stronger you are.
To gain strength and expand movement capacity, it’s important to consider leverage progressive strategies:
Increase the load being applied to an exercise.
Decrease the base of support (bilateral to unilateral).
Increase the range of motion of an exercise.
Drill mobility: train active range of motion, articulate joints, expand control over end range, etc.
Increase the complexity of an exercise (example below: pistol squat to dragon squat)
Fixation on Strength
It’s nauseating for me to read hyper-focused blogs or websites dedicated to sharing content on building strength, with zero mention of anything else.
A lot of these articles are written by gym rats who can lift big weight, but often neglect other important qualities such as active mobility and endurance.
It’s less than appealing to deadlift 700lbs, yet blow out your back while putting on your socks.
That being said, the average person needs to know how to go about improving strength.
Gain in strength make a huge difference with movement capacity, carrying over into real world tasks, boosting aesthetics (assuming diet is decent) and contribute to overall health.
Strength is a good thing to pursue.
Bodyweight Only Exercise Progressions
Paying attention to exercise progression while training is similar to following a road map to a destination.
An exercise progression increases the demand of any give exercise, somehow, someway.
Refer to the list in the opening paragraphs that describes ways to increase the demand of an exercise.
By progressively challenging an exercise with incremental load, body positions and range of motion, we can make quality progress while staying safe.
Move from bilateral to unilateral exercises
Without question, single leg exercises are super important when it comes to strengthening the legs using only the body as weight.
If you’re subscribed to a exercise professional, program, book, blog or website that’s center around bodyweight training, and they aren’t talking about the value of unilateral exercises, run away.
By transitioning from two legs to a one leg, you are decreasing the base of support, which increases the stability, balance, and coordination demands of the exercise.
The game changes when you start moving on one leg.
The ability perform well on a single leg is crucial for life and athletics.
Assisted Single Leg Squats
When you do make the transition from bilateral to unilateral exercises, do not be surprised if you need assistance to complete the exercise.
There’s zero shame here. Embrace it.
Assistance can be provided in many forms, but a simple approach is to place your hands on a steady object to help guide yourself up and down.
Limiting the range of motion makes a big difference when you’re attempting to learn these exercises.
The skater squat video above is a great example of what progressive range of motion looks like.
The yoga blocks are roughly 3 inches thick, so every time I remove a yoga block the range of motion increases by 3 inches.
You can feel this change in depth immediately.
I’m always amazed by what a few inches can do when it comes to a successful repetition versus a failed repetition.
“Ok, unilateral squats are great for building strength. Which exercise is best?“
It doesn’t work like that, ALL of the single leg squat variations are good.
Don’t make the mistake of ranking exercises.
Select a variation that is appropriate to your current fitness level, and work at it.
Practice them all for best results.
Developing efficiency, strength and control over a bunch of different movements is a good thing.
Expanding movement capacity.
Here’s a list of single leg squat exercises organized in descending order of difficulty:
Rear Foot Elevated Split Squats
👇
Skater Squats with limited ROM Squats with limited ROM
👇
Full ROM Skater Squat
👇
Pistol Squat with limited ROM
👇
Full ROM Pistol Squat
👇
Shrimp Squat with limited ROM
👇
Full ROM Shrimp Squat
👇
Assisted Dragon Squats (partial ROM, less load)
👇
Full ROM Dragon Squat
This is not the LAW, simply a suggestion of how to attack single leg squats.
I tweaked the order by including limited range of motion and full range of motion options, leading up to the mother of all single leg squats, the Dragon Squat.
Dragon squats require an insane amount of hip mobility and control over a really foreign pattern and body position.
As you descend, the non-working leg moves behind and out the front of the workin leg. There is timing involved in making this happen. This is not a simple maneuver.
Shrimp Squats are HEAVILY quad dominant, requiring plenty of ankle and hip mobility.
The final few inches right before, during and after touching the knee cap to the floor is intense.
Don’t be surprised if you can’t stand up after lowering down.
Where do we go from here?
Add weight.
Look, I know this is a bodyweight focused article, but the legs need progressive loading.
You need to add additional weight to these exercises to continue making progress.
The good news is you don’t have to have own an entire set of dumbbells, kettlebells or the nicest kevlar sandbag to add a loading challenge to any of these exercises.
You can add weight with common household items, children, pets, etc.
Weight is weight.
Your body does not know, nor does it care, if you’re progressively loading using a fancy piece of gym equipment, or a gallon of milk. Use whatever you have available.
Adding weight to an exercise/movement is simple and effective.
I’ve played around with ultra slow eccentrics for each of these movements.
Eccentric training has its place, but in my opinion adding weight to the exercises listed is the most effective path to building strength.
Rear foot elevated split squats are PRIMED for adding weight. You get the stability of the back leg on a bench, box or chair, while loading the front leg aggressively and safely. The rear foot elevated split squat is back friendly.
It’s an incredible exercise.
Reps, Sets and Tempo
3-5 sets of 5 challenging reps provides a great training stimulus.
Certainly, you have the option to lower the reps further and perform either singles or 2-3 reps with more weight.
Bang out one grinding rep, rest for a while, then attack another rep.
These exercises can also be adjusted for an endurance-like training effect. 12-15 reps or so. In this scenario, the load must decrease (compared to strength-focused training) and you might be using assisted pistol squats or bodyweight ONLY loaded pistol squats.
For a strength focused, lower to 3 reps and train strength.
If you’re training for strength, each rep should be a grind.
In order to make the reps difficult, consider slowing down the tempo of the movement or adding load.
My preference is to add load.
A weight vest, kettlebell, weight plate or sandbag. Anything that adds weight to the exercise and can be handled without risk of dropping on your toes is perfect.
The final few reps should be CHALLENGING.
I like to walk the line between technically great form and using the most load possible. When technique takes a sh*t and I start making odd shapes to complete a rep, I pull the plug on the work set.
Finishing a set of pistol squats, you should feel like doing another 1-2 reps was probably not going to happen, regardless if you’re training higher rep endurance or lower rep strength.
Some might disagree with this oversimplification, but I believe a GREAT training stimulus is achieved when you’re busting your ass in the work set (versus going through the motions).
The thing is, this approach to a work set applies to all methods of improving fitness. Strength, endurance, mobility, etc.
When you’re working, WORK!
The effort should be hard.
Tempo-wise, I really like the 30X0 approach.
3 seconds of eccentric
0 pause at end range
X explode up
0 pause at the top before starting the next rep
Anywhere Workouts
I love writing about bodyweight fitness because bodyweight training is incredibly resourceful.
If you understand how to make an exercise more difficult/challenging using nothing more than gravity, body positions, tempo, varying rep ranges and the weight of your body, you’re literally never without the opportunity for a workout.
Eliminating the need for a gym membership crushes a few of the common excuses people use for not exercising.
Money, equipment and time.
If I remove those barriers, what reasons are left?
Again, I am not asserting myself as a bodyweight fitness guru, I simply want to share how simple getting strong can be, if you’re willing to stay consistent and explore.
If you’d like to learn more about effective bodyweight training, I highly suggest checking the bodyweight based training program from Global Bodyweight Training.
Benefits of skater squatsBeginner skater squat variations
Skater squat progression ideas
How to organize skater squats in workouts
Skater squats are a less frequently explored single leg squat variation, yet very challenging and worth anyone’s time.
Pavel Psatsouline ruined it when he popularized Pistol Squats back in the mid-2000s.
I’m here to re-popularize Skater Squats.
Unilateral squat training is a resourceful way to increase the demands of traditional bilateral squats, build strong legs, improve balance, stability and coordination.
Single leg squats are no joke.
Skater squats fall under the single leg squat category, and to the extent that you don’t add external loading, also can be categorized as a bodyweight based exercise.
Skater Squat Technique
Skater Squat coaching cues are:
1) Lowering into the squat with control, raise arms as you descend
2) Keep the chest up, spine straight and avoid hunching
3) Allow the working leg knee to track over the toes
4) Lightly “kiss” the airborne kneecap to the floor
5) Stand up
Counterbalance. Raising the arms with weight during skater squat creates a counterbalance to help distribute wait, remain stable and balanced.
Be mindful to avoid excessive hunching or rounding of your back.
The upper body will lean forward slightly for balance.
Most Common Technical Difficulty
By far, the most common technique mistake with skater squats is overly rounding (hunching) the back.
The fix is simple.
Decrease the demands of the exercise and try again. If you’re struggling to maintain ideal shape during a movement, the movement is too aggressive (somewhere) for you.
Options to decrease the demands:
Increase the height of the surface behind you to decrease the range of motion of the knee touch.
Use a door, couch, suspension trainer or resistance bands to help stabilize, keep balance and reduce the load.
Or, both.
When the demands of an exercise exceed a person’s current ability to meet those demands, exercise technique suffers.
Practicing a regression of an exercise is helpful, but including dedicated mobility training in addition to the attacking the exercise can speed up the process significantly.
I’m said it before, but mobility training is a game changer.
Learn more about effective joint mobility training here if you want.
Benefits of Skater Squats
Skater squats are a unilateral lower body exercise.
Unilateral exercises, or in this instance single leg squats, have many benefits, including (but not limited to):
Effective strength builder for the legs
Improving balance
Avoiding overuse of a dominant side
Injury mitigation
Improving movement capacity
Cross-education training effect
Resourceful strategy to add load and demand to the squat pattern
Cross Education Effect
The cross-education benefits of unilateral training are fascinating.
Simplified, the cross education effect is when you train one side of the body, but the other side is also stimulated.
A person with a lower leg injury might still be able to practice skater squats (and other unilateral strength exercises) with the healthy leg, indirectly receiving strength benefits via cross-education.
Assisted Skater Squat Variations for Beginners
Beginners to unilateral training need to consider the increased balance, stability and load demands of such exercises.
To help ease into single leg squats, it can be helpful to hold onto something.
A chair, door or a suspension trainer can be used to assist with each repetition, allowing the body a chance to familiarize and adapt to the demands.
Here are few ideas on how beginners can dive into skater squats using assistance.
Couch assisted:
Door assisted:
Baseline Skater Squat
This a run of the mill, baseline skater squat.
I’m using 5lb weight plates as counterbalance, lowering my trailing knee to the floor, kissing the knee cap, standing back up.
Again, the weight plates keep me steady from front to back while I perform the movement.
Advanced Skater Squats
Progressing the skater squat into the “advanced” realm can be achieved by adding more weight or increasing the range of motion.
There’s no secret sauce here, either add weight or lower down further (increase range of motion).
I recommend exploring both options to see how you do.
If you don’t have access to a weight vest, heavier dumbbells or kettlebells, play around with skater squats from a deficit like you see in this video.
The only real change here is the range of motion. I’m standing on a 45lb bumper plate, which elevates my position 4-5 inches above the floor, yet, makes a HUGE difference with difficulty.
Adding a few inches of motion to an exercise can change A LOT.
Worst case, if you’re struggling to stand back up from an elevated position, use a SLOW eccentric ONLY skater squat variation.
For a painful 8-10 second count, resist gravity down to the floor.
Place a focus on the last 4-5 inches of the exercise and really fight off gravity’s pull.
If you do have access to heavier weights or a weight vest, check out these loaded variations.
Minutiae: Other Names for Skater Squats
“Skater squats” have been referred to as airborne lunges or shrimp squats.
Shrimp squats, in my opinion, are quite different compared to skater squats, but I’ve seen the terminology used interchangeably.
Shrimp Squats:
I’m sharing this with you to avoid confusion.
At the end of the day, single leg squats are single leg squats.
It’s just a matter of body position, where the arms/legs are positioned and the path of motion.
Both Skater Squats and Shrimp Squats will put your ankle mobility to the test. You’ll find out pretty quickly if the ankle is the weak link.
Decreasing or increasing the demands of an exercise doesn’t always be related to subtracting or adding load, but it’s a really simple adjustment to make, and also nice for quantifying progress.
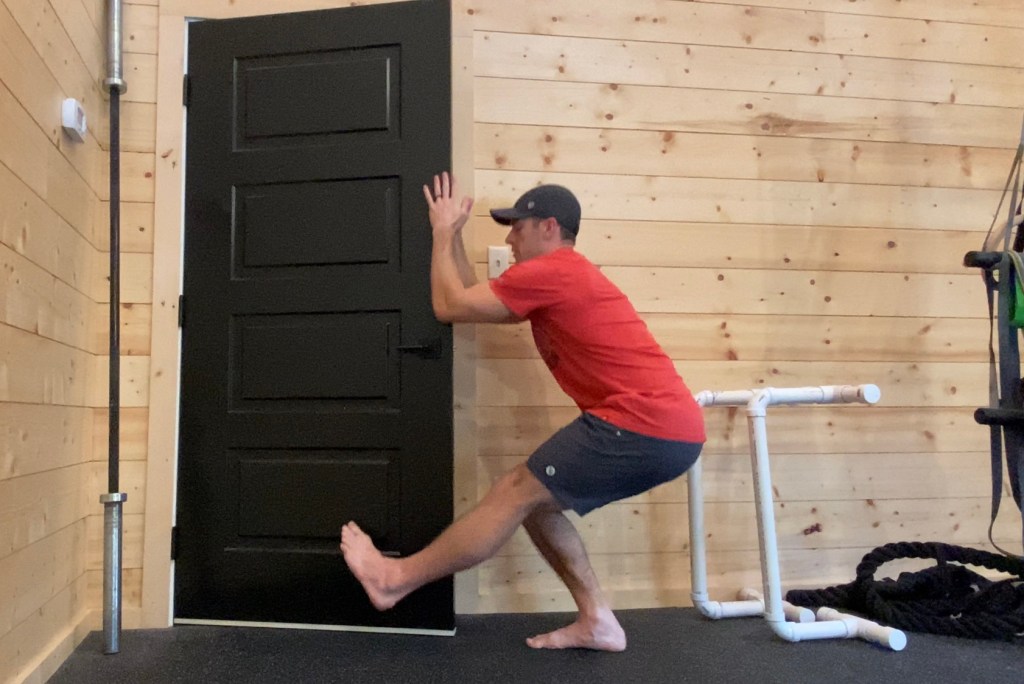
Here’s a series of single leg pistol squat variations, covering beginner, intermediate all the way to advanced.
I hope you find these instructions to be simple, yet effective. Single leg squats are an incredible exercise to practice on a regular basis. Single leg squats can be trained 2-3 days per week, leading to impressive gains over time.
Beginner| Fully Assisted On the Way Down and Up
Grab the door itself, or ideally the door handle, using both hands. Use upper body to help guide you into the bottom of the squat and back up to the top. This beginner variation allows for decreasing weight moved, more stability and balance.
3-5 sets of 5-6 reps
Intermediate| Slow Lowering with Limited Assistance, Full Assistance on the Way Up
Use minimal upper body assistance on the eccentric (lowering phase), really slowing down the descent as much as possible. Once you’re at the bottom, the upper body can assist with standing back up.
Eccentric focused exercises can increase muscle soreness significantly in the days that follow, just a heads up.
3-5 sets of 5-6 reps
Intermediate| Lower down with NO Assistance, MINIMAL Help on the Way Up
Time to let go of the door and lower to the bottom of the squat without assistance. You feel shaky, wobbly and maybe even weak. This is normal. You’re building strength, control and coordination with this pattern!
Slow down the descent as much as you can.
3-5 sets of 5-6 reps
Once at the bottom, use minimal assistance to stand up. Challenge yourself here, you dictate the intensity of the exercise, make a choice to ramp up the intensity. Go for it.
Intermediate/Advanced| Pancake Hands on the Door for Balance Only
Slide the hands along each side of the door, stabilizing the motion. The hands are there to prevent you from falling to one side or the other, NOT to reduce the load.
If having two hands on the door feels unnatural, and it may, try using one hand, thumb on one side and the other fingers on the opposite side. Use a feather light touch on the way down and up.
3-5 sets of 5-6 reps
Advanced| Freestanding, Unsupported Single Leg Pistol Squat
Congratulations, you made it. A freestanding, unsupported, zero help single leg pistol squat.
People like to joke about pistol squats being a circus trick, but there a demonstration of single leg strength, stability, mobility and athleticism.
Once you own a single leg squat, you’d be surprised how often use it stand up from the floor. It’s quick and efficient.
Lastly, single leg training is back-friendly.
This is not a recommendation to ignore researching corrective strategies to address the back pain and train around it forever.
In a world where every other person has suffered some sort of back tweak or injury, single leg training is extremely forgiving and often a great option for people.
Some folks may need to limit the range of motion to acclimate to this freestanding single leg squat, and that is ok. Grab a chair and lower down until your butt contacts the seat. Touch and stand back up.
Increasing the load beyond bodyweight is the next logical progression.
I’ve added weight by using kettlebells, dumbbells, barbell, sandbag, weight vest, and so on.
Whatever you choose as weight really doesn’t matter. Weight is weight. Gravity doesn’t discriminate. What’s important is that it’s comfortable to hold onto.
Adding weight to exercises is trial and error at times. You want to add enough to challenge each rep in the set, but not too much that you’re unable to control the movement or find yourself compensating/cheating to complete the reps.
Bodyweight training is making a serious comeback in my own training habits.
It’s easy to forget about how effective bodyweight exercise is.
I’m guilty of it for sure. But I’ve recently returned to what I consider the foundation of all exercise, basic bodyweight training. “Basic” doesn’t mean easy. Single leg squats, single arm push ups, hybrid pulling movements, handstands and crawling variations are some of the most challenging movements in the exercise rolodex. Especially when you hold yourself to strict technique.
Workout equipment is always going to be evolving and innovating, but the idea that you can get a highly effective workout anywhere and anytime is incredibly valuable.
The rules of bodyweight training don’t differ much from more traditional forms of resistance based training. There are advantages/disadvantages and sacrifices to every form of exercise when you think about it, and bodyweight strength and conditioning is no different.
Nearly all of the major movement patterns are present: pulling, pushing, squatting, lunging along with various forms of cardiovascular conditioning such as running, hybrid movements like burpees, mountain climbers, and crawling.
I used the word “nearly” in the previous sentence because there is still no viable way to load the hip hinging pattern using just bodyweight. Deadlifts are still a no go, especially if you are staying minimalist with your definition of bodyweight training.
However, since the rise of glute thrusts and other glute activation drills, strengthening the backside without equipment seems feasible. Progression is the key here, especially since many strong individuals will find that the double leg versions of bodyweight hip bridging and bodyweight hip thrusts just don’t load the backside enough.
Progressing to a single leg version of the hip thrust is the ticket here. Go for increased reps, slow the tempo of movement down or hold the top (lockout) position for time.
Let’s not forget about the vast amount of abdominal focused training that bodyweight exercise has to offer. Plank variations, hollow body rocks, crawling, slow mountain climbers and hanging leg raises are all incredibly challenging exercise when performed with strict technique and adequate time under tension.
Progressing the intensity -and therefore the training effect of bodyweight exercises- can also provide a unique challenge.
Knowing when to increase reps, increase time under tension, increase the intensity and skill challenge of a movement pattern all come into play here.
Single arm push ups are a great example here. The transition from a traditional push up to a single arm push up is drastic when it comes to the increasing demands in stability and loading. There is also a grooving issue early on, where the body simply hasn’t been exposed to what’s required physically to complete a quality rep/set of single arm push ups.
In these situations, I will either break up the movement or add assistance in the form of a resistance band.
Breaking up the exercise into its segments typically involves working the eccentric portion of the exercise first.
So, for the single arm push up, I will focus on the lowering portion (eccentric) exclusively for a few weeks, or until I have developed the control, strength and stability to progress to adding the concentric (ascending back to the top) portion of the exercise. Eccentric training isn’t sexy and even 3-5 seconds of lowering can feel like an eternity, but it’s a gateway method to arrive at the next logical progression of an exercise.
If you have access to a resistance band, you can loop it around your chest and receive assistance during key moments of the lift. For a single arm push up, it can be challenging to push out of the bottom of the exercise, and this is where the band assistance technique works wonders. Since the band will be stretched to the maximum at the bottom of the push up, you’ll receive the most assistance where it’s needed most.
Band assistance is fantastic for working up to chin ups, pulls ups and single leg squats.
If you’re looking for a simple yet effective bodyweight training session, try this one…
Set #1:
10 push ups
10 squats
10 hollow rocks
—> Repeat for 5 rounds, or work continuously for 10 minutes w/o rest.
Set #2:
10 chin ups
10 lunges (right/left)
10 yards and back crawling
Conditioning:
10 burpees every minute on the minute for 10 rounds.
Adjust the progression of each exercise to fit your strength and skill level. Everything can be adapted to your needs.
Leave the workout feeling invigorated and empowered knowing that you can handle your bodyweight…