

I took a break from jumping rope for about 2 months.
After destroying my 4th jump rope and nearly slicing my cat in half on the very next rotation of the broken rope, I decided that the durability of 90% of jump ropes on the market are piss-poor.
[On a side note, I recently came to learn the origins of “piss-poor”… kind of interesting actually]
I gave up on jumping rope for a while.
Replacing ropes was getting expensive and frustrating.
Considering that most jump ropes are nothing more than plastic handles with plastic rope or leather rope, spending $20 on a tool that has a lifespan of 2 months seems ridiculously. At least it does to me. I want my equipment to last. I want to be able to abuse it (not recklessly) without holding my breath, waiting for it to break. My first jump rope (from a reputable company) severed at the handle/rope junction and smashed the screen on my 47″ Vizio television. No damage resulted, but it was extremely frustrating.
That’s why I love kettlebells. They are indestructible and effective. Pay once, use them forever. That is a good investment if you ask me.
But, the benefits of jumping rope are tremendous and undeniable, and I could not push forward with my workouts without having the jump rope around. It’s just too valuable of a tool to not leverage. Both as a warm up tool, a circuit filler drill or a complete conditioning tactic in and of itself, jump ropes serve a number of purposes and truly work wonderfully.
So after searching the forums high and low, along with discussing jump rope products with colleagues, I made the decision to go with the Rogue SR-1 speed rope. $20+shipping might seem like a lot, but honestly, it’s a steal if you’re actually going to use the rope. If you aren’t going to use the fitness equipment you buy, everything is a rip off, right? Use it and you can justify it.
Choose to eat out one less time per month and the rope becomes affordable! 🙂
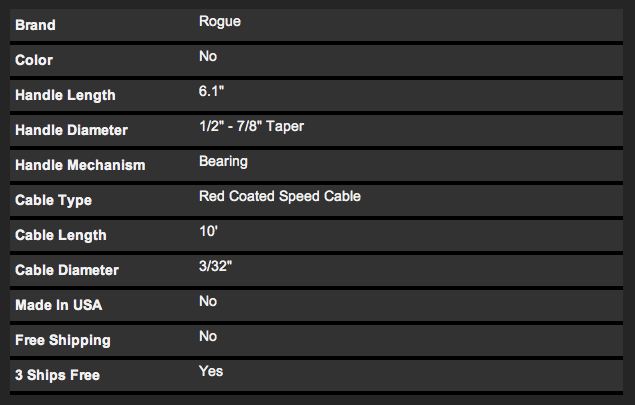
Instead of pretending like I wrote an original gear spec on the SR-1 rope, let me share a snapshot taken directly from the Rogue website:

Although the description touts the rope as the best for “solving your double-unders”, I should tell you that it’s not necessary to be able to execute double-unders in order to get a great workout with a jump rope. I view at double-unders as the “hill sprinting” of the jump rope world. Sprinting an incline will definitely create a large training effect (strip fat, building athletic-like conditioning, etc), but you can also arrive to your destination without sprinting that hill, or in this case, using double-unders.
Single revolution jumping can be tweaked to create a serious training effect also.
Are double-unders great? Yes, absolutely they are, but you can use other variations of jumping rope to accomplish goals also, or at least until you are able to work into double-unders. I’ve had my heart rate at the upper ranges using aggressive single revolution jump workouts.
I commonly use my jump rope for 5-10 minute of continuous jumping warm-ups or interval style work. Set the clock in plain sight, adjust your Spotify playlist to something up tempo and go.
If you’re thinking of warming up using a jump rope, work in a bunch of variations of jumps (two foot square, single leg, running, side to side, forward and back, rotational, etc) within that time frame. It will keep you engaged, work different body/foot positions and make the time move much faster. The more monotonous you make jumping rope (or training in general), the more likely you won’t jump at all.
Keep it fresh.
For intervals, I would suggest starting by executing one style of jump, twirling the rope as fast as you can while maintaining solid body posture and rope technique.
Usually, the two-foot square stance jump is a great place to start. As you become skilled at the basic two-foot square stance jump, progress to a stationary running action as you twirl. Stay soft on your foot ground contacts and bring the knees up to a reasonable height (without hunching), which is probably a few inches below belt level.
30sec work: 30sec rest for 10 rounds (or slow jumping active recovery) is a great place to begin scaling to your conditioning level. If you are crushing a 30/30 for 10 rounds no problem, add time to the work and decrease the rest or add additional rounds. Play around with the logical progression that suits your situation. I prefer to keep the 1 minute block for work:rest. It’s much easier to calculate if you don’t have a dedicated interval timer like a Gymboss .
I’ve found that single foot jumping is very challenging, but I have to admit that I don’t like it for conditioning specific workouts. Technique gets sloppy as the loading is overwhelming for your foot/ankle/leg to handle. Think about it, it’s the entire weight of your body coming down on each impact, and the impact is completely vertical in direction.
Single leg plyometrics are considered advanced methods for training elite athletes, so imagine the effect they have on the average desk worker. Before of the increases ground contact time with single leg jumping, the rope tempo also slows down.
I’ll work single leg jumps in often while jumping rope, I am just not sold for using single leg jumping exclusively for interval training. It’s too much for a lot of people and it seems to work against the idea of interval training.
If I do work single leg hopping in for an interval session, it is usually a 3right + 3left alternating variation to avoid exhausting either side, keeping the tempo as high as possible.
But, as always, I recommend that you test it for yourself because your situation is unique to mine.
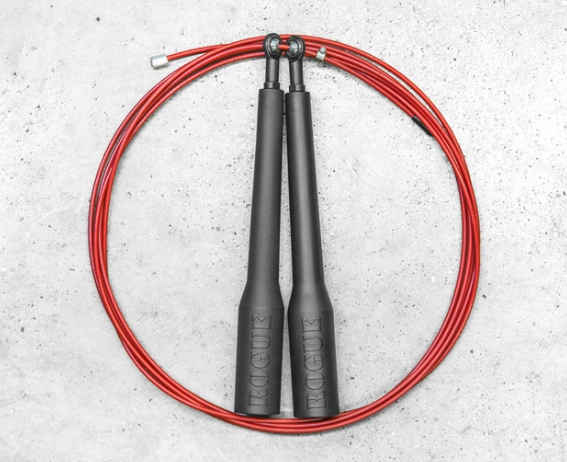
Peaking back at the construction of the SR-1 jump rope, notice the length of the handles, the ball bearings and the construction of the rope itself (cable coated in plastic).

All of these features make this rope silky smooth when jumping, which in reality, is the key to great jump rope experience. If you have to fight a jump rope that grinds on every revolution, you’re going to drive yourself nuts. I’ve been there a bunch so I can attest to this situation.
Here is a more complete view of the rope:
Lastly, you can adjust the SR-1. Don’t buy a rope that you cannot adjust. A jump rope needs to be fit to your height in order to work properly. Most come in a 9ft length, and you can trim down from there. Here is a video on how to adjust the rope from the Rogue guys:
If you’re a small space workout warrior (like I am), jumping rope is the perfect conditioning alternative to running and cycling during the Winter months. Cycling is out of the question (unless you ride a $2500 fat bike) and running becomes a challenge here in Wisconsin from late November through March/April (or late May as we received 10inches of snow last year). Yuck.

Yup, that should about do it if you want to jump rope inside.
Jumping rope on carpet is a nightmare, so I would avoid it from the beginning if I were you. You’ll have a much better experience on hard floor with the rope skipping underneath your body without any interference.
Jumping rope is a an acquired taste. I composed a post a while back that discussed what I personally believe are the pitfalls of jumping rope. I would call these words of caution, not a protest against jumping rope. Even though the jumps in between the rope rotations is basically a low intensity plyometric, it is still ballistic and requires high volumes in order to receive any kind of training effect. These were just words of caution.
If you haven’t conditioned your legs, specifically your calves and ankles to jumping rope, start slow. You’ll know instantly if you overdid it, as you won’t be able to touch your calves without wincing in the days that follow.
Know thyself you’ll be just fine.
If you’ve lost faith in the quality of jump ropes recently, re-read this post and restore that faith.
There are decent products out there, you just have to do some homework before you make the purchase.
Cheers to jumping rope!
KG


