
While combing over the internet, I noticed that there aren’t many updated resources that share how to properly use a suspension trainer.
Since I am a huge fan of suspension training, both for beginners and advanced trainees alike, I thought I would share the need-to-know information on how to successfully use a suspension trainer.
Here we go…
1) Buy one.

I know this sounds elementary, but you have got to actually buy a suspension trainer for rest of this post to have any positive effect. Stop hovering and purchase yourself a nice unit. I highly suggest buying from a couple of manufacturers… LifeLine Fitness and TRX are the major players. My suggestions for these units are based on personal experience and also a simple observation of what the best coaches in America are using with their athletes and clients. I am a LifeLine Jungle Gym fan (pictured above).
You can build your own suspension trainer if you like. They are really nothing more than tough nylon/kevlar straps with handles and loops. Not rocket science. However, if you choose to build your own suspension trainer, I will caution you that your fate rests in the quality of your craftsmanship and material you choose to use. Build at your own risk.
Below are links to the different brands that I mentioned, along with a link to a
2) Anchor the suspension trainer.
Suspension trainers are effective because you’re able to leverage your body mass against the directional pull of gravity, which creates the resistance during exercises, demands stability and mobility, etc. If your anchor point is sketchy, your suspension training is going to suffer. Trust me, you don’t want to be in the middle of a set of body rows wondering if the anchor point is going to collapse. The nice part about suspension trainers is that you can anchor to a closed door, or directly overhead, so you have options.
From personal experience, only anchor the suspension trainer on the door if you have no other options. Why? Because anchoring on the door limits your exercise selection, and can make a lot of the exercises, well, awkward. Anchoring to a door means that the suspension trainer will never cross the mid-point of its range of motion, so exercises will start with arc built into them. The door prevents any backswing, and any low hanging movements will have arc built into them no matter what. Due to the arc, exercises like push-up+knee tucks (aka: atomic push-ups) and suspended hamstring curls now become much more difficult. If you’re a beginner, your technique may suffer because of the increased difficulty of these movements.
Hanging the suspension trainer directly overhead gives you immediate freedom to not only progress all movements, but also regress movements to make exercises more effective. The overhead position also allows for an infinite number of body positions that will serve to increase or decrease the training stimulus for any given exercise. Take a simple (yet awesome) movement such as body rows. For a beginner, I would suggest starting in a lean back position where the heels are firmly planted into the ground surface, while the pulling action is angled to anchor point. Angling the pull will decrease the resistance of the exercise, increasing the likelihood of successful reps. For an advanced trainee, I would suggest moving your body directly underneath the anchor point so that the pulling action is completely vertical (up and down). In this position, the resistance is completely vertical. The loading is therefore increased the exercise is much more difficult.
*** It is also worth mentioning that increasing horizontal (in relation to the ground) body position (supine or prone) with exercises like push ups and body rows increases the challenge of keeping the body rigid and straight from head to toe. In other words, there is an increased demand on the torso musculature to maintain this static posture while work is being done elsewhere.
The suspension trainer, based on the body row example, is highly adjustable to fit any strength level. The stimulus presented to the beginner is just as intense (based on their fitness level) as the stimulus received to the advanced trainee (based on their fitness levels).
3) Angles
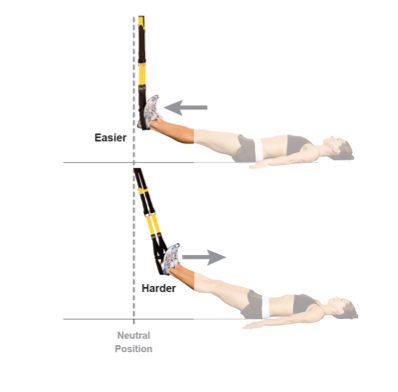
Suspension training is all about body position in relation to the anchor point of the straps.

Figuring out the angles to increase or decrease the difficulty of movement is part of the beauty of suspension training. Using the body row example, the more your move your feet underneath the anchor point, the harder the exercise becomes. Push-up + knee tucks become more difficult based on your starting position. When your feet start directly underneath the anchor point, the effort to complete the knee tuck decrease. If you walk your hands out and start with feet ahead of the anchor point, the knee tuck becomes increasingly resisted based on the natural arc of motion. Move your feet behind the anchor point, and arc becomes an assistance aid for the knee tuck.
The feedback from the suspension trainer is immediate. If you know your target reps for a given exercise, it becomes trial-and-error to locate the proper body position that allows for completing those reps without sacrificing technique and challenging your body through the entire range of motion.
4) Integrated movement.
One beef that I have heard from others regarding the use of suspension trainers, is the lack of real world carry over. The argument is that a suspension trainer workout regimen lacks a loaded vertical posture (thinking standing) during most exercises. This is true. However, we often forget that not every exercise needs to look like something that we are doing in real life.

Example: I often reach for and return water glasses to the highest cabinet of my kitchen, but do I need to lift dumbbells on my tippy toes to train for that? No. I push a lawnmower around my yard in the Summer. Do I need to push a heavy sled to train for that? No. This is a personal beef that I have with people who attempt to make exercise look like real world activities.
The suspension trainer is a tool, and as a tool you need to understand that it is not going to be the be all end all of fitness.
Using a suspension trainer will accelerate and enhance your ability to successfully perform other physical tasks in life, no doubt about that.
The suspension trainer provides a low-cost, high reward training stimulus to its users that incorporates movements that are safe and effective. The workouts are meant to enhance the physical function of our bodies, and as a byproduct you’ll improve your body composition. Building strength, stability and mobility with a multi-dimensional approach will yield high carry over into daily life.
Besides, if you enjoy suspension training and you’re making progress, why worry about anything else? The grass is not always greener on the other side, keep it simple and stick to your recipe. Trust your training.
5) Buy a book or reference a website for exercises/workouts.
There are thousands of free resources on the internet that share knowledge about suspension training. I am an exercise technique junkie, so I am going to recommend that you keep checking my YouTube page of updated videos of suspension training exercises, but the choice is yours.
As I always do on this blog, I will remind you to keep your efforts on the suspension trainer simple. Avoid going fancy with your movement. Lock in technique for basic movements and then progress (using common sense) from there. To this day, I still use the simplest of movements which include (but are not limited to):
- Push ups
- Body Rows
- Planks (and variations)
- Shoulder activation exercises
- Chin Ups
- Knee tucks
- Explosive jump variations
- Squat variations
- etc.
If you are finding that you have progressed beyond the basics, add a weight vest and work through the same exercise variations once again. It’s that simple. Keep progressing in an intelligent manner.
It’s just a matter of challenging yourself each time you use your suspension trainer.
Cheers to suspending yourself!
KG


